Hooked on Needles


Sunday, July 25, 2010

Frolic fabric for baby quilt

On our recent vacation to New Hampshire, I spent some time at Keepsake Quilting oogling and drooling over all the thousands of bolts of gorgeous fabrics. It seemed every bolt that I pulled out to get a closer look at had fabric designed by Sandy Gervais on it! I guess my Sandy Gervais radar was working at top speed! There is just something about her colors and her designs that I am very attracted to.

I had given some thought to purchasing fabric for a baby quilt I want to make for a friend, but I really didn't know what I wanted...until I spotted (no pun intended, really!) these fabrics...


Frolic fabric for baby quilt
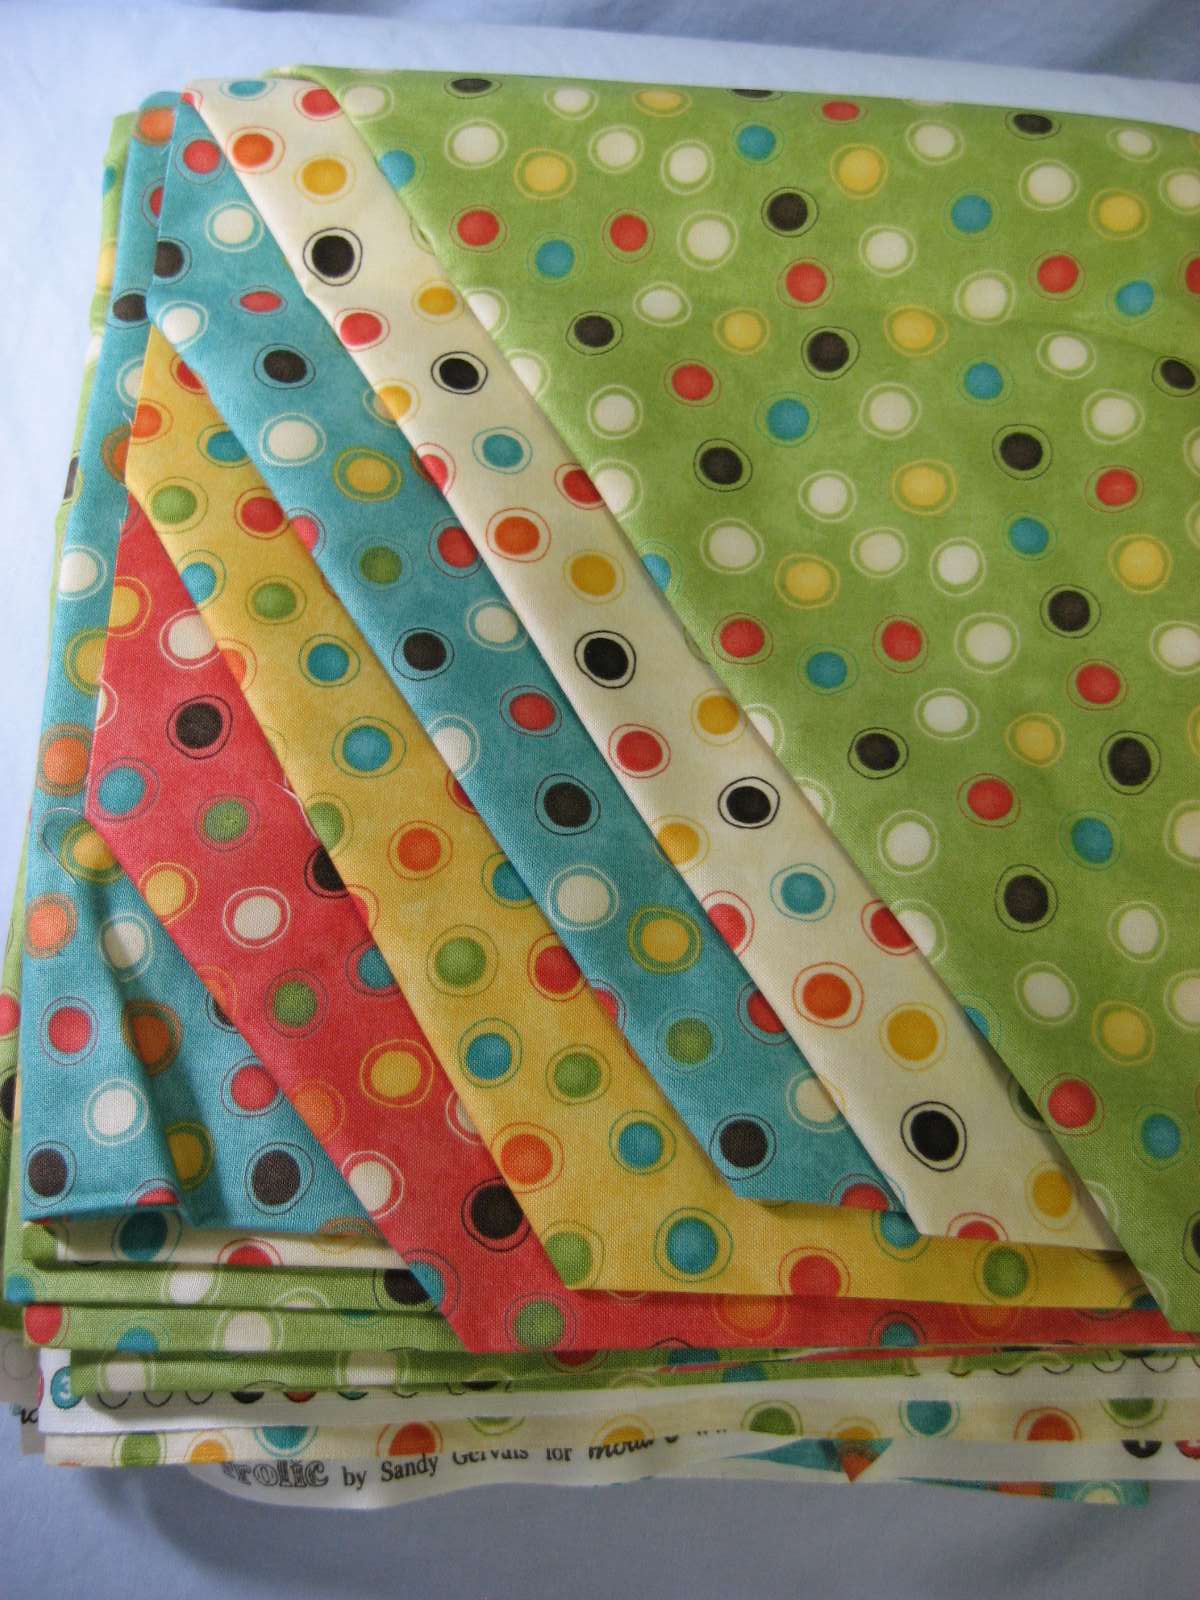
Aren't they FUN? I love the dots with the circles around them. And I think the colors are just the thing for a baby quilt. I love Sandy's Frolic line, but decided to stick with all the same design in the different colorways for this project.

Don't you love how they cut and fold fabrics at Keepsake Quilting? These were all laid out on their cutting-mat-covered cutting table so that the appropriate cutting lines for each fabric were on top of each other, then one swish with the rotary cutter and all the fabrics were cut at once! Then they fold them up together and tuck under the exposed corner to show off each fabric. I love it!


Frolic fabric for baby quilt
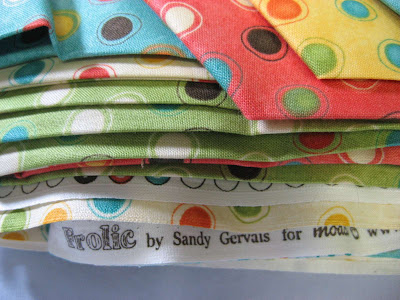
Even Sandy's selvages are fun! I'll have lots from this project!

Today I cut the binding for this I Spy Quilt using this method which still never ceases to amaze me. I even measured my fabric before sewing the triangles together because I was convinced that little square of fabric could never produce enough 2 1/2 inch binding to go around this quilt. The numbers seemed to say it would work, but even after using this method so many times, I was still skeptical. I cut it anyway, and sure enough, ended up with way more yummy striped bias binding than I will need for this quilt! Amazing! If you haven't tried this method of making bias binding, you really need to. It's awesome!

This week I'll be spending all day every day at cub scout camp with my seven year old son. This is his first time at scout camp, and mine too! We are both very excited about it. I think we'll come home exhausted and stinky, with lots of great adventures to talk about! Wish me luck though...I just might be getting too old for this sort of thing!

Happy Stitching!

Click here to return to HookedOnNeedles.com

Labels: , , , , ,

Saturday, July 24, 2010

Jeanne Worsted Weight Yarn for Patternworks Chemo Caps

Last night we returned from our wonderful week at the lake and it is so good to be home! I had the opportunity, not just once but twice, to visit my favorite shopping spots while on vacation and if you've read Hooked On Needles for a while, you know where I mean...Keepsake Quilting and Patternworks in Center Harbor, New Hampshire. If you've never checked them out, click over to their sites and get on their mailing lists. Their catalogs are wonderful to look at and so full of great ideas and supplies for quilting and yarn work. Visiting these shops in person is even better though. The sheer volume of fabric bolts and yarn skeins is unbelievable, and the people who work in the shops are so knowledgeable and always friendly and helpful.

I'm still in the process of getting things back in order here at home, so today I just wanted to quickly show you one of my purchases, this one being from Patternworks. I had decided not to purchase any yarn on this trip because I still have projects waiting to be made from last year's visit and I'm very much into fabric projects right now. Wouldn't you know half way through the week, I received an email from Patternworks announcing their project for collecting 1000 chemo caps for three very worthy cancer treatment centers. You can find all the information on the home page of Patternworks. How could I resist?


Plymouth Jeanne yarnSo here's my little purchase...three skeins of Jeanne worsted weight yarn, each one enough to make one chemo cap for someone suffering the side effects of their lifesaving cancer treatment. This yarn is so soft and warm, and just feels good to touch. I do a lot of sitting and waiting, as most moms of young children do for lessons, picking up from school, going to the dentist or doctor's office, you all know what I mean. I like to have a little take-along project to grab and go, and this seems to fit the bill perfectly.

I'm looking forward to starting one of the caps and testing this yarn. I'll be sure to let you know how I like working with it.

Coming up, I'll be showing you my other purchases from this trip as well as the project I worked on while at the lake, and the project my daughter worked on along with her purchases. We both had a very productive, and relaxing, vacation week!

Happy Stitching!

Click here to return to HookedOnNeedles.com

Labels: , ,

Thursday, July 22, 2010

Quilted Book Covers

The quilted sewing kit which was the prize in my recent giveaway was only one third of the items made from a quilting kit I had purchased from Connecting Threads some time ago. The other two items this kit made are these quilted book covers...


Quilted Book CoversThe front and back of each book cover is pieced and quilted with either a heart or a star, so I made each one different with the heart being the front of one and the back of the other, and the same for the star.


Quilted Book CoversThe inside lining fabric of this cover is one of my favorite fabrics in this line of Mama's Cottons. I like yellow and purple together, and white flowers too! I added a purple grosgrain ribbon bookmark to each of the covers.


Quilted Book CoversPiecing these fronts and backs was fun for me. I don't usually do very involved piecing so this was a good project for me to learn some of the tricks for piecing shapes that look more complicated than they really are.


Quilted Book CoversI fused the cutout shapes of the hearts and stars onto the purple background fabric and zig-zag stitched around them. After layering the outside of the covers with fusible fleece, I machine quilted in the ditch around each of the pieces, then used my presser foot as a guide to do another stitching in the green fabric around the while design.

This kit was a fun project using nice fabrics and interesting patterns and making three useful items. The quilted sewing kit is already at its new home, and at least one of these two book covers will be used in a similar fashion, perhaps very soon. I do love giveaways!

I was lucky enough to make a second visit today to Keepsake Quilting and Patternworks in Center Harbor, New Hampshire while on our vacation so I'll be showing you all my fun purchases as soon as I have a chance to take some good pictures. We've been enjoying the beautiful lake, swimming every day, picking wild blueberries, watching fabulous thunder storms come and go, playing cards, working on projects and just relaxing. I hope you're making the best of whatever kind of weather you've been having too!

Happy Stitching!

Click here to return to HookedOnNeedles.com

Labels: , ,

Wednesday, July 21, 2010

Showing off Upcycled Jeans projects

The Upcycling Jeans class at our local children's library was a huge success! I am not sure who had more fun, the girls in the class or me! At the end of the first class, they were all so excited to go home and finish what they started or work on something new. By the end of the last class, they were really on a roll. Here are a few pictures of some of their projects, taken just before they all left after the last class...


Showing off Upcycled Jeans projectsA few of the aprons the girls made for themselves. Denim from old jeans is so durable and versatile. One leg makes a great apron!


Showing off Upcycled Jeans projectsThis is the beginning of a tote bag with pins still in the bottom trim. But check out the yo-yo already attached for decoration! The girls LOVED their yo-yo makers!


Showing off Upcycled Jeans projectsHere are all the girls, headless of course because I promised their mothers not to show their faces, showing off their bags and purses.


Showing off Upcycled Jeans projectsA close-up of one little over-the-shoulder purse...


Showing off Upcycled Jeans projects...and another one still a work in progress...


Showing off Upcycled Jeans projects...and another one that I think will probably get a little more embellishment at home.


Showing off Upcycled Jeans projectsHere's a tote bag all decked out...


Showing off Upcycled Jeans projects...and another one even more dressed up!

These classes are so much fun to prepare for and teach, and so much fun for the girls who get into them. They are funded by the Friends of the Leominster Public Library and are free to the students. Now that this year's program is finished, it will be interesting to see what we come up with for next year.

Happy Stitching!

Click here to return to HookedOnNeedles.com

Labels: , , ,

Tuesday, July 20, 2010

I Spy quilt for a little boy

Before leaving on vacation, I was able to almost finish the I Spy quilt I had started with the denim strips. I talked about that fast and fun method HERE. So this is what it looks like now...


I Spy Quilt with denimI organized the blocks and sewed them all together...


I Spy Quilt with denim...then layered the top with the batting I had leftover from the apple retirement quilt I had made a few months ago and the fun Debbie Mumm backing fabric I purchased at Joann's...


I Spy Quilt with denim...then I started machine quilting with red thread using the edges of the I Spy blocks as my guide. I'll stitch 1/4 inch from each edge of each block going in both directions, vertical and horizontal, for the quilting. I thought the red would look good with the denim fabric.


I Spy Quilt with denimThis coordinating stripe was the perfect fabric for the binding I will make and apply when I have time after returning from vacation. I think it will make a very cheerful little boy quilt, don't you?

Happy Stitching!

Click here to return to HookedOnNeedles.com

Labels: , , , ,

Monday, July 19, 2010

How to make a frugal Tankini

If you are a frugal, use-it-up kind of person like I am, you don't like to get rid of something that works perfectly fine just so you can have the newest model. I have had a couple of bathing suits for several years and they still fit me just fine and are in good condition. There is no reason not to use them, except that they are the old fashioned type of one-piece bathing suit that has to be taken all the way down from the shoulders and pulled up all the way over the shoulders for all the necessary activities of a swimming day...if you know what I mean! Having had issues with my shoulder recently, this has become quite a problem for me when my suit is wet, so I was thinking how nice it would be to have one of those tankini bathing suits that looks like a one-piece but is actually a separate top and bottom. I just couldn't bring myself to pay the price when I still had two bathing suits that I liked, that fit and that were in good shape.

So here's what I did...


How to make a frugal TankiniI laid out one of my suits on my cutting mat...


How to make a frugal Tankini...and lifted up the outer skirt part which was loose all the way around the suit from just under the arm holes, and I put my straight edge across the bottom just above the leg openings...


How to make a frugal Tankini...then I cut across, separating the top part from the leg opening part...

How to make a frugal Tankini...and now I effectively have a tankini top that I can wear with the tankini bottom which I purchased for a fraction of the cost of a whole new suit. The cut edge of the inside part of the original bathing suit can be tucked into the tankini bottom and it looks like an old fashioned one-piece bathing suit, but now with the convenience of two pieces!

I did this to both of my bathing suits and love wearing them now! Just in time for our vacation at the lake!

Happy Stitching!

Click here to return to HookedOnNeedles.com

Labels: ,

Sunday, July 18, 2010

V-A-C-A-T-I-O-N in the summer time!

It's that time of year. Time to pack up the family and head north for a little much anticipated R & R. This is the week that we look forward to every summer. Besides all the vacation essentials, I always make sure I pack at least one project to work on during quiet times. Since I can't bring my sewing machine and associated stuff, I usually pack something like a crocheting or knitting project that is compact and doesn't require too much concentration. I'll show you the project I brought with me another time, but today I just wanted to show you the view I'm looking at this very minute as I type these words. Take a look...


Most beautiful vacation spot in the worldI know, I know. It's tough to take such beauty and calm for an entire week, but someone has to do it! We've only been here for a little over 24 hours and have already been in the lake for swimming three times, during one of which Elizabeth and I noodled all the way across to those rocks at the other side of the lake which is almost an hour round trip. I've picked about a quart of the most delicious wild blueberries from bushes that grow right at the water's edge. My husband has shown the children the finer points of fishing from the beach and also from the row boat. We've been out to lunch and out to dinner and ice cream, and visited the local Catholic church for Mass which is always a treat for us since this particular church is air conditioned! This is shaping up to be a fabulous family vacation!

But just so you don't think I've abandoned Hooked On Needles in favor of sitting by the lake, I do have a few projects to tell you about this week: a handy tip for updating your one-piece bathing suit, pictures from my class at the library on upcycling jeans, quilted book covers, progress on the I Spy quilt with denim background, and the project I brought with me on vacation. I may also share with you some pictures of our annual visit to Keepsake Quilting, Patternworks and Keepsake NeedleArts which is one of my favorite parts of this vacation!

I hope you are enjoying your summer or winter as the case may be. I'll be moderating comments and checking in with all my favorite sites as time permits. Any PDF patterns that are ordered through my Etsy shop will be emailed within 24 hours as stated in their descriptions, but any other items that are ordered will have to wait until next week to be shipped.

Happy Stitching!

Click here to return to HookedOnNeedles.com

Labels:

Thursday, July 15, 2010

Button, Button

Did you ever stop to think what a funny word Button is? The more I type it, the more I think I am misspelling it. But my trusty spell checker is OK with it, so I guess I should be too. Still, Button is a funny word.

Anyway, remember that trip to New York City that my daughter and I took back in May? Seems like forever ago, what with everything else that has happened since then. But my husband is back to work full time and feeling good, the kids are all into the swing of summer with swim lessons every day and preparing for our family vacation, I'll be wrapping up my Upcycling Jeans class at the library tonight and I have been working on some projects that have been calling to me for some time, one of which is using up my I Spy blocks.

So anyway, back to the NYC trip and our visit to M&J Trimming. I came across my bag of goodies the other day and realized that I never showed what I purchased from that fabulous store. So here are a few pictures of my little purchase...and I do mean little!


M&J Trimming ButtonsAren't these buttons amazing? I just couldn't resist picking out a few fun colors. They are huge - 1 3/4 inches across! The flower buttons are thick and chunky and so cute. They almost feel like wood, but they are plastic. And that animal cracker patch brought back memories of carrying around those little boxes with the string handle when I was a kid. I still don't know what I will do with it, but I just love it!


M&J Trimming ButtonsThat's a quarter sitting on the white button, just so you can have an idea how big these buttons are. I think they will end up on a tote bag or maybe in the middle of a really huge pin cushion! The possibilities are endless!

So out of all the thousands and thousands of incredible items M&J Trimming carries in their NYC store, all I could think to bring home with me were 11 buttons and one patch. It was just too overwhelming! Really! If you ever have a chance to stop in and see for yourself, I know you will understand!

Happy Stitching!

Click here to return to HookedOnNeedles.com

Labels: , ,

Monday, July 12, 2010

Rip 'n Strip -- my fun, fast method of quilting!

How do you begin a new project without spending lots of time looking at patterns and going shopping for fabric? I like to see what I have on hand that might be looking for attention. Then I spread it out and rearrange it a few times, then I ponder the different ways I can put it all together. Sometimes I even bounce ideas off of the occasional visitor and see what kind of feedback or advice I might get in return.

This past weekend, after finishing the sewing kit for my giveaway and the two quilted book covers which that same Connecting Threads kit made, I decided it was time to pull out the blocks I received in Karen's I Spy swap last fall.

My sister was visiting from Pennsylvania and she is quite an accomplished hand quilter herself, so I showed her my blocks and told her my plans for them. She suggested instead of a scrappy sashing between the already busy I Spy blocks that perhaps denim would be a better choice. You all know how much I love denim, so I jumped right on that idea and this is what I came up with...


I Spy Quilt blocks I had already pulled out 24 blocks that were particularly boy-ish with the thought that I would make a small quilt for a boy.


I Spy Quilt blocksI also had pulled out 24 blocks that I thought looked particularly girl-ish, having a girl's quilt in mind.

Once I had determined that denim would be the perfect fabric for in between all the blocks, I zipped down to my local Joann Fabrics and picked out a wonderfully lightweight denim fabric that was 60 inches wide. Not having a coupon available, I only purchased 2 yards, figuring that would be enough to get me started and give me time to find a coupon so I could buy more.


2 inch ripped stripsI was in the mood for some instant gratification, so instead of rotary cutting lots of strips and little pieces for a regular sashing, I decided to rip 2 inch strips of denim.

So I started ripping and this is what I ended up with...

2 inch ripped strips...a luscious pile of 2 inch denim strips in no time at all! Such good therapy!

Then I started sewing...

I Spy Quilt blocksI stitched all the blocks onto the strips, one after another, joining a new strip at the end of the previous one by overlapping the selvages. Once one side of all 24 blocks was sewn onto the strip, I snipped the strip between the blocks just enough to cut the stitching thread and then ripped the strip apart to separate the blocks. Then I turned the blocks around and stitched the opposite side of all 24 blocks onto strips in the same way, snipping between the blocks and ripping to separate at the end. Then I pressed the seams away from the blocks on both sides.

In the same manner as before, I stitched the third side of all the blocks, now with denim sashing on top and bottom edges, to more strips of denim, snipping and ripping them apart at the end. And finally the fourth side was stitched, snipped, ripped and all seams pressed.

It only took me about 2 hours to surround all 24 blocks with 2 inches of denim! I'd call that instant gratification!

I Spy Quilt blocksThis is how I will arrange them to join them into the quilt top, with the long and short edges offset from each other. I think that adds a little more interest to the quilt. The next thing I will do is square up each block to a uniform size and then stitch them all together.

I think I will rummage through my fat quarter collection and do some kind of scrappy backing for this one and I'm thinking a fun red fabric for the binding. What do you think? I'm open to any suggestions, even if you're not stopping in for a visit to my home!

Happy Stitching!

Click here to return to HookedOnNeedles.com

Labels: , ,

Friday, July 9, 2010

Upcycled Jeans class projects -- and giveaway winners

Congratulations to Anne Marie and Tudi, the winners of my 2nd Anniversary Giveaway! I've already emailed for addresses so they will be receiving fun little packages in the mail sometime next week.

Last night was the first of three 2-hour classes I am doing at our children's library this summer on Upcycling Jeans. It was a smashing success and all the girls in the class seemed to have a really good time working on their projects. I think their favorite part of the class was when I showed them how to rip fabric to get straight strips...it's good therapy!

A few of the girls finished their tote bags and allowed me to take pictures to share with you. So here they are...


Upcycled Jeans tote bagC made this bag using an old pair of jeans and some of the leftover scraps from my charity quilt that I recently finished. I was glad I brought lots of fabric for them to choose from. It was great fun seeing what caught their eyes.


Upcycled Jeans tote bagAnd her sister A also seemed to like that same fabric for her bag, only in the purples and blues.


Upcycled Jeans tote bagI think F was going for a Minnie Mouse look to her tiny little bag. She brought in the itty bittiest little pair of jeans to use, so naturally her bag ended up being itty bitty too. It suits her just fine!

Next week we'll be using the leftover legs of the jeans to make two other projects and they will also be learning how to use yo-yo makers which they will be able to keep for themselves. I have a feeling my pile of scrap fabric won't last too long once they find out about making yo-yos! Fun, fun, fun!

Happy Stitching!

Click here to return to HookedOnNeedles.com

Labels: ,

Thursday, July 8, 2010

Drawstring Threader -- A Handy New Must-Have Gadget

Who doesn't love a new sewing gadget? Especially one that will save time and frustration and actually work the way it is intended? I found just such a thing quite by accident the other day while shopping for my upcycled jeans class supplies.

I've always used a large safety pin to run a drawstring through its casing, not because I like using a safety pin, but because it's all I have that can do the job. My thumb always gets a cramp and sometimes the pin opens up inside the casing causing all kinds of fun and dangerous problems. I actually used to have a bodkin which is a handy little tool for this job, except that more often than not, the little ring that was supposed to hold it closed on the ribbon would move while I was running it through the casing, letting go of the ribbon and leaving the open bodkin inside the casing. Not very helpful. I looked for it the other day and couldn't find it. No big loss. I never liked it anyway.

I used this handy little gadget today and fell in love...


I found this at my local Michael's store in the sewing notions section and paid a whopping $1.99 for it. I figured it was a good investment if it worked and an inexpensive experiment if it didn't.


This is what it looks like hanging on the display. It's made by Dritz as you can see in the bottom right corner.


And here it is out of the package, just a long, flexible, plastic stick that is thicker at one end and tapers to a thinner size with two openings at the other end.


So all you do is thread your ribbon or shoestring or whatever you want to run through the casing into the two holes at the end, then run the thicker end through the casing and out the other end. I was able to run a new drawstring through the casing of an old pair of shorts this morning in about 30 seconds. This tool is so long that I didn't have to worry about securing the other end of the drawstring so that it wouldn't get pulled in.

Can you tell I was thrilled with my $1.99 investment?

There's still time to sign up for my giveaway so click HERE for a chance at a quilted sewing kit or a fabric biscornu pin cushion to celebrate my 2nd anniversary here at Hooked On Needles. I wouldn't want you to miss the celebration!

Happy Stitching!

Click here to return to HookedOnNeedles.com

Labels: ,


Newer Posts Home Older Posts
Copyright ©2010 HookedOnNeedles.com. All rights reserved.