Hooked on Needles


Friday, September 30, 2011

Rainbow Quilt ~ Version Two!

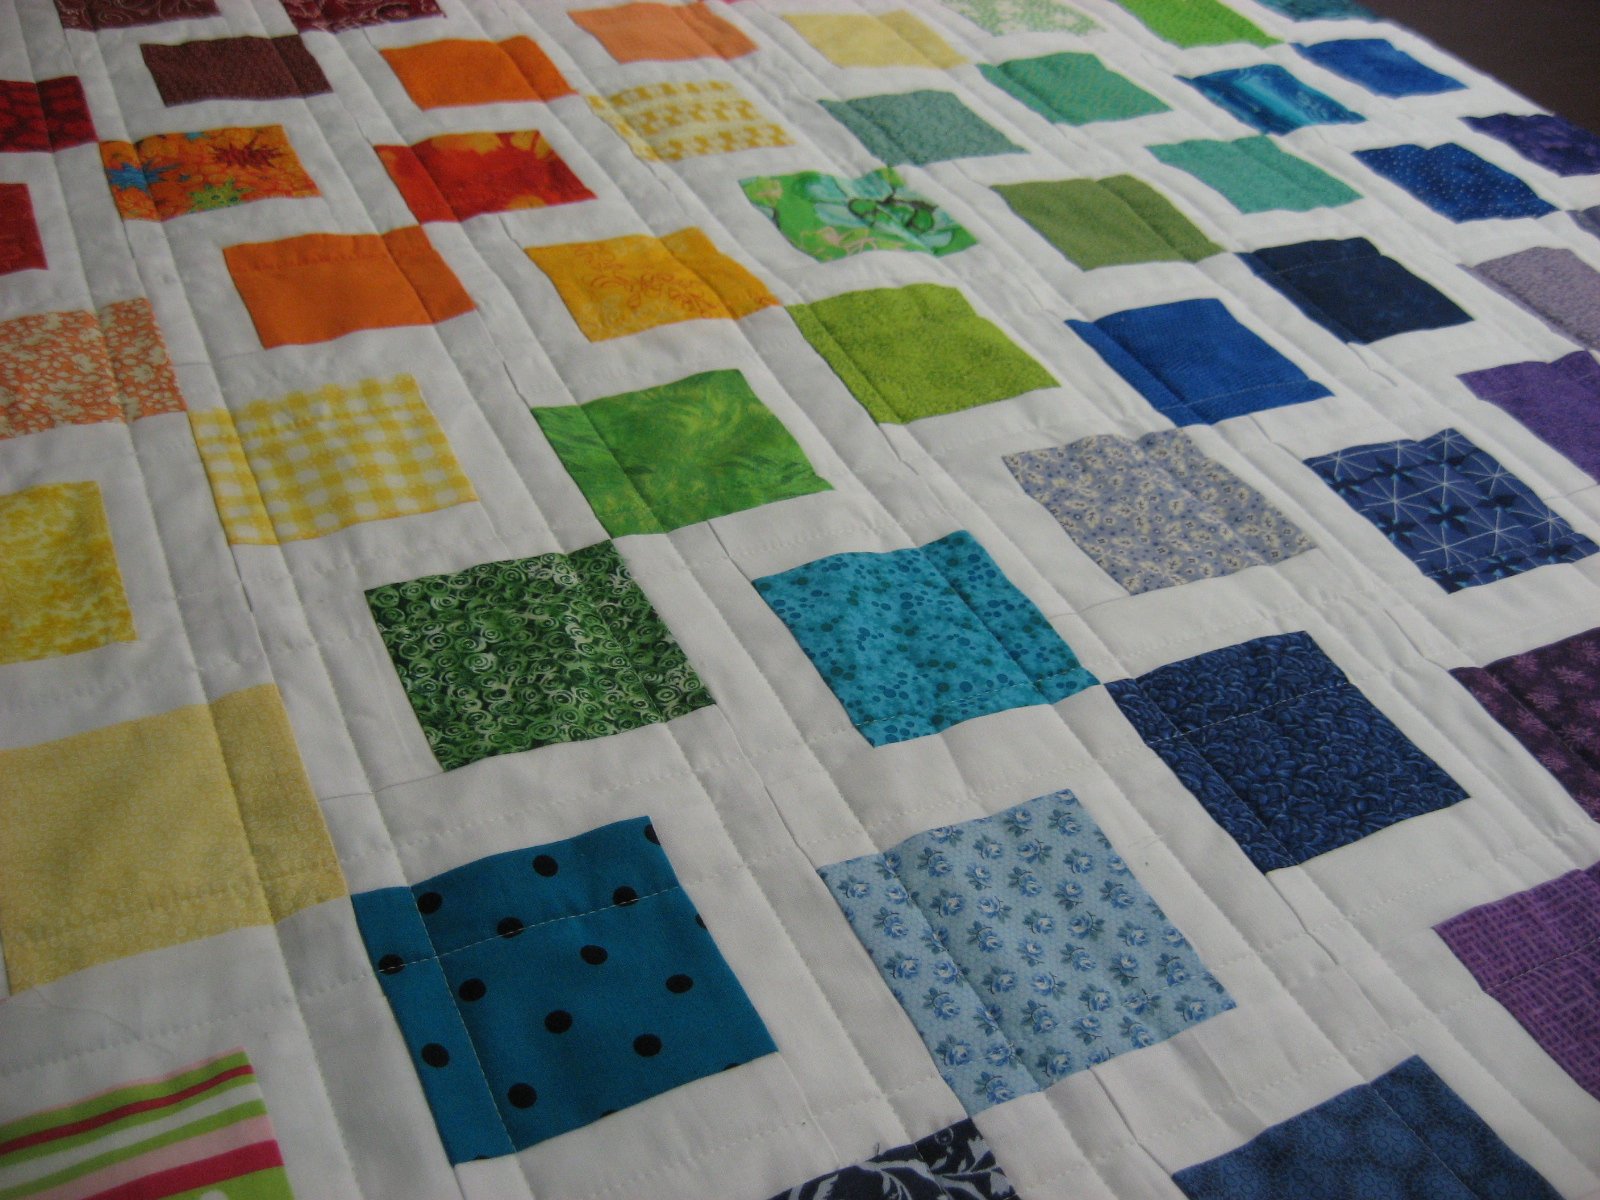
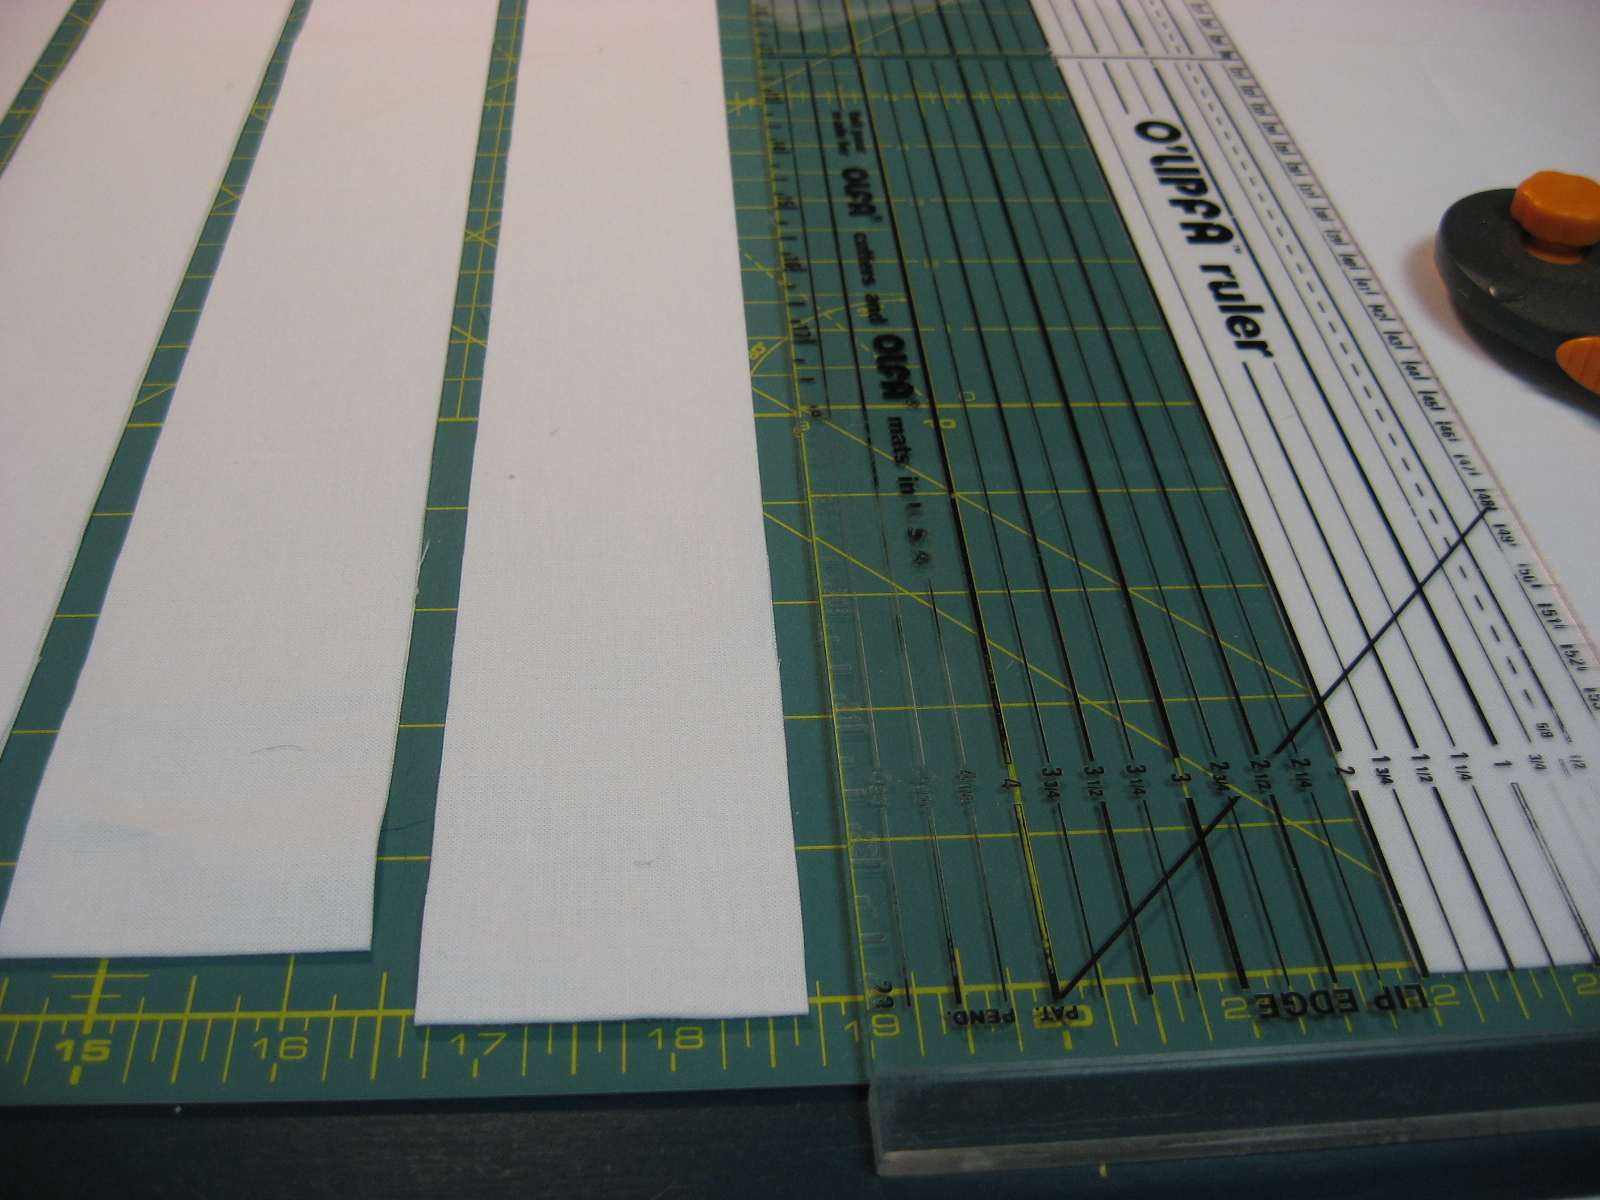
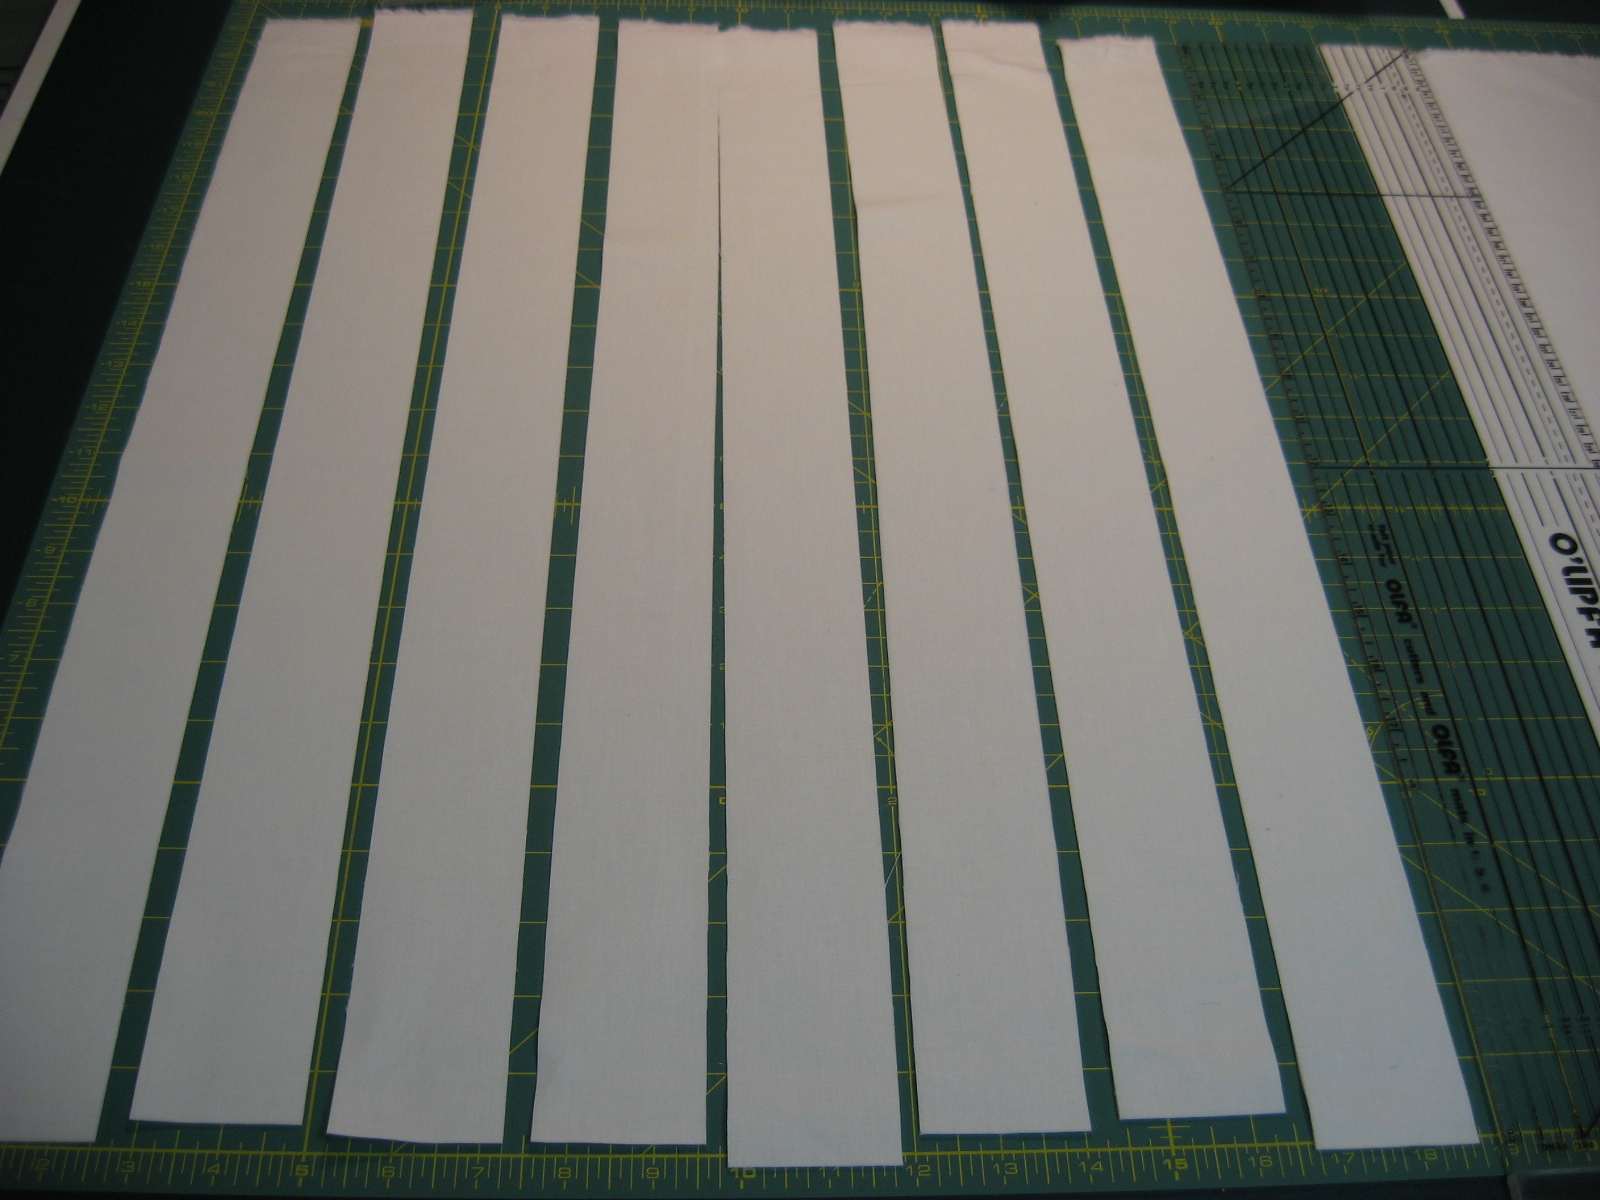
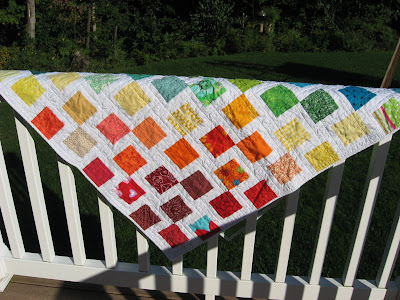
After making this picture tutorial, I finished Version Two of the Rainbow Quilt and it's now ready to show off to the world! Take a look:


Rainbow Quilt ~ Version Two!I really love how you can look at this quilt hanging over the railing and it looks like only pinks, purples, blues and some greens...


Rainbow Quilt ~ Version Two!...and then you hang it this way and only see reds, oranges, yellows and a hint of blues and greens.


Rainbow Quilt ~ Version Two!
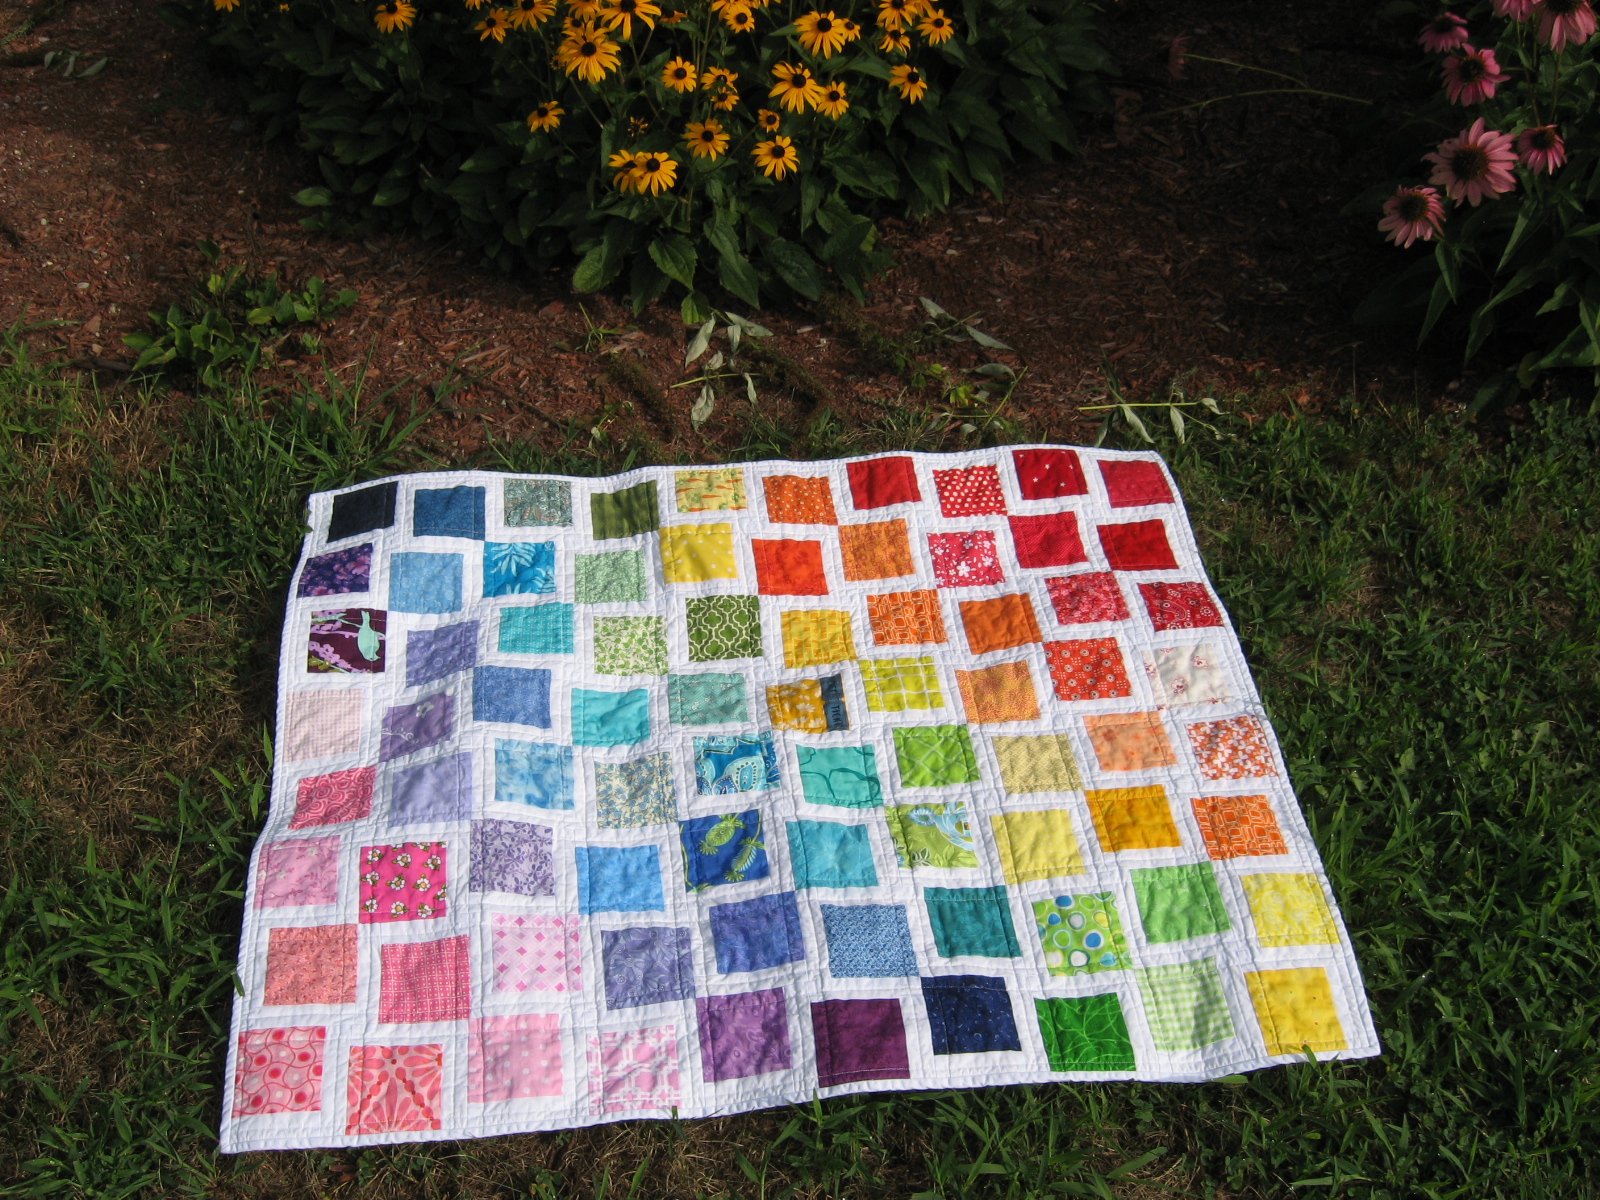
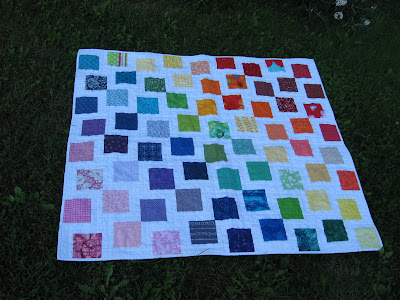
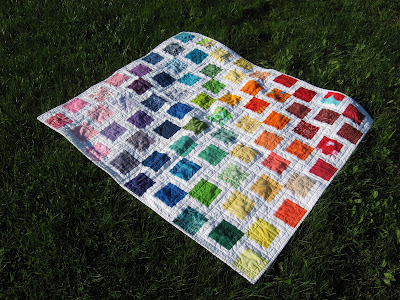
But here it is all in one piece and looking like a beautiful rainbow after a summer rain shower!


Rainbow Quilt ~ Version Two!
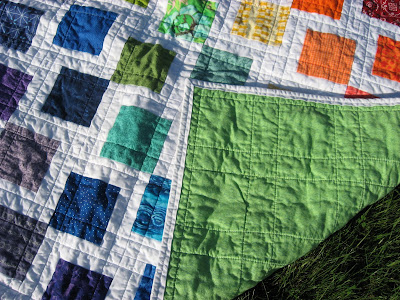
The backing fabric on this quilt is green with leaves on it. It's sort of a tone on tone fabric so it's hard to see the leaves in this picture.


Rainbow Quilt ~ Version Two!This quilt finished at 38 by 42 inches and has already been washed, giving it that wonderful quilty cozy feel. It will be showing up in my Etsy shop soon, so if you're interested in owning it or giving it as a baby gift, that's where you can find it...while it lasts!

Happy Stitching!


Click here to return to HookedOnNeedles.com

Labels: , , ,

Monday, September 26, 2011

DanDoh Scarf ~ Free Pattern

The weather here cooled down for a bit and teased me into thinking I could start crocheting again on an afghan I had put down at the beginning of the summer. Then it turned back into summer, of course after we removed the AC units! Isn't that always the way? But I was back into the swing of yarn work in the evenings, so I had to do something.

I was poking around on Facebook one day recently and ran into a post from NobleKnits linking to a free scarf pattern. I really liked the look of it so I ordered up some of the suggested yarn and another skein of a different yarn and went to work knitting. It was a good take-along project too for when I'm waiting at my daughter's Irish step dancing class and soccer practices and games. But this pattern worked up so fast that it only lasted me through one dance class and one practice! Good thing I bought two skeins of yarn!


DanDoh Scarf ~ Free PatternThis DanDoh scarf is a quick project, and using the Poem's silk yarn makes it so soft and luxurious. I love the ruffled edges and the keyhole at one end to run the other end through. NobleKnits is a great place to shop for yarn too. They have free shipping and their service is quick. If you've never checked them out, hop to it! You'll find plenty to keep your hands busy no matter what the weather!

Happy Stitching!

Click here to return to HookedOnNeedles.com

Labels: , , , ,

Saturday, September 24, 2011

How to Chain Sew a Quilt Top ~ A Picture Tutorial

After you have laid out your blocks as shown at the end of the previous tutorial on making this Rainbow Quilt, it will be time to sew the blocks together keeping them in the proper order and orientation so the design will work out as intended. Everyone has a favorite way to sew quilt blocks together, and mine is chain sewing. Here's how I did this quilt...


How to Chain Sew a Quilt Top ~ A Picture TutorialAfter I made sure each block was positioned the correct way for the pattern, I took each block from the far right column of blocks and flipped it over onto the block just to its left so that the right sides were together.


How to Chain Sew a Quilt Top ~ A Picture TutorialI did this all the way down the column...


How to Chain Sew a Quilt Top ~ A Picture Tutorial...until the far right column was essentially turned upside down onto the column next to it. Where the raw edges come together on the right in the picture above is where my first seam is going to be.


How to Chain Sew a Quilt Top ~ A Picture TutorialSince I wanted to start sewing this seam at the top of the column, I picked up the first pair of blocks at the top of the column and placed them onto the pair below it. Then I picked up those two pairs and placed them onto the pair below it, and so on until I had a little stack of block pairs at the bottom of the column. Make sure when you pick up your block pairs that you do not turn them around or over or any way. They must stay in the proper position to maintain the pattern.


How to Chain Sew a Quilt Top ~ A Picture TutorialNext I took my little stack of block pairs to my sewing machine, keeping track of which side would be the seam side. To do this, I always place my stack onto my sewing table with the seam side towards the sewing machine. This way I know which side I will be sewing. The next step is to pin each pair together on the seam side. I always pin at the beginning and end of the side, and anywhere there is another seam. On some block pairs there will be a seam on each block, and on other block pairs there will be a seam on only one block. You'll notice this as you go along.


How to Chain Sew a Quilt Top ~ A Picture TutorialThen I stitched a quarter inch seam on that first block pair, leaving it on the machine at the end of the seam.

How to Chain Sew a Quilt Top ~ A Picture TutorialThe I picked up the next block pair and pinned it on the seam side and fed it into my machine right after the first pair. I continued this until all the block pairs were stitched together. Do not cut apart the block pairs from each other, as this would defeat the purpose of chain sewing!


How to Chain Sew a Quilt Top ~ A Picture TutorialNext I brought my two columns of blocks back to my work table and laid them out again in their original position. This is a good time to double check that all the blocks are turned in the proper way to maintain the design. If one pair got turned in the process, just pick out the stitches and position it correctly and sew the seam, then place the pair back where it belongs in the column.


How to Chain Sew a Quilt Top ~ A Picture TutorialNext I turned each block in the third column over on top of its mate in the second column...


How to Chain Sew a Quilt Top ~ A Picture Tutorial...and then pinned these blocks right at the work table before I moved the whole set to the sewing machine. It's much easier to keep the blocks in the correct position if they are pinned in place before moving them! It could just be that I know this from experience!


How to Chain Sew a Quilt Top ~ A Picture TutorialAfter chain sewing the third column onto the second, I placed the three columns back on the work table and checked for proper positioning of each block...


How to Chain Sew a Quilt Top ~ A Picture Tutorial...then turned the blocks from the fourth column over onto their mates in the third column, pinned them, chain stitched the column, brought it back to the table, and repeated this process with each column until...


How to Chain Sew a Quilt Top ~ A Picture Tutorial...the last one. Nothing new to do here! Just do the same thing again! I find it easier to handle the already-chain-stitched columns if I roll them up as I go as shown in the above picture.


How to Chain Sew a Quilt Top ~ A Picture TutorialViola! Now you have all your blocks connected either by a seam or by a thread, and hopefully all turned in the correct position for the pattern. Double check that one more time and fix any mistakes before moving on to the last step...


How to Chain Sew a Quilt Top ~ A Picture Tutorial...which is much easier than sewing the columns together! Next I turned the bottom row over onto the row next to it, pinned at all seams, making sure to turn each seam towards the print fabric so they nest neatly, then I stitched a quarter inch seam. I did this with every row until the whole quilt top was sewn together...


How to Chain Sew a Quilt Top ~ A Picture Tutorial...then I layered it with batting and backing and did some straight line quilting, made white binding using my favorite never ending bias binding method, sewed that on and it was done!

It has since been washed to give it that crinkly, quilty look and feel which is what makes a quilt so cozy. If it ever stops raining here and the sun ever comes out again, I will take some pictures of it and post it in my Etsy shop. It will be listed for $85, plus shipping. But if you would like to purchase this quilt before it hits the shop, you can just email me and pay only $80 with free shipping (US addresses only please!). I'm happy to pass the savings from not having to pay fees along to you!

I hope this little tutorial on chain sewing proves helpful to any of you who may not have tried this method of assembling a quilt top. It really is very efficient and fun to do. I hope you try it and like it as much as I do!

Happy Stitching!

Click here to return to HookedOnNeedles.com

Labels: , , , , ,

Tuesday, September 20, 2011

Getting Ready for my First Craft Fair

My goodness I've been a busy beaver these past many days! You see, I am having my very own Hooked On Needles table at a charity event craft fair this coming Friday evening and it's the first time ever that I have done anything like this for myself. Very exciting, don't you think?


Preparations for my first craft fairEven with the short notice, I decided that I would have to do it up as big as I could, so I had this banner made which I think turned out super cool. Need a banner? Be sure to check out Vistaprint online. Here's a hint: order something small at first and get on their email list. Then you'll get all kinds of offers for free stuff! I got this poster for practically nothing, business cards, postcards, post-it notes, even a tote bag and mouse pad for next to nothing. The quality is quite good too.


Preparations for my first craft fairWith such a nice banner to display, I had to build something on which to display it, and why not make it roomy enough to display my tote bags and Christmas stockings too? So I went down to Home Depot and bought about $20 worth of pvc and connectors, and built this simple frame on which to hang my banner, stockings, tote bags and maybe even a few other handmade items. This whole frame will sit on top of my table. The pvc on the bottom will be covered by some pretty fall fabric. I sewed sleeves of blue corduroy to cover the rest of the frame. I love pvc! It's so versatile!


Preparations for my first craft fairMy sewing area is a total mess right now with everything all over the place in preparation for this fair. But I have all my patterns and signs printed and stored in that cute flower folder. I have my product list all printed with prices of everything. That green thing in the plastic bag there is the rainbow quilt I made for my recent tutorial which I just quilted on the long arm today. I am hoping to get the binding on it and have it available for sale at the fair Friday too. Wish me luck!


Preparations for my first craft fairAfter pricing all my items, I have packaged most of them as neatly as possible in these two containers. You can see two aprons there on top of the purple tote and some Hershey's chocolate. I've been to enough craft fairs and trade shows to know that the booths people like to visit are those with free chocolate! In the box on the right are all the crocheted cotton wash cloth bundles and pot holders I made over the summer, and on top you can see a pink metal tin which holds a set of ten cute little magnets. I have seven of those for sale. Also in that box, you can see a little thing that says 'Jane' on it. That is a quilted name tag I made for my friend Jane who will be accompanying me for the evening, helping me set up and staff my table. I made one for myself too which you can see sticking out a little under Jane's. I used selvages from Deb Strain's Makin' New Friends fabric to frame our names. I thought that was appropriate for name tags!


Preparations for my first craft fairHere's the rainbow quilt all trimmed and ready for binding, along with a cute little red basket which will hold the afore mentioned free chocolate. And right behind the red basket are boxes of the greatest plastic bags for sewing and quilting projects. They come in three different sizes, are heavy duty, have a handle for carrying, and have a zip closure to keep dust and other icky stuff out. A friend of mine found them at the dollar store and uses them to store all her fabric projects while they are waiting their turn on the long arm. I'll be using my supply of them to package some of the bigger items I will have for sale Friday night, if they sell!

So that is what I've been up to since my last post over a week ago. Since then, I have also long armed the Tranquility Quilt but have not yet bound it, and I have put the binding on my other Christmas gift quilt which I still cannot show. I'll take some pictures Friday night and share them here over the weekend. If you're in the area and want to stop in, come over to the 2nd Annual Tyler Foundation Vendor & Craft Fair at Devons Common Center, 31 Andrews Pkwy, Devons, Massachusetts from 6:30 to 9:30. There will be local vendors, artists & businesses, free admission, cash bar, appetizers, and raffle tickets. I'll be at booth number 4. You can find me under the big banner that says Hooked On Needles! I'd love to meet you!

Happy Stitching!

Click here to return to HookedOnNeedles.com

Labels:

Friday, September 9, 2011

Rainbow Quilt wants YOU!

In case you haven't seen enough of my Rainbow Quilt recently, with THIS POST showing the original, and then THIS POST offering a lengthy picture tutorial so you can make your own, here is another place you can view my Rainbow Quilt: Quilting Gallery's weekly themed contest and this week the theme is Baby Quilts! I entered my rainbow quilt and sure would love to get your vote.

So click on over and check out all the lovely baby quilts, which are listed in alphabetical order. After all the pictures, each quilt is listed by name with a little check box next to it. You can vote for up to 6 quilts for this contest. After checking up to 6 boxes (and I hope the box next to Rainbow Quilt is one of them!), then go to the bottom of the list and click on the VOTE button. It's that easy!

Contest ends Sunday at midnight so get a move on!


Rainbow Quilt ~ Finished! Here's a picture of my Rainbow Quilt just so you know what to be on the lookout for!

Thanks so much! I'll let you know if I win!

Happy Stitching!

Click here to return to HookedOnNeedles.com

Labels: ,

Sunday, September 4, 2011

Rainbow Quilt ~ A Picture Tutorial

After the rain stops and the sun comes out here on this cold dreary day, I would not be at all surprised to see a rainbow somewhere in the sky. It's so nice to catch a glimpse of those short-lived little gifts after a rainy day. Well, if you don't want to wait for a rainy day, here's a little rainbow you can make for yourself. It's my Rainbow Quilt which I designed and made over the summer, and a few people have asked for a tutorial. You can see pictures of the original Rainbow Quilt by clicking HERE.

Keep on reading for a picture-heavy tutorial to make your own rainbow quilt like this...


Rainbow Quilt ~ Finished!


Materials I used for my quilt:
  • 72 4-inch squares in assorted colors (you can use any size square you like in any colors you like, but you may have to adjust the amount of fabric you need for the sashing)
  • 1 yard white fabric for sashing (more if you are using larger squares)


Rainbow Quilt ~ A Picture TutorialCut your white fabric into 2-inch strips.


Rainbow Quilt ~ A Picture TutorialI used 17 strips, so if you are using squares larger than 4 inches, you will need more strips.


Rainbow Quilt ~ A Picture TutorialI used 72 4-inch squares from 8 color groups: red, orange, yellow, green, aqua, blue, purple and pink. Of course you can use whatever colors you have on hand, or swap with friends until you get the colors you want, or purchase a fat quarter of each color. My squares were from a swap, so each square is a different fabric.


Rainbow Quilt ~ A Picture TutorialTo begin chain piecing the sashing to the squares, lay one square face down onto a strip of sashing so that it is just below the selvage and the right side edges are even. Stitch a 1/4 inch seam. Leave this stitched piece on the machine and add the next square...


Rainbow Quilt ~ A Picture Tutorial...and continue stitching...


Rainbow Quilt ~ A Picture Tutorial...adding a new square, face down with right edges even, until ...


Rainbow Quilt ~ A Picture Tutorial...you come to the end of the first strip. Start another strip and do the same thing with the remaining squares until all the squares have been stitched onto sashing strips.


Rainbow Quilt ~ A Picture TutorialAll my squares have been chain stitched onto the strips of sashing.


Rainbow Quilt ~ A Picture TutorialYou can see here that each square is right up next to the previous square. This method of chain piecing makes short work of sashing all these squares! I was able to sew 11 squares onto each strip of sashing. Depending on the fabric you are using, you may be able to sew 11 or only 10, but just keep sewing until all the squares have been added to sashing strips.


Rainbow Quilt ~ A Picture TutorialI just thought this was a cool picture!


Rainbow Quilt ~ A Picture TutorialNow lay each strip on your cutting mat with the sashing down and the squares up. Line your straight edge up with the edge of each square and cut through the sashing to separate the squares from each other.


Rainbow Quilt ~ A Picture TutorialThis is what you will get...


Rainbow Quilt ~ A Picture Tutorial...and this is how the squares will look from the other side.


Rainbow Quilt ~ A Picture TutorialYou will end up with a pile of 72 squares with one piece of sashing attached to each.


Rainbow Quilt ~ A Picture TutorialLine these squares up on your ironing board, overlapping to conserve space, and then press the seams to set them. This is done before you open the seam, and it makes each seam press to the side much nicer. I never believed it would make a difference when I would see other people taking this extra step, but it really does, so I recommend it.


Rainbow Quilt ~ A Picture TutorialThen take each square individually and press the seam towards the colored square. All seams will be pressed towards the colored squares so they will not show through the white when the quilt is finished.


Rainbow Quilt ~ A Picture TutorialWhen you are finished pressing, you will have a colorful stack of rectangles with all seams pressed towards the color. (Please excuse my icky ironing board cover...I'm getting a new, oversized, rectangular top for my ironing board very soon! Can't wait!)


Rainbow Quilt ~ A Picture TutorialTo attach the second sashing piece to each block, do the same thing as before, making sure that you begin with the white going through the machine first instead of the colored square so that the pressed seam will naturally stay towards the color.


Rainbow Quilt ~ A Picture TutorialSo chain piece all your blocks to the remaining sashing strips, adding a new block after stitching each block...


Rainbow Quilt ~ A Picture Tutorial...and always feeding the white section through first to keep that seam going in the right direction...


Rainbow Quilt ~ A Picture Tutorial...until you have added a second sashing to each block.


Rainbow Quilt ~ A Picture TutorialThen bring your nice little pile of colorful strips back to the cutting mat...


Rainbow Quilt ~ A Picture Tutorial...and cut the sashing strips apart as you did before...


Rainbow Quilt ~ A Picture Tutorial...and this nice neat little pile is what you will have.


Rainbow Quilt ~ A Picture TutorialLine these pieces up on your ironing board and press the seams to set them...


Rainbow Quilt ~ A Picture Tutorial...then press each one with the seam allowance towards the color.


Rainbow Quilt ~ A Picture TutorialNow you will have 72 colored squares sashed with white on two sides. Divide them into your color groups and arrange them in the order you would like them to radiate on your quilt. I did mine in rainbow order (with aqua and pink thrown in) so I stacked mine up in this order: red, orange, yellow, green, aqua, blue, purple and pink.


Rainbow Quilt ~ A Picture TutorialStarting in the lower right corner with red, I placed the first block with the color in the upper left. Then I added the next diagonal row, and the next, as you see above. Take note of the position of the colored squares in the four blocks that form the corner square in the above picture, as that is the pattern that will be repeated throughout.


Rainbow Quilt ~ A Picture TutorialContinue placing your blocks in diagonal rows from lower edge to right-hand edge, taking them right off the stack you made when you organized them into color groups, and paying attention to the position of the colored square in each block.


Rainbow Quilt ~ A Picture TutorialYou should have 8 squares across the bottom and 9 squares up the side and your colors should radiate from lower right to upper left in the order you stacked them.


Rainbow Quilt ~ A Picture TutorialBefore you start piecing your blocks together, check each row and column to make sure each block is positioned correctly for the design. Make any adjustments necessary to maintain the pattern.

Piece your top together, layer it with batting and backing, quilt it, bind it, and enjoy!

This quilt will finish to be approximately 38 by 42 inches.

If you make a quilt using this design, I would love to see it! I would also appreciate a link back to this post if you make use of this design. Have fun with it!


Happy Stitching!

Click here to return to HookedOnNeedles.com

Labels: , , ,


Newer Posts Home Older Posts
Copyright ©2010 HookedOnNeedles.com. All rights reserved.