Hooked on Needles


Tuesday, February 28, 2012

Tranquility Mini Quilt ~ Quilting and Binding

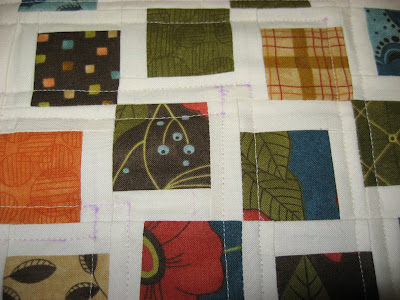
This Mini Quilt has been so much fun to make! I just hope my swap partner likes it as much as I have liked making it! The next step, after piecing the top, was of course to layer it with backing and batting and then quilt it. That's what I'm showing today...


I quilted it on my little old (and I mean OLD) domestic machine after marking my stitching lines with my handy dandy purple disappearing ink pen. You can see some of the marks still waiting to disappear there in the above picture! Those were from where I mis-marked and had to squiggle them out so I wouldn't stitch them!


Here's the top all quilted...


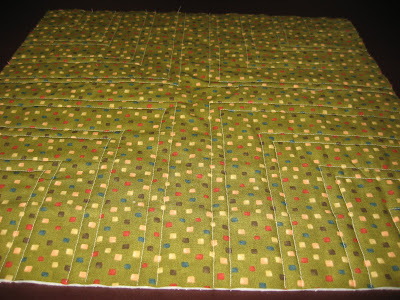
...and here's the back where you can clearly see the quilting lines.


Using my very favorite method of making bias binding, which you can find HERE, I made enough to neatly bind this little quilt. Next time I'll show you the finished mini quilt and the even mini-er bonus to go with it.

Going from mini to extra large, today I put my Butterfly Garden quilt on the long arm and quilted it. Using that same method of making bias binding, yesterday I made all the binding for this quilt so I should be able to finish it up in a few hours of work time. Finding that few hours will be the hardest part! Pictures of that project will also be coming soon!

Happy Stitching!

Click here to return to HookedOnNeedles.com

Labels: , , ,

Monday, February 27, 2012

Crocheted Slipper Pattern Help

Occasionally I receive emails from readers who are having a problem with a particular project or stitch and ask for my help in figuring it out. Recently Ginger contacted me and said she was having trouble with a crocheted slipper pattern that she purchased from an Etsy shop. She just couldn't seem to get it right. She gave me a link to the shop and told me which pattern she had purchased. So I clicked into Genevive's Crochet Patterns shop and looked for her crochet pattern 11 which is for cute Mary Jane slippers in all sizes. You can find her shop HERE, then just scroll down to find her pattern number 11 for Mary Jane slippers. It took me a while to find the right pattern because, of course, I had to look at all the other fabulous patterns Genevive offers in her shop.

I purchased the pattern for myself so that I could make a slipper and see what I thought about the pattern. Perhaps it wasn't written well and the pattern itself was the cause of Ginger's trouble. I did not find that to be the case at all. Genevive's pattern was comprehensive and well written and included color coded instructions for all sizes. So I made one slipper and took some pictures to share with Ginger so she could compare her slipper with mine and let me know where they look different. With this information, I am hoping to be able to isolate the areas where Ginger is having trouble, and then help her understand the instructions better.

So here's my slipper...


I made one in medium since that is what I would wear, and I did not weave in the ends yet, nor did I sew on a button to close the strap.


I think this is a very nicely shaped crocheted Mary Jane, don't you?


I like how the back of the heal extends further up the ankle...I don't like cold ankles!


And here it is on my very wide foot. I'm thinking I could make a pair for each of my kids and let them slide around on the wood floors for a while instead of dry mopping them. My mother always said work is fun! That would certainly make dusting the wood floors fun!

So if you're looking for some cute crochet patterns for baby shoes, booties, slippers in all sizes, sock patterns and even a few free patterns, take a peek into Genevive's Etsy shop. She's got some great patterns.

I'll be back soon with a video which will hopefully help Ginger make her slipper successfully.

Happy Stitching!

Click here to return to HookedOnNeedles.com

Labels: , , ,

Sunday, February 26, 2012

Tranquility Mini Quilt ~ Almost Finished!

Quilting in miniature is fun, but it's not necessarily any faster to make a miniature quilt than a full size one! It just uses less thread! Here's my latest update on my Tranquility Mini Quilt...


Tranquility Mini Quilt ~ Almost Finished!Since my first writing about this project, which you can read HERE, I continued piecing this mini quilt in the same was as I pieced my Rainbow Quilt show in this tutorial.


Tranquility Mini Quilt ~ Almost Finished!Sewing all the little squares onto the sashing strip ...


Tranquility Mini Quilt ~ Almost Finished!... and then pressing them while still connected made this part of the process so much easier than cutting tiny strips and sewing them onto tiny squares and then pressing tiny seams individually.


Tranquility Mini Quilt ~ Almost Finished!I even used my tiny cutting mat, tiny straight edge and tiny rotary cutter to cut the tiny blocks apart!


Tranquility Mini Quilt ~ Almost Finished!Then I continued piecing the blocks by sewing the second sashing strip ...


Tranquility Mini Quilt ~ Almost Finished!... onto all the blocks, pressing the seams, and cutting them apart.


Tranquility Mini Quilt ~ Almost Finished!Then came the fun part...laying out the little blocks in different arrangements to find out what I liked best. I tried this one first, where the colors graduated and pairs stayed together.


Tranquility Mini Quilt ~ Almost Finished!Then I mixed up the colors and made some pairs match up at their points and other pairs face away from each other. I liked this arrangement better, and decided to go with it.


Tranquility Mini Quilt ~ Almost Finished!Using my favorite chain piecing method of connecting blocks, which you can read about HERE, I pieced these 81 little blocks together.


Tranquility Mini Quilt ~ Almost Finished!If you didn't already know that this is a mini quilt, you could be fooled into thinking it is a much larger square since there is nothing in this picture to show scale.


Tranquility Mini Quilt ~ Almost Finished!Each print square finishes at 1 1/2 inches and the sashing finishes at 1/2 inch.


Tranquility Mini Quilt ~ Almost Finished!I added a border all around the whole piece to finish off the top. This will be useful for when I do the second stitching of the binding which I will show in a later post.


Tranquility Mini Quilt ~ Almost Finished!So there is my mini quilt, waiting for some batting, backing, quilting and binding. I'll share pictures of that with you soon.

The Butterfly Garden Quilt that I finished some time ago is going on the long arm this week and I am so excited to pick out a quilting design and get that quilting done. I'll be making the binding for it today so it will be all ready to stitch onto the quilt and then it will be finished and ready to deliver. This one is a bridal shower gift that a friend is giving to her daughter. What a lovely gift! I'll be sure to share pictures of that finished project as soon as I can!

Happy Stitching!

Click here to return to HookedOnNeedles.com

Labels: , , ,

Wednesday, February 22, 2012

How to Clean a Crocheted Doily

Crocheted doilies have been around forever. They have been used as table runners, dresser scarves, chair back and arm covers (also called Antimacassars), coasters, placemats, jar covers, tablecloths, pillow covers, bedspreads and the list goes on and on. Recently I've even seen doily designs, which are traditionally crocheted using fine cotton thread, worked up in big chunky yarn producing a blanket of sorts that looks like it might belong on the table in that castle at the top of the magic bean stalk!

I've been crocheting doilies for most of my crocheting life, which started around the age of 8 and has continued almost uninterrupted for over 40 years now! You can see some of my doilies and doily-like crocheting HERE, HERE and HERE. My mother also does lovely thread crochet and I've shared some of her work HERE and HERE.

After a doily has been used and displayed for some time, in this case many years, it will be in need of a serious cleaning. Here are the pieces in need of cleaning this time around...


How to Clean a Crocheted DoilyThese pieces are a single and a triple dresser scarf which I made about 20 years ago for the furniture in our bedroom. You can see how the single doily is much more discolored than the larger one. This is because it was used on the nightstand which is just in front of a window that stays open all summer and the only thing that is put on it is the lamp so most of it is exposed to dirt, dust and sun.


How to Clean a Crocheted DoilyThe larger piece was mostly covered by the many books my husband keeps on his bureau so it is not exposed nearly as much to the elements. Anyway, they are both in need of a good cleaning.


How to Clean a Crocheted DoilyAfter trying mild soaps and laundry detergents on other doilies with no success, I had the idea to try Oxyclean and see if that would do anything to remove the years of discoloration from these cotton treasures.


How to Clean a Crocheted DoilySo I filled my big Tupperware bowl with warm water and poured a whole cap full of Oxyclean into the water. I placed the two pieces into the bowl and made sure they were fully submerged. Then I left them alone for a few hours.


How to Clean a Crocheted DoilyEeewwwww! Nasty! I guess something's happening in there!


How to Clean a Crocheted DoilyI stirred it up with the handle of a wooden spoon and noticed that the doilies looked remarkably cleaner.


How to Clean a Crocheted DoilySo I emptied the bowl and gave the pieces a little rinse under running water. They still were not as clean as I wanted, so I did the same process over again, filling the bowl, adding the Oxyclean and letting it sit. This time I left it overnight.


How to Clean a Crocheted DoilyThis is what the bowl looked like in the morning before I touched it. What a difference!


How to Clean a Crocheted DoilyAfter giving them a good rinse under cool running water, I laid them out on a clean towel...


How to Clean a Crocheted Doily...and stretched them slightly so that the edges were straight and corners square.


How to Clean a Crocheted DoilyThis one looks just like it did when I made it many years ago!


How to Clean a Crocheted DoilyThe smaller one seems to have suffered from having the lamp on it all these years. I don't know if that discoloration is caused by the rest of the doily fading or by that part of the doily not being exposed to air or what, but that spot on it is right where the lamp sits and it is barely noticeable in person. It shows up pretty clearly in these pictures though. Very strange.


How to Clean a Crocheted DoilySo after laying them out on the clean towel, I put another clean towel on top of them and then rolled the whole thing up starting from the short end. After rolling, I squeezed along the roll as I continued to gently roll the whole thing, to get the water out of the doilies and into the towels.

Then I laid out another clean towel on my ironing board and spread the two doilies on it to continue drying. And that is where they are still. Once they are completely dry, I will return them to their places of honor upstairs in our bedroom, fresh and clean and ready to serve for another many years!

Happy Stitching!

Click here to return to HookedOnNeedles.com

Labels: , , ,

Tuesday, February 14, 2012

Tranquility Mini Quilt

This year so far I have signed up for a few swaps and have fulfilled most of them by sending the appropriate number of fabric squares in the specified colors. Those are the easy swaps that net a great variety of fabric squares to make all sorts of fun things with. My two rainbow quilts shown HERE and HERE, my I Spy quilts shown HERE and HERE, my red and aqua quilt shown HERE, and a few other projects I have done were made with swap fabrics.

The swap I am working on right now is a little more involved. It's the New Beginnings Mini Quilt Swap that I mentioned HERE. I have never made a mini quilt...well, that might not be entirely true now that I think of it. I suppose you could call mug rugs, table runners and wall hangings mini quilts, right? I've made a few of those, pictured HERE, HERE, HERE and HERE.

Well anyway, I have begun my mini quilt for this swap and wanted to share with you the process as I go along. So here goes...


Tranquility Mini QuiltAlong with the name of my swap partner, I was also given other vital information about her such as her website address. I used that information to determine that she seems to like warm fall-like colors. So I chose a charm pack of Tranquility by Sandy Gervais as my fabric. You may recall that I made a full size quilt using that same fabric last fall and gave it to my sister for Christmas. You can see it HERE.

This being a mini quilt swap, of course I had to cut down the size of the charm squares so I took each one of the 48 squares and cut a 2-inch strip from it and then cut 2 2-inch squares from each strip. So now I have 96 2-inch squares. The remains of each charm square will be saved for another project.


Tranquility Mini QuiltI thought long and hard about a design for this mini quilt. At first I thought I would do an appliqué picture of some sort. Then I thought perhaps I would take a standard quilt block and make that the center of the mini quilt and then add some extra piecing around it to finish it off. But then I had the idea to make a regular quilt design, only in miniature. What an inspiration! And what better design to use than my own! So I did a little figuring and drawing and discovered that I could make a super fun mini quilt using my Rainbow Quilt pattern, 2-inch print squares and 1-inch solid strips. The squares will finish to 1 1/2 inches and the strips will finish to 1/2 inch.

I am going to make this mini quilt nine squares by nine squares and then add a small solid border around the outside edge, making the finished size somewhere around 20 or 21 inches square. I will use the leftover blocks to piece into the backing, just like I do on my full size quilts. You can see pictures of how I piece leftover blocks into a backing HERE. The backing and binding fabric will be the same fabric as the binding on the big Tranquility quilt I made for my sister.

I'm so excited to get started sewing on this project. It will be something like going from making clothing for myself to making clothing for my kids -- big difference in size! I think it will be fun! So stay tuned for more updates as I go along. I'll keep my camera handy so I can share the whole process with you.

Happy Stitching!

Click here to return to HookedOnNeedles.com

Labels: , , , , , ,

Thursday, February 9, 2012

Six More Zippered Accessory Bags

I'm beginning to wonder if I should start looking for a 12 step program for people who can't stop making little zippered bags! I just finished six more and have fabric and matching zippers picked out for at least another four! Take a look at this collection and see how fun and functional these little bags are...


Six More Zippered Accessory BagsAren't they just great? They are also headed over to my Etsy shop in case you are looking for them or any of their little zippered friends!

Besides sewing, I've been making great progress on my crocheted scrap afghan. This one is being stitched lengthwise so each row takes longer to complete and turning it is starting to become an issue! It's heavy! I only have 3 more partial skeins of yarn to add to it and then it will be finished and ready to keep someone warm and cozy!

Swap partners for the New Beginnings Mini Quilt Swap over at Quilting Gallery have been sent so I can finally start stalking my partner and see if I can learn a little about what she likes before I decide what colors, fabrics and design I will use for my mini quilt. This will be fun! I'm pretty sure she does not read Hooked On Needles, so I feel safe sharing this project as it is in the works. But even if she does follow me, how would she know what I make is for her? That's the fun of a secret swap! I'll let you know as soon as I get started.

I hope you have been working on a project that makes you happy too!

Happy Stitching!

Click here to return to HookedOnNeedles.com

Labels: , ,

Saturday, February 4, 2012

More Zippered Accessory Bags

It's been a busy week here mostly with school activities with my children, but I did manage to spend a little time in my sewing room. These little zippered bags are too fun to stop making! Here are a few more I have finished...


More Zippered Accessory BagsYou might recognize the fabric in these first three bags as being the same as what I used in my Petite Point Flowers table runner pattern. It's called Celebrate Spring by Sandy Gervais and I had a nice selection of charms and some yardage left in my stash.


More Zippered Accessory Bags


More Zippered Accessory BagsCelebrate Spring Bag #2


More Zippered Accessory Bags


More Zippered Accessory BagsAnd Celebrate Spring Bag #3...aren't they so cheerful?


More Zippered Accessory Bags

More Zippered Accessory BagsThis little bag was made using the last of the leftovers from Elizabeth's Cheap Talk cinch sack that I made for her to use on our trip to New York City which was now almost two years ago. This fabric was from Connecting Threads and it is just so cute!


More Zippered Accessory Bags


More Zippered Accessory BagsThis bag uses more of my Fandango leftovers and is a bit bigger than the other bags, but still small and quite a useful size.


More Zippered Accessory Bags
These bags will show up in my Etsy shop very soon along with a few others that I hope to make this week. I've already picked out fabrics and zippers so now all I need is time!

Happy Stitching!

Click here to return to HookedOnNeedles.com

Labels: , , , , , ,


Newer Posts Home Older Posts
Copyright ©2010 HookedOnNeedles.com. All rights reserved.