Task lighting is so important when doing the kind of work we quilters, embroiderers, crocheters, knitters, any-kind-of-handworkers do. If you can't see it, chances are it won't turn out so well. Many years ago, about 25 in fact, we purchased our first home and at the same time, I made a very untimely investment in my first and so far only sewing machine. I guess it turned out to be a good investment after all! The basement room where I set it up was quite dark, so I also invested in a task light that could clamp onto my sewing table. I used it almost daily until just recently when the little plastic thingy into which the lamp post went cracked. The plastic thingy could no longer support the lamp and without it, the lamp was dead. Here's the dead lamp...
 Very sad. The really sad part is that the lamp itself worked just fine, but it didn't do me any good spread out on the table.
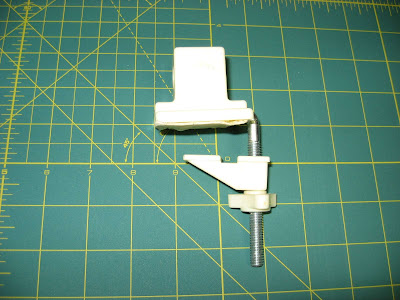 This is the clamp that came with the lamp. It worked great for pretty close to 25 years which, now that I look at it, really surprises me.
 I don't know if you can see it, but there is a little vertical crack just to the left of where the metal piece goes into that upper piece. This crack causes the lamp to lean over too far and be very unstable. So I came up with an inexpensive, very stable, still portable solution that has brought this old faithful dead task lamp back to life again.
 I purchased a four inch C clamp and a package of leg tips from my local Home Depot store.
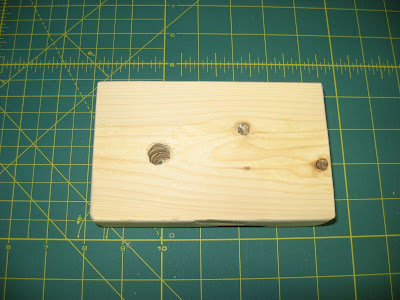 I dug around in our scrap wood bucket and found this perfect length of 2 by 4, into which I drilled a 1/2 inch hole about an inch and a half from one end. I chose the end away from the knots since they are hard to drill through.
 See? You can see right through it! I sanded the block of wood and rounded off all the edges so there would be no roughness to catch on my fabric. I love using my power tools! For this project I got to use my drill and my palm sander. Fun!
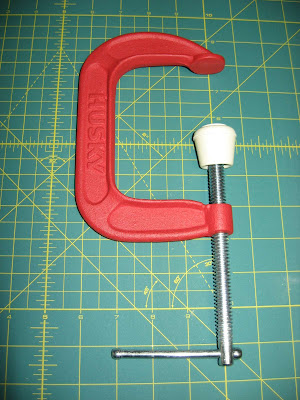 I took one of the leg tips, which are those rubber cup-like do-dads that you put on the bottom of chair or table legs to protect your floors, and I put it over the metal part of the clamp to protect the underside of my table.
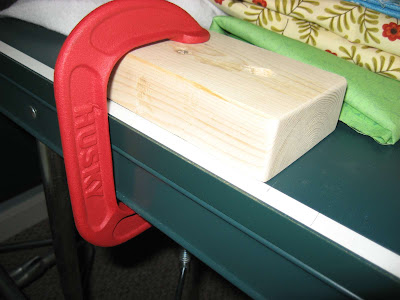 I then clamped the block of wood onto the side of my ping pong table, which is my large flat workspace for cutting fabric. Notice the thickness of the edge of the table. This, along with the thickness of the wood block is why I needed a four inch C clamp instead of one of those super cool ratcheting clamps.
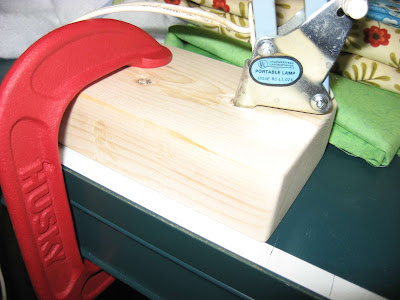 Then I set the post of my lamp into the hole I had drilled in the wood block and plugged it into the wall socket that is just to the left of the table.
 And now my cutting table has a task light that isn't going anywhere anytime soon! Don't you love being able to salvage an old favorite? I hope I get at least another 25 years out of this one!
Happy Stitching!
 Click here to return to HookedOnNeedles.com
 Very sad. The really sad part is that the lamp itself worked just fine, but it didn't do me any good spread out on the table.
  This is the clamp that came with the lamp. It worked great for pretty close to 25 years which, now that I look at it, really surprises me.
  I don't know if you can see it, but there is a little vertical crack just to the left of where the metal piece goes into that upper piece. This crack causes the lamp to lean over too far and be very unstable. So I came up with an inexpensive, very stable, still portable solution that has brought this old faithful dead task lamp back to life again.
  I purchased a four inch C clamp and a package of leg tips from my local Home Depot store.
  I dug around in our scrap wood bucket and found this perfect length of 2 by 4, into which I drilled a 1/2 inch hole about an inch and a half from one end. I chose the end away from the knots since they are hard to drill through.
  See? You can see right through it! I sanded the block of wood and rounded off all the edges so there would be no roughness to catch on my fabric. I love using my power tools! For this project I got to use my drill and my palm sander. Fun!
 I took one of the leg tips, which are those rubber cup-like do-dads that you put on the bottom of chair or table legs to protect your floors, and I put it over the metal part of the clamp to protect the underside of my table.
  I then clamped the block of wood onto the side of my ping pong table, which is my large flat workspace for cutting fabric. Notice the thickness of the edge of the table. This, along with the thickness of the wood block is why I needed a four inch C clamp instead of one of those super cool ratcheting clamps.
  Then I set the post of my lamp into the hole I had drilled in the wood block and plugged it into the wall socket that is just to the left of the table.
  And now my cutting table has a task light that isn't going anywhere anytime soon! Don't you love being able to salvage an old favorite? I hope I get at least another 25 years out of this one!
Happy Stitching!
Click here to return to HookedOnNeedles.comLabels: handy helper, task lighting
posted by Mary Grace McNamara on Saturday, September 25, 2010
![]()
![]()


3 Comments:
Bravo!!
By Nancy, At
September 26, 2010 at 5:05 PM
Nancy, At
September 26, 2010 at 5:05 PM
You sound like a make-it-do kind of woman. Very inovative. In this throw away world, I am proud of you for making your light last a little bit longer.
By Nedra, At
September 26, 2010 at 6:27 PM
Nedra, At
September 26, 2010 at 6:27 PM
I have one of those same lamps and I bet it is twenty plus years old. It is still holding up. I admire your wood skills - I would not know the first thing about using a drill or sander - sad I know!
By annemarie, At
September 26, 2010 at 8:15 PM
annemarie, At
September 26, 2010 at 8:15 PM
Post a Comment
Subscribe to Post Comments [Atom]
<< Home