Hooked on Needles


Saturday, April 4, 2020

Fabric Face Mask ~ Picture Tutorial

A few people have asked me to share how I make homemade fabric surgical type masks, so today I will share a picture tutorial for a very easy version of how to make a mask.

Materials:

2 pieces of 100% cotton fabric, 8 inches by 7 inches, fits average adult, but if you have a bigger or smaller head, adjust accordingly. Also I've been hearing that those who are wearing these masks like them made with two different fabrics so they know which side is on the face and which side is exposed. Good idea, I would say.
13 inches of 1/4 inch elastic for hooking to ears, but if you plan to hook to pony tails or buns, or to buttons on a headband, you might want to make the elastic a little longer. I have also seen where some people are hooking the elastic together with a large paperclip at the back of their head. This saves the skin on the back of the ears from breakdown.

That's it for materials, just two pieces of fabric and a length of elastic cut in half. A sewing machine with heavy duty or denim needle, pins, a ruler and iron are useful tools as well. Let's get started!


Cut your fabric of choice into two rectangles. For my mask, I used fabric cut to 8 inches by 7 inches. The 8 inch side goes across the face and the 7 inch dimension goes from under chin to over the nose. Make any adjustments to your own measurements as needed.


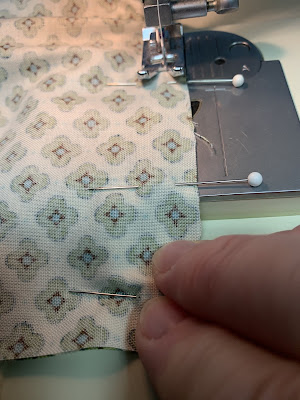
Cut your elastic in half so you have two pieces about 6 1/2 inches long each. That's the size I used for mine. Again, depending on how you plan to wear your mask, or how big your head is, make adjustments accordingly. Pin one end of each elastic piece about 3/8 inch below the top of the 7 inch side of fabric as shown. Be sure you are pinning elastic to the right side of the fabric.


Bring the other end of each elastic to the bottom of the 7 inch side and pin in place about 3/8 inch from the bottom edge as shown.


Now place the other piece of fabric onto the piece with the elastic pinned to it, right sides together. Line up corners and re-pin. The 8 inch sides should match and lie flat, but the 7 inch sides will not lie flat because the elastic is shorter than the fabric on each side.


Pin both layers of fabric together all around with raw edges even, as shown.


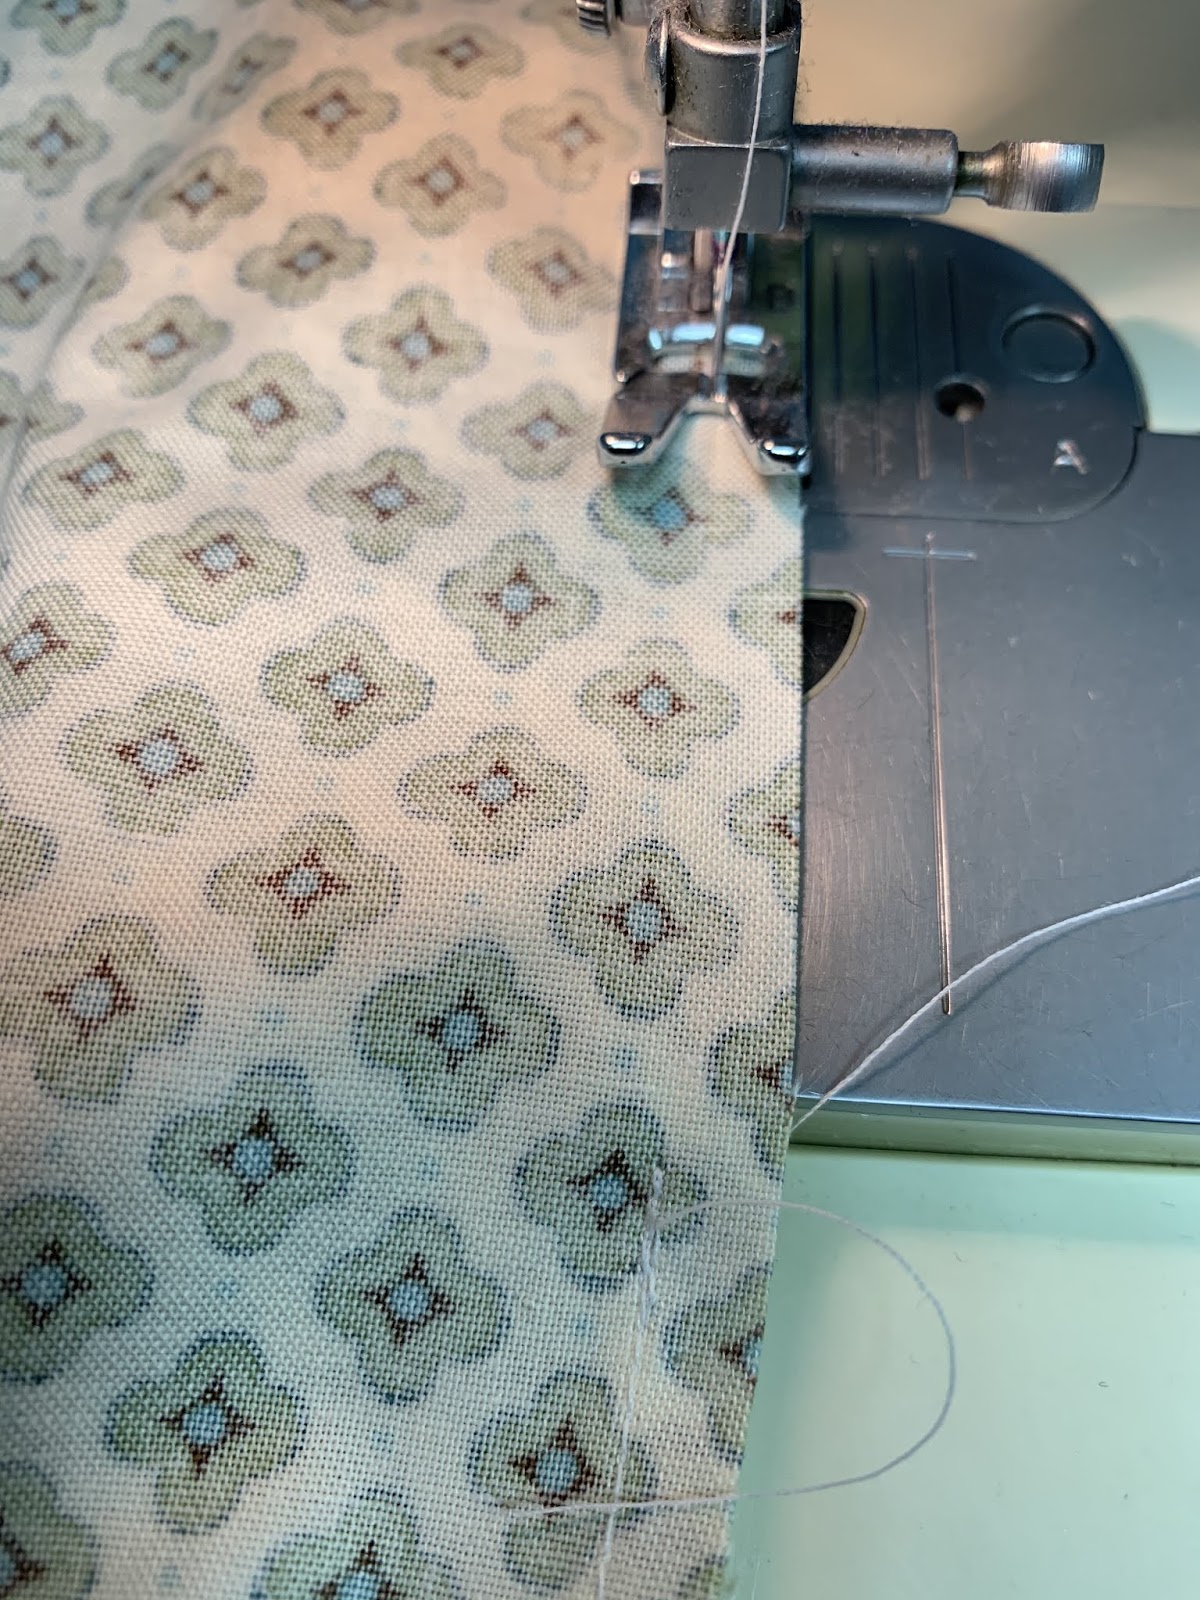
Stitch around the mask with a 1/4 inch seam allowance, starting about two inches from a corner on an 8 inch side with a few backstitches...


...pivoting at corners and adjusting the fabric along the 7 inch side so it stays together. Remember the elastic is shorter than the fabric so you have to sew a little, then adjust and sew some more to accommodate the shorter elastic. Once you do it, you will see what I mean.


Once you have sewn all around the rectangle, stop stitching about two inches from the last corner and back stitch a few stitches to lock your stitches, leaving an opening to turn the mask right side out.


Your mask should look something like this picture at this point.


Clip all four corners to reduce fabric bulk in the corners. Be careful not to cut the stitching!


Now turn the mask right side out through the opening that you left in the 8 inch side. Poke out the corners so they are sharp and press all edges. You can see now that the elastic comes out just below and above the corners on the 7 inch sides and the little opening is pressed neatly along with all the sides. Don't press the elastic or it might melt! You could ask me how I know, but I'd rather you didn't!


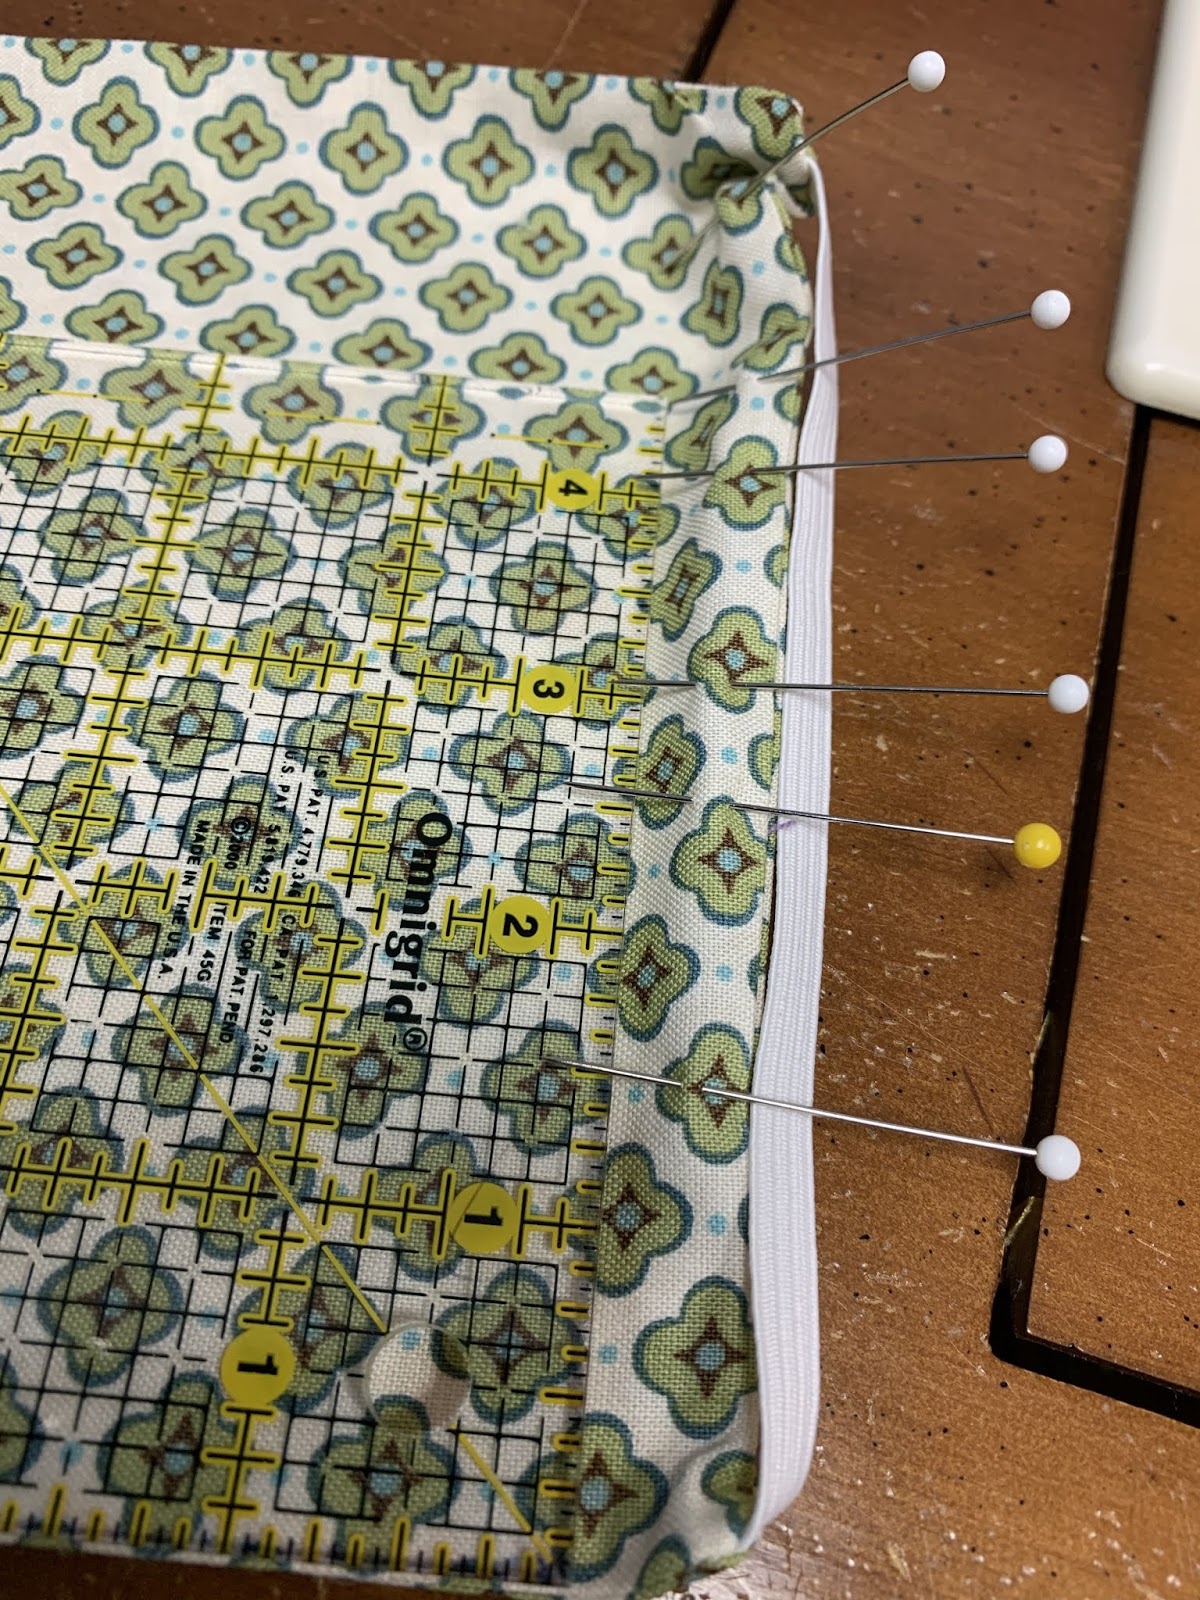
Now it's time to make the pleats in the sides between the elastics. Some people wing it and just pin three pleats on one side and three on the other. I prefer to measure and mark my pleats. You do what works for you, but here is how I do it. Starting from the bottom of the 7 inch side and using a ruler for a guide, place a pin at these marks: 1.5, 2.5, 3, 4, 4.5, 5.5 inches. This will give you three 1-inch spaces with a 1/2 inch space in between them.


Then do the same on the other side only starting from the top, because you need the markings to line up with each other from side to side so your pleats will be straight.


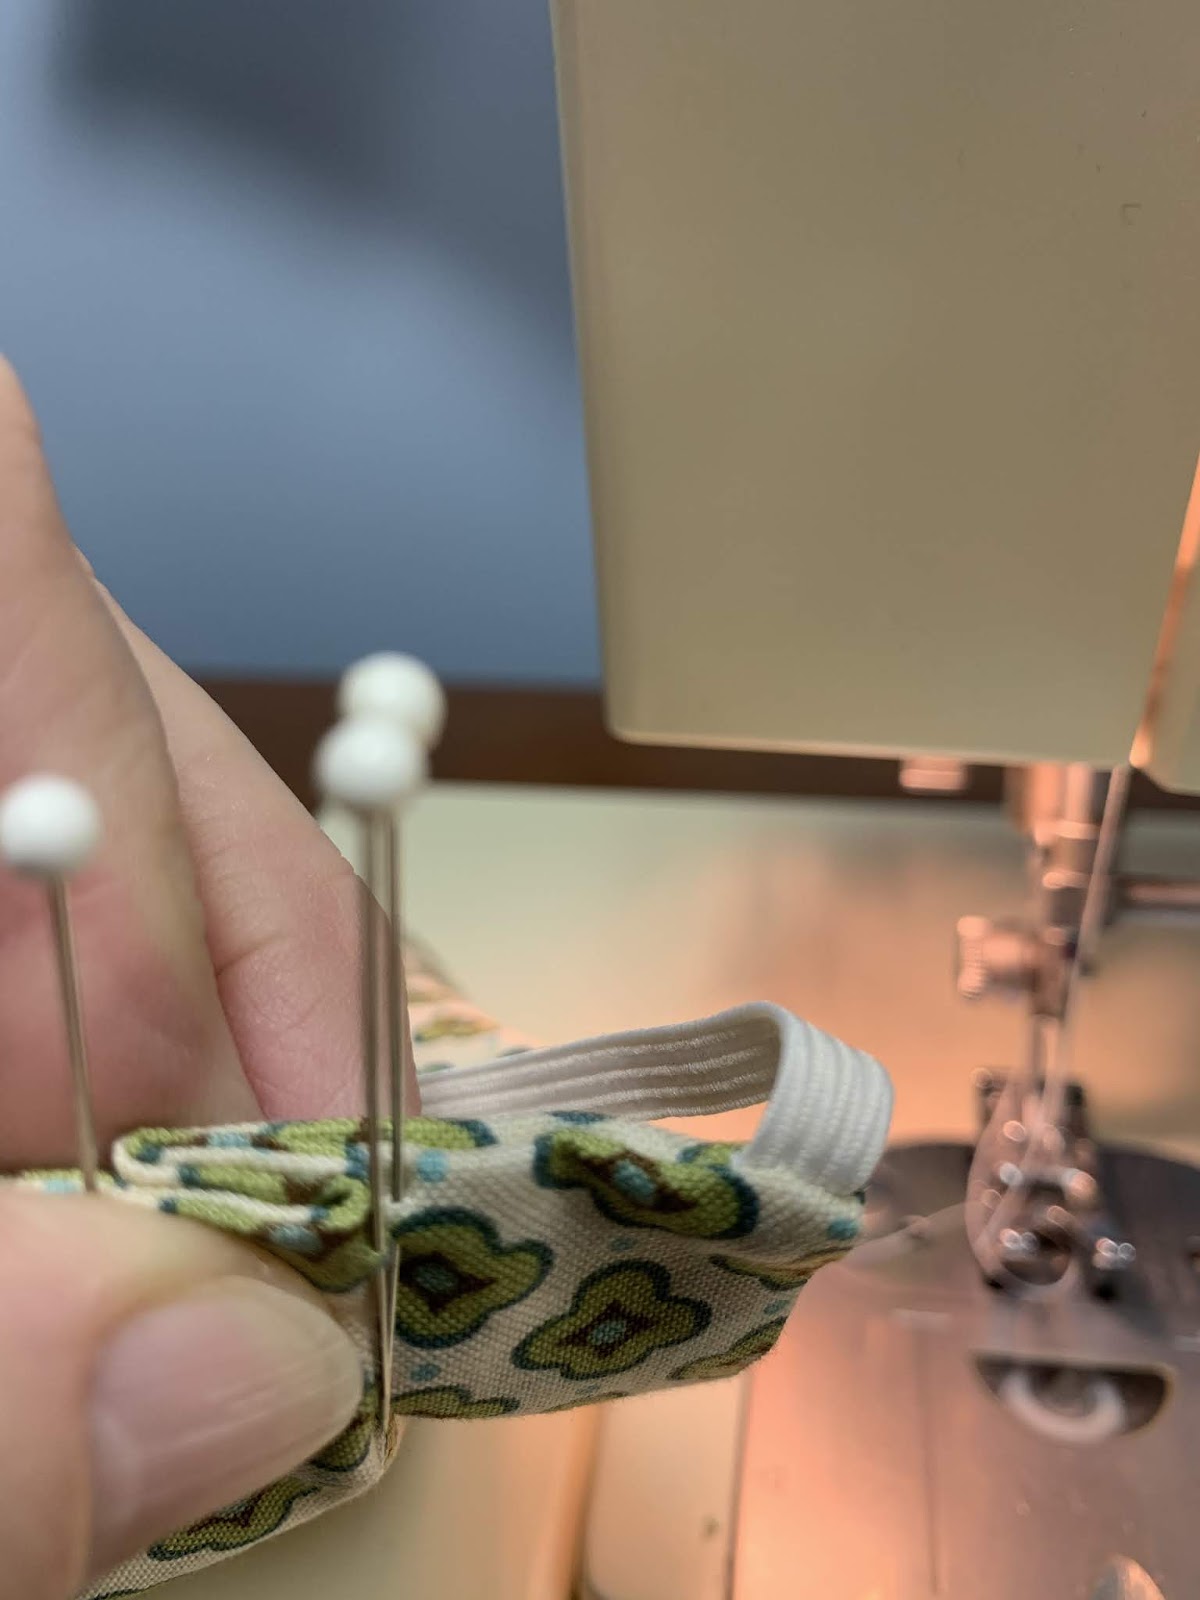
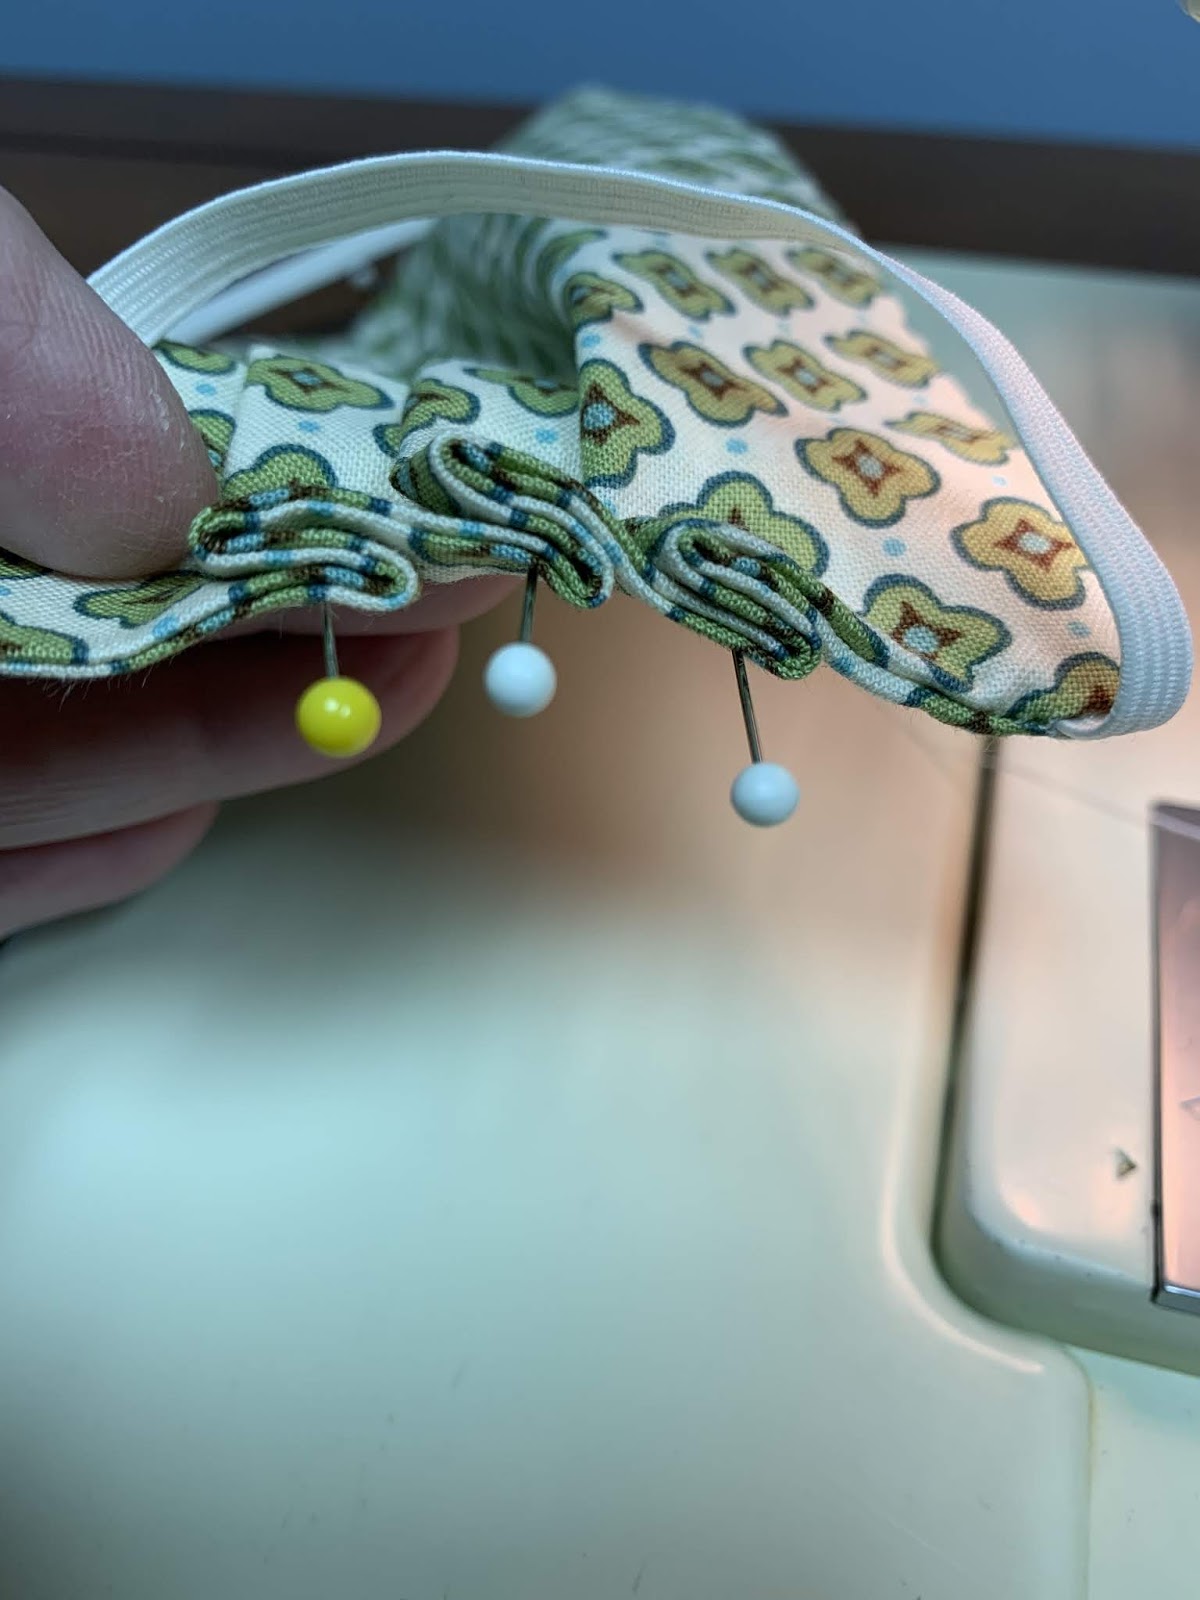
Bring the first two pins that are 1 inch apart together, making a pleat. The fold of the pleat should be right at the next pin marker. Pin this pleat in place.


Make the next two pleats in the same way, pinning them in place as you go.


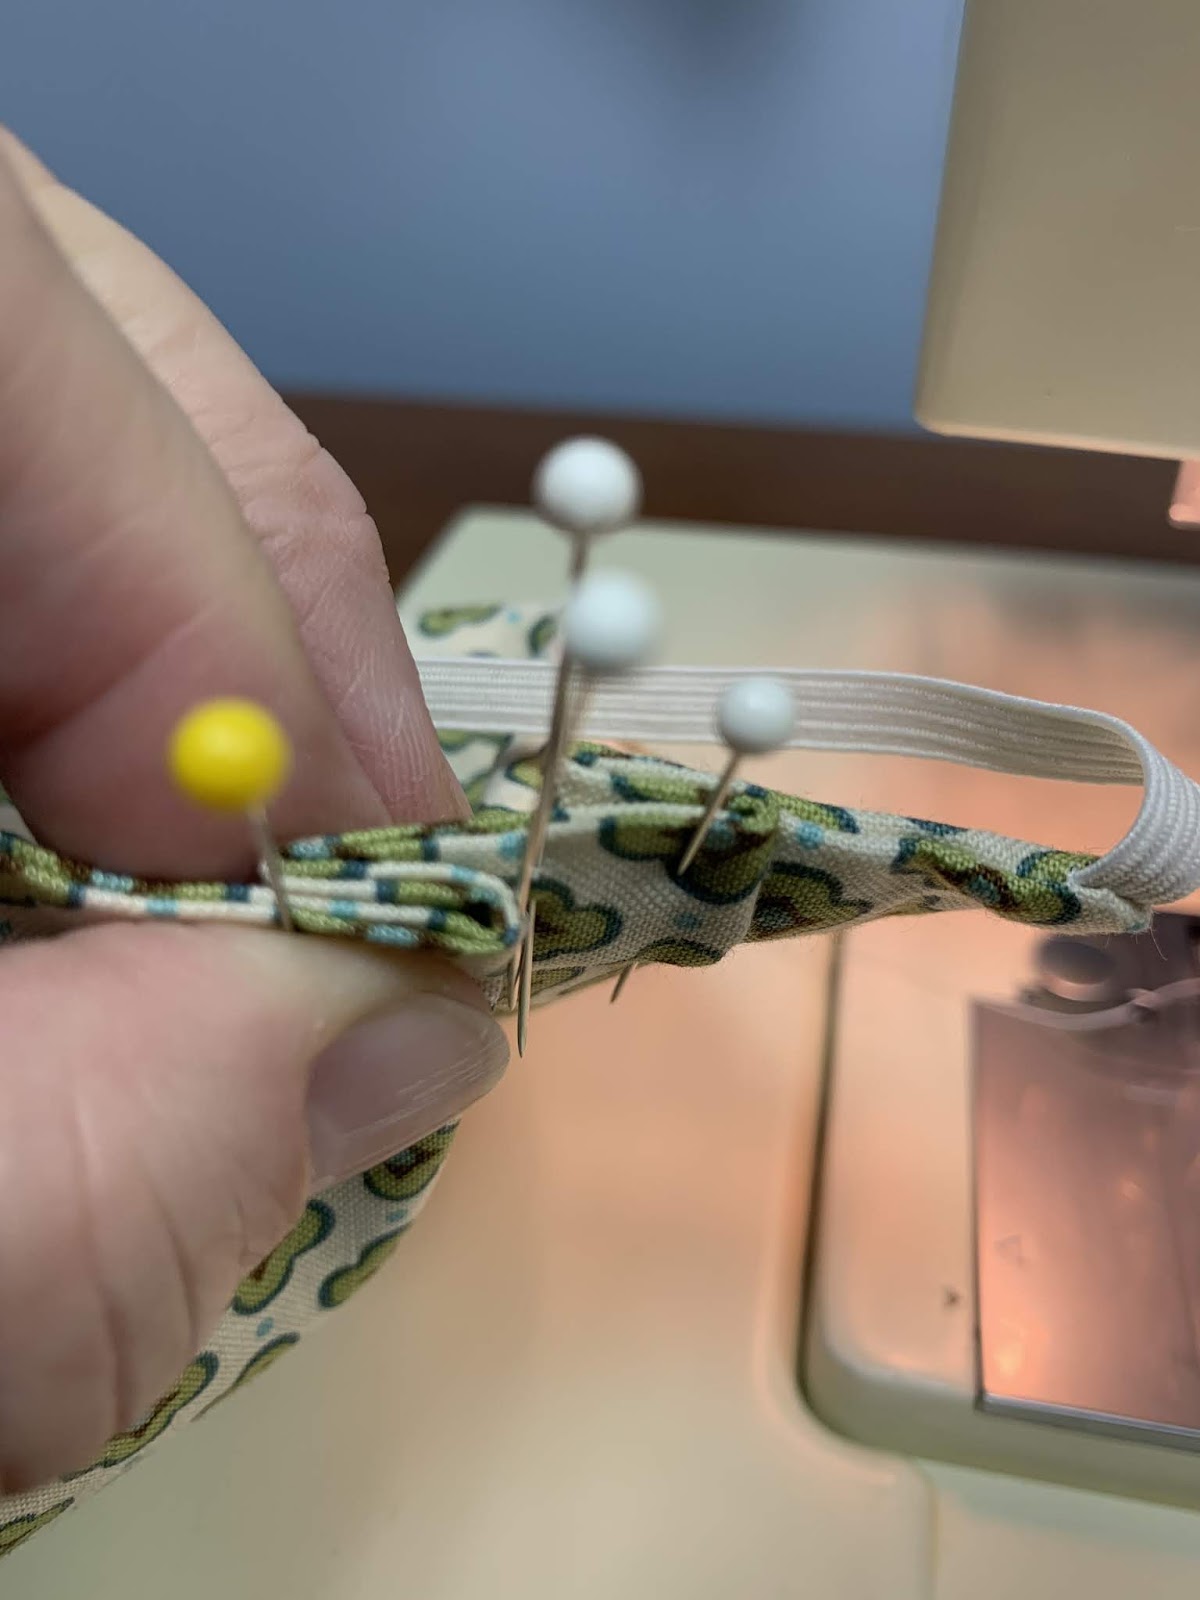
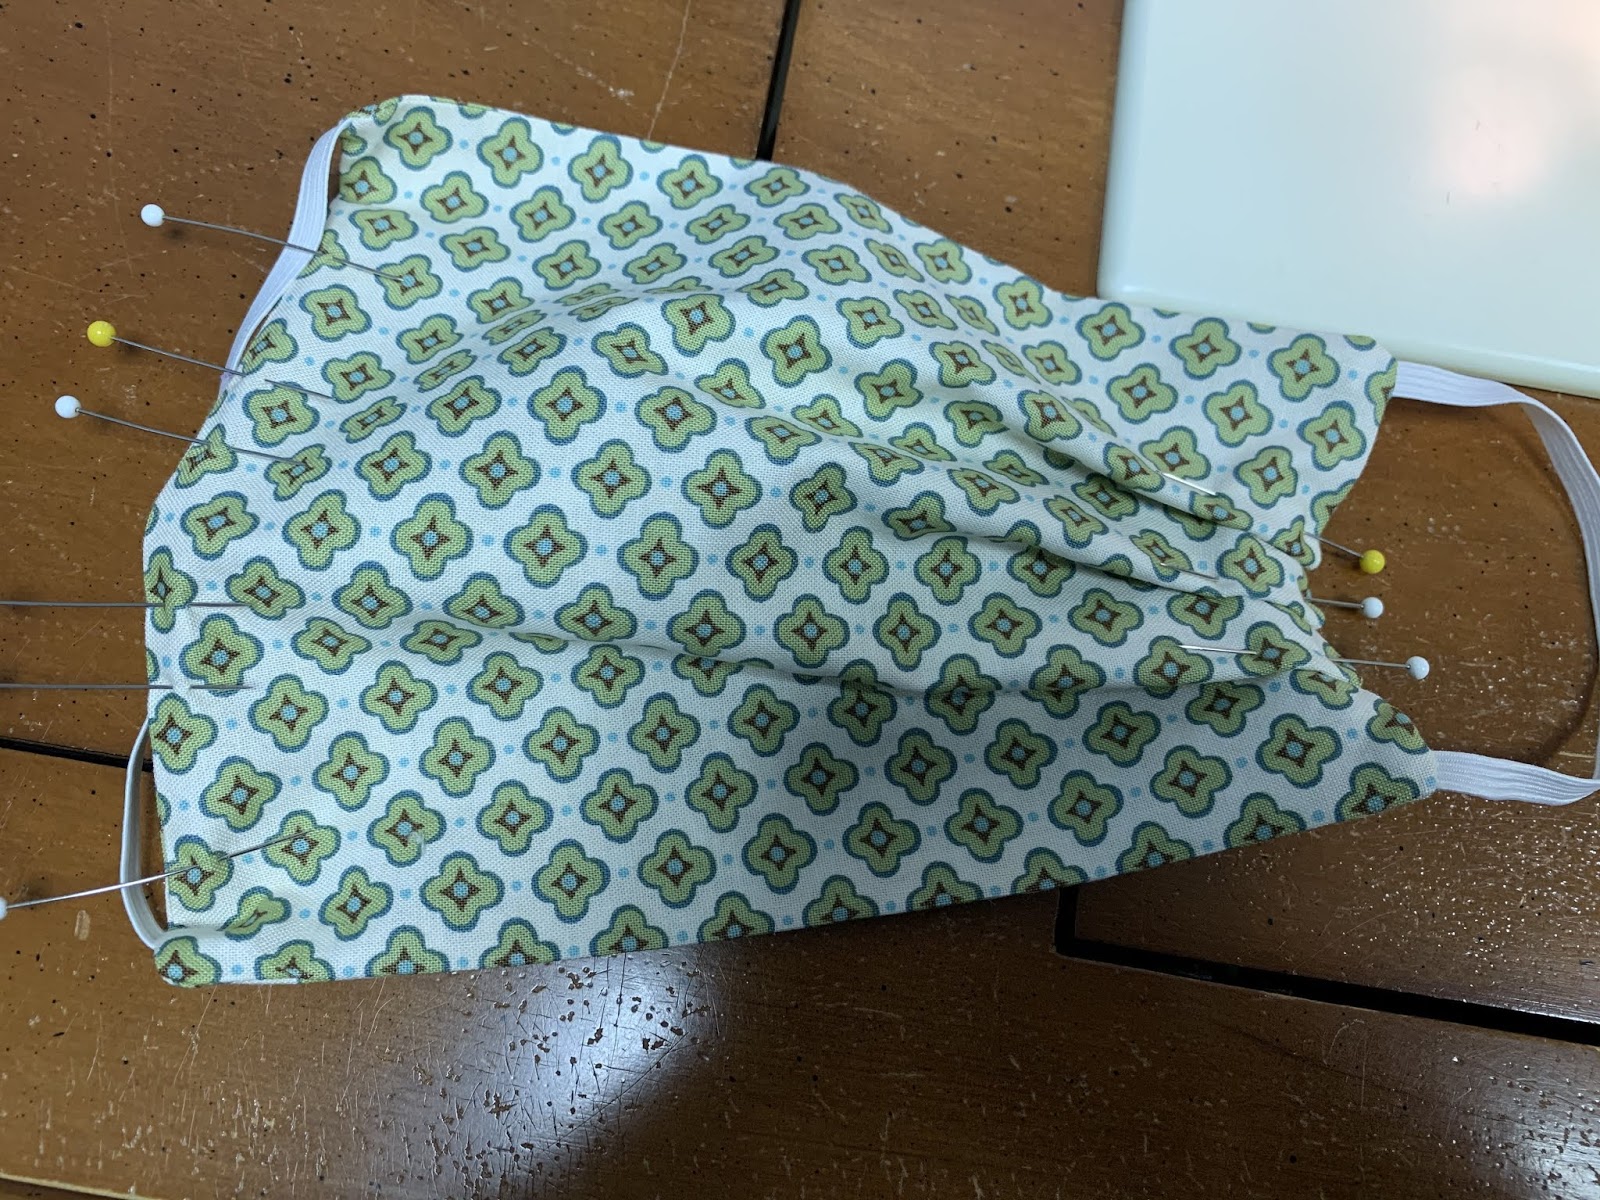
This is what it should look like when you have all three pleats pinned.


Now you have pleats on one side and no pleats on the other side. Time to fix that!


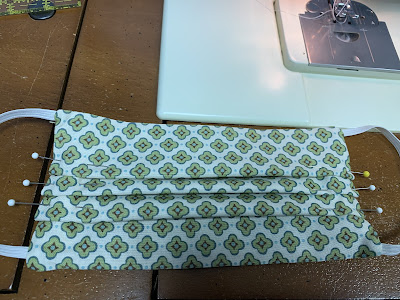
Do the same with the other side, bringing the 1-inch spaced pins together, fold even with the next pin, pin pleat in place and move on until all three pleats are pinned. Make sure the folds are straight across the mask and the pleats are even.


Now it's time to stitch those pleats in place! This is where I like to have a heavy duty needle in my sewing machine since it is hard work going through all those layers of fabric where the pleats are.


Stitch around the entire edge of the mask, about 1/8 inch from the outside edge, pivoting at corners. If you like, you can go around a second time 1/8 inch in from first stitching to secure the pleats. This stitching will finish off the mask and close the opening where you turned the mask.


Ta Da! That's it! A homemade fabric mask!

I have made about 50 of these at the request of my oldest daughter for some of her friends who work in local hospitals and other essential facilities. Elastic is sold out everywhere now unfortunately. I did make a mask using ribbon instead of elastic, but I did not like how it turned out and how hard it was to get it secure on my head, so I abandoned that idea. There are lots of creative ideas out there for different ways to secure these masks to your face, so find a way that works for you and go for it. This tutorial can be adjusted for size and materials, but the basic construction method will be the same.


Happy Stitching!

Click here to return to HookedOnNeedles.com

Labels: , , , , , , , ,

Wednesday, August 7, 2019

Dune Afghan ~ Finally on the Attic24 Bandwagon!

When I first started Hooked On Needles back in June of 2008, it became apparent very quickly that there were a lot of other creative people out there loving yarn and hooks and fabric and needles and color and all things creative. One of the blogs I landed on was written by a lady from England named Lucy who lives in an attic and she was a relatively new crocheter at the time. Lucy was also a relatively new blogger, having started her own blog Attic24 in March of the same year. Lucy shared beautiful photos of her home and town and crochet projects and rain boots and all sorts of colorful things. If you've never strolled through Lucy's world, you really should. It's just lovely.

Over the years, I popped into Lucy's Attic regularly to read about her adventures and see what she was working on. I even made use of one of her afghan patterns to make the blue/purple/white cozy afghan seen in this post for a friend of mine to give to her daughter.

Lucy's blog has continued to be a delightful respite over the last 11 years, full of color and creative crochet ideas. A while ago, she started working with a yarn manufacturer putting together her yarn choices for her different blankets so that her fans from all over the world could take advantage of her creativity and make their own blankets using the same yarns and colors. I resisted for as long as I could, even though each blanket seemed to be more appealing than the last. Then Lucy introduced her Dune blanket and I could resist no longer! As soon as it was available for purchase, I put in my order and look what showed up on my doorstep...


...the Dune blanket yarn pack complete with full-color printed pattern, with all the yarn needed to complete the blanket, all wrapped up in the sweetest organza drawstring bag. Wool Warehouse does a great job packaging and shipping these little bundles of joy! While I was at it, and since I was already paying shipping, I went ahead and splurged even more by ordering an earlier yarn pack and pattern for Lucy's Cupcake blanket. The colors are just about delicious enough to eat!


After allowing these lovely packages to rest a bit from their long journey across the ocean, I broke open my Dune pack and used my handy dandy yarn ball winder to wind each of the 15 balls of yarn into center pull cakes. I rolled up the ball band and tucked it into the middle of each cake so I could reference it for the color name. Then I stacked them into a covered bin to keep them neat and tidy. When I started working on the blanket, I took one cake out at a time and put it back when I was finished with that color stripe. After a few stripes, I realized that leaving the cakes unwrapped like this was not going to be practical. I needed to package each cake individually to help keep it neat and tidy throughout the process of crocheting this afghan. So I took regular plastic bags, the kind that come with the little sheet of twist ties, and wrote the name of one color on each of 15 different bags with a big permanent marker. Then I placed each cake into its own bag and loosely closed it with the twist tie, leaving the tail of the yarn hanging out. After doing this, the yarn stayed much neater in the box and was easier to move in and out of the bin without the cake falling apart.


I had never used Stylecraft Special DK yarn before, and I am pretty sure it was love at first sight! The colors are luscious and the yarn feels so nice in my hands. I started working on my Dune blanket and loved the pattern right away.


It was easy to get into the 4-row-repeat groove of this pattern, and before long I was well on my way.


This picture shows the front, or what I call the front, of the afghan. It is the side which shows the right side of the shell stitches. Some people in the Hooked on Attic24 Facebook page, where many of the fans of all things Lucy and Attic24 gather to discuss their colorful projects, like the other side better as the front because it looks more like actual shells than this side does.


In this picture you can see both sides of the blanket, my front on the top and my back on the bottom of the picture.


There was some discussion of starting each color stripe from the opposite end of where the previous stripe was started. Would that change the overall look of the afghan? Would it resolve the problem some people were having with their woven-in ends causing one side to feel more bulky than the other side? I decided to do a little short-row experiment to find out for myself. In the picture above, you can see that the tails for each short color stripe alternate sides. But can you really notice the difference in the actual stitches of each stripe?


This picture shows the same short rows of my experiment, only from the other side. What do you think? I can tell the difference, but then I've been crocheting for over 45 years. I don't really think the average person would notice.


I also didn't seem to have a problem with the side where the ends are woven in feeling or looking any more bulky or stiff than the other side. This picture shows the front of the afghan along the edge where the ends were woven in. Oops, I just noticed I took the picture of the afghan upside down!


And this is the back side of the afghan along the edge where the ends are woven in.

Once the color stripes are finished, 100 in all according to Lucy's pattern for a full size afghan, there is a lovely four-round border that encircles the whole thing, so even if your edges aren't perfectly straight and neat, the border should help to even out the finished project.

Next time, I will share pictures of the completed afghan and my thoughts on using this Stylecraft yarn for the first time.


Happy Stitching!

Click here to return to HookedOnNeedles.com

Labels: , , , , ,

Sunday, May 26, 2019

Pillow Quilt Picture Tutorial

Last time, I shared a little story about my sister asking me to make 27 of these Pillow Quilts, or Quillows, to give to her grandchildren for Christmas. At the end I said I would share a tutorial in case you would like to make one, or ten or a hundred, for yourself or for gifts. They are quite easy to make as long as you have basic sewing skills and tools.

Shall we get started? Just click that bar down a little further that says "click here to read whole post and comments" and you will find the rest of this post with step-by-step instructions and pictures to guide you.


Materials needed for one pillow quilt measuring approximately 42 inches by 58 inches:
  • 4 yards of quilting fabric, either in a single cut of one fabric or two 2-yard cuts of coordinating fabrics
  • crib size batting - I used Mountain Mist Soft, Medium-Loft Batting, 45x60 inches
  • coordinating thread
  • cutting mat, rotary cutter and straight edge
  • long quilting pins
  • sewing machine

Pillow Quilt Picture Tutorial
The blue ballerina print fabric is going to be the front of my quilt and the pocket, and the pink fabric is going to be the back of my quilt, so I have two yards of each fabric.


Pillow Quilt Picture Tutorial
With fold of fabric towards you, line up fold with straight edge of mat and trim off any uneven edge taking off the least amount of fabric possible, squaring up the cut edge of the fabric.


Pillow Quilt Picture Tutorial
Still with fold of fabric towards you and even with the ruler edge of your cutting mat, cut a 16 inch length of print fabric from fold to selvedge. Then make another cut, this time horizontal and parallel to the fold, 16 inches from the fold. This double layer square will be the pocket that the whole quilt will fold up into to become a pillow. That little rectangle of fabric at the top of the picture is your only piece of scrap from the print fabric.


Pillow Quilt Picture Tutorial
Square up the other cut end of print fabric as before, then measure remainder of print fabric and make note of that measurement so you will be able to cut your backing fabric to match. In my example, the remainder of the print fabric measured 59 inches.
  • If you are using the same fabric for front and back of quilt, cut two 60-inch lengths of fabric from what is left after pocket is cut. You should end up with a small piece of fabric leftover to save for another project, about 8 inches or so.


Pillow Quilt Picture Tutorial
If you are using a solid or coordinating fabric for the backing, lay that fabric out on the cutting mat. Now square up the cut end of the backing fabric just as before. In my example it is the pink fabric.


Pillow Quilt Picture Tutorial
Cut a length of backing fabric to match the length of the print fabric. In my example it is 59 inches.


Pillow Quilt Picture Tutorial
Open up and lay out quilt top with one cut end toward you and right side facing up. Place pocket piece onto quilt top matching cut end of quilt top with cut ends opposite fold on pocket piece. Determine if your print fabric is directional or not by comparing how the design on the pocket piece looks in this orientation compared to the design on the quilt top. If direction is not an issue, as it is not in my example, turn pocket piece right sides together and stitch up the two sides of the pocket using 1/4 inch seam allowance, leaving the bottom edge opposite the fold open for turning. If direction of print is an issue, then turn pocket piece until the print direction on the pocket matches the print direction on the quilt top. Note which raw edge is matched to the raw edge of the quilt top, and stitch the other two raw edges in an "L" to form the pocket. Just be sure to leave one side open for turning.


Pillow Quilt Picture Tutorial
Clip the corners of the seam allowances to reduce bulk after turning. Turn pocket right side out and press all seams flat.


Pillow Quilt Picture Tutorial
With raw edges towards you, fold pocket in half and press a center crease into the raw edge. This will allow for easy placement in center of quilt top.


Pillow Quilt Picture Tutorial
Place pocket onto quilt top, matching center creases and raw edges.


Pillow Quilt Picture Tutorial
Pin along raw edge...


Pillow Quilt Picture Tutorial
...then stitch only along raw edge to attach pocket to quilt top. The other two sides of the pocket will be stitched later, after blanket is complete and quilting is done.


Pillow Quilt Picture Tutorial
You can safety pin the pocket to the quilt top to keep it from flopping around if you want to. Just make sure the pocket is flat to the quilt top and the safety pin is on the right side of the quilt top, otherwise you won't be able to remove it later.


Pillow Quilt Picture Tutorial
Now lay out the backing fabric you cut earlier, right side up.


Pillow Quilt Picture Tutorial
Layer the quilt top, right side down, onto the backing piece. The pocket will be in between the backing and the quilt top. Match raw edges, center creases and selvedges as much as possible. Sometimes fabrics are different widths, so selvedges may not match completely and that's ok. Later the selvedges and extra batting will be cut off.


Pillow Quilt Picture Tutorial
This is the batting I used for my pillow quilt. You can also piece together scraps leftover from larger projects as long as they are all the same, or cut a piece from a larger batting. Another option is to use an old fleece blanket or piece of fleece that is no longer usable by itself. Whatever you decide to use for batting, lay it over the fabric.


Pillow Quilt Picture Tutorial
I liked using the crib size batting as it was so easy to unroll onto the fabric. I lined up the batting with the raw edge of the fabric and started to unroll it...


Pillow Quilt Picture Tutorial
...I kept unrolling it...


Pillow Quilt Picture Tutorial
...until it was flat on top of my fabric.


Pillow Quilt Picture Tutorial
Now pin all layers together all around the quilt. You can see in this picture that my selvedges don't meet, so the pins are well inside the innermost selvedge. This is where you want to stitch so that all the selvedge can be removed leaving about a 1/2 inch seam allowance.


Pillow Quilt Picture Tutorial
You may have an overhang of the batting on one end.


Pillow Quilt Picture Tutorial
If you do, just trim it off even with the raw edge of the fabric. You can save the scrap for other projects.


Pillow Quilt Picture Tutorial
In the center of the short end opposite the end where the pocket is, I removed two of the pins that were about 8 inches apart and placed them perpendicular to the other pins. These pins will mark the beginning and ending of my stitching, leaving an opening for turning.


Pillow Quilt Picture Tutorial
Now bring all three pinned layers to the sewing machine and start stitching at the horizontal pin closest to you. Be sure to backstitch a few stitches once or twice to secure the beginning of your stitching, then start stitching around the quilt leaving at least a 1/2 inch seam allowance from the raw edges or the inside of the selvedges.


Pillow Quilt Picture Tutorial
Remove the vertical pins as they come to the presser foot so you don't sew over them, and continue stitching all around the quilt. In some places, it will seem like you are leaving quite a wide seam allowance, but remember that you have to leave enough to be able to trim off all of the selvedges and still have 1/2 inch left of regular fabric in the seam allowance. Don't worry if it's not exactly perfectly straight and even. That will all get worked out in the turning and once it is quilted and washed and all quilty and fluffy, no one will ever notice a little imperfection!


Pillow Quilt Picture Tutorial
When you get back around to the second horizontal pin, backstitch a few times as in the beginning to secure your stitches and cut thread.


Pillow Quilt Picture Tutorial
Remove the remaining pins in the opening space and push back the lower fabric in that space which is the pink fabric in my example. It's a good idea to stitch the batting to the quilt top fabric in the opening space for ease of closing after turning.


Pillow Quilt Picture Tutorial
Here you can see that the pink fabric has been pushed back out of the way and only the batting and quilt top layers remain.


Pillow Quilt Picture Tutorial
Stitch these two layers together in the 8 inch opening space, using about a 3/8 inch seam allowance so that the stitching won't show when this opening is stitched closed, but the batting will stay in place.


Pillow Quilt Picture Tutorial
Stitch across the opening space, keeping the lower fabric out of the way of stitching, going almost to the end of the opening. Cut thread. This little stretch of stitching will be inside the quilt in the seam allowance when the project is finished so it is not important to backstitch at both ends.


Pillow Quilt Picture Tutorial
Bring your quilt to the cutting mat and trim off selvedges leaving about a 1/2 inch seam allowance on both long edges.


Pillow Quilt Picture Tutorial
Trim all four corners diagonally to reduce bulk in the corners when turning.


Pillow Quilt Picture Tutorial
Now reach into the opening and grab one of the corners on the opposite end of the quilt and pull it through the opening.


Pillow Quilt Picture Tutorial
Keep pulling the quilt out of the opening until the whole thing is turned right side out.


Pillow Quilt Picture Tutorial
The opening will be on one short end of the quilt and the pocket flap will be hanging out the other short end of the quilt.


Pillow Quilt Picture Tutorial
Pin the opening closed making sure that the basting stitches from where the batting was stitched to the quilt top are hidden inside the seam allowance. You may finger press or iron this first if that makes it easier for you to pin, or just go for it!


Pillow Quilt Picture Tutorial
Now stitch the opening closed about 1/8 inch from folded edges. Continue stitching around the entire edge of the quilt, making sure to pull out the folded edges as you go and maintaining the 1/8 inch space between stitching and folded edges. At this point, you can use a neutral thread color on the top and bottom of the quilt, or you may choose to use thread that matches each side as I have done in my example. Because I had a spool of pink and a bobbin of light blue, I stitched with the quilt back facing up and the quilt top facing down. Position your quilt in whatever way necessary to make the best use of your thread.


Pillow Quilt Picture Tutorial
You may also find it easier to pin the edges all around the quilt before stitching, or at least pin the pocket edge so that the pocket flap is pinned to the top side of the quilt. In my example, the pocket was pinned to the blue side of the quilt and the edge stitching went through all layers: backing, batting, quilt top, and the bottom edge of the pocket flap.


Pillow Quilt Picture Tutorial
Continue stitching around the entire quilt until you reach the beginning again. Secure stitches by sewing back and forth a few times.


Pillow Quilt Picture Tutorial
At this point, you can choose to either tie or sew the quilt layers together referring to the batting package for recommended distance between quilting lines or ties. I chose to machine quilt my example by using a longer stitch length and stitching a continuous line in a sort of rectangular spiral design, just eyeballing my stitching line as I went along. You can stitch in any design you like, or tie your quilt using embroidery floss or yarn, or you could even long-arm quilt if you have that option available.


Pillow Quilt Picture Tutorial
This is what my quilt looked like after the quilting was complete. Note that the pocket flap is still hanging loose.


Pillow Quilt Picture Tutorial
Lay pocket flap onto the quilt top and pin the two edges.


Pillow Quilt Picture Tutorial
Stitch edges through all layers of pocket and quilt about 1/8 inch from pocket edges, securing stitches at beginning and end of each stitching line.


Pillow Quilt Picture Tutorial
Here is the pocket stitched to the quilt. Note that the top edge of the pocket is still open as this is where the quilt will fold into to make the pillow.

Your pillow quilt is now complete! Here's how to fold the quilt into a pillow:

Pillow Quilt Picture Tutorial
Lay quilt flat with the wrong side up. Fold one long side into the middle.


Pillow Quilt Picture Tutorial
Then fold the other long side into the middle.


Pillow Quilt Picture Tutorial
Now fold the edge opposite the pocket towards the middle...


Pillow Quilt Picture Tutorial
...then fold it again so that the fold almost meets the top edge of the pocket.


Pillow Quilt Picture Tutorial
Now fold one more time so that the quilt is in a very puffy square-ish shape with the pocket on the bottom.


Pillow Quilt Picture Tutorial
Flip the whole puffy pile over so that the pocket is on the top. Reach into the inside corners of the pocket and grab the quilt and pull it into the pocket, turning the pocket over the quilt.


Pillow Quilt Picture Tutorial
Pull the whole pocket over the quilt, and then reach into the pocket and poke out the inside corners and straighten up the edges to make the pillow smooth and nice.


Pillow Quilt Picture Tutorial
And here you have a cozy compact quilt...


Pillow Quilt Picture Tutorial
...all wrapped up in a pillow!

If you use this tutorial to make a pillow quilt, I would love to know how you liked making it. Please share pictures too! If you have any questions, please don't hesitate to contact me through the comments.

Happy Stitching!

Click here to return to HookedOnNeedles.com

Labels: , , , , ,


Newer Posts Home Older Posts
Copyright ©2010 HookedOnNeedles.com. All rights reserved.