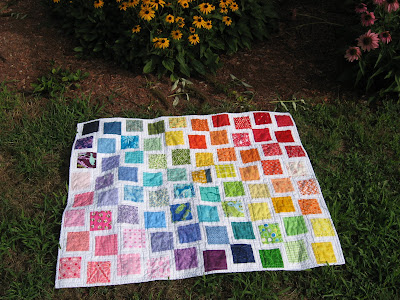
After the rain stops and the sun comes out here on this cold dreary day, I would not be at all surprised to see a rainbow somewhere in the sky. It's so nice to catch a glimpse of those short-lived little gifts after a rainy day. Well, if you don't want to wait for a rainy day, here's a little rainbow you can make for yourself. It's my Rainbow Quilt which I designed and made over the summer, and a few people have asked for a tutorial. You can see pictures of the original Rainbow Quilt by clicking HERE.
Keep on reading for a picture-heavy tutorial to make your own rainbow quilt like this...
Materials I used for my quilt:
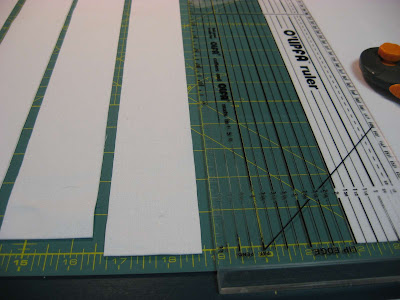 Cut your white fabric into 2-inch strips.
 I used 17 strips, so if you are using squares larger than 4 inches, you will need more strips.
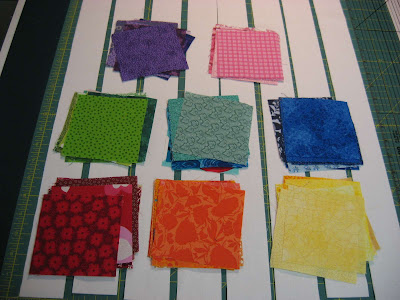 I used 72 4-inch squares from 8 color groups: red, orange, yellow, green, aqua, blue, purple and pink. Of course you can use whatever colors you have on hand, or swap with friends until you get the colors you want, or purchase a fat quarter of each color. My squares were from a swap, so each square is a different fabric.
 To begin chain piecing the sashing to the squares, lay one square face down onto a strip of sashing so that it is just below the selvage and the right side edges are even. Stitch a 1/4 inch seam. Leave this stitched piece on the machine and add the next square...
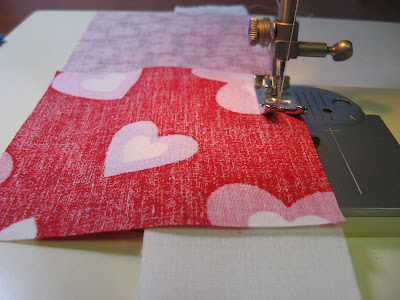 ...and continue stitching...
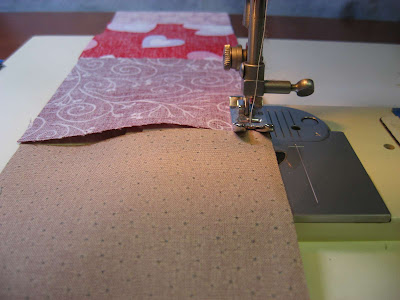 ...adding a new square, face down with right edges even, until ...
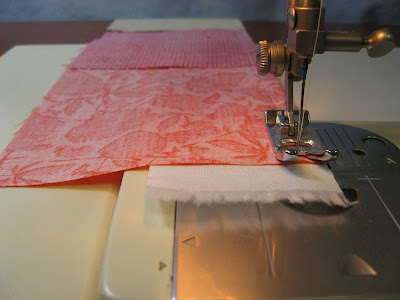 ...you come to the end of the first strip. Start another strip and do the same thing with the remaining squares until all the squares have been stitched onto sashing strips.
 All my squares have been chain stitched onto the strips of sashing.
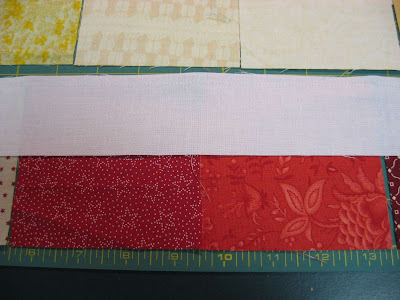 You can see here that each square is right up next to the previous square. This method of chain piecing makes short work of sashing all these squares! I was able to sew 11 squares onto each strip of sashing. Depending on the fabric you are using, you may be able to sew 11 or only 10, but just keep sewing until all the squares have been added to sashing strips.
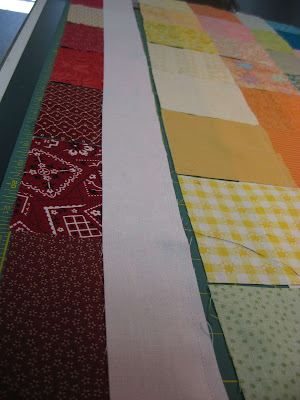 I just thought this was a cool picture!
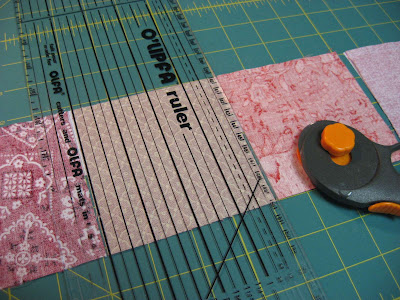 Now lay each strip on your cutting mat with the sashing down and the squares up. Line your straight edge up with the edge of each square and cut through the sashing to separate the squares from each other.
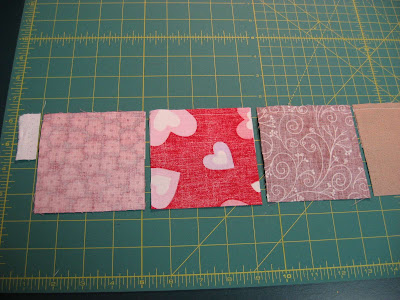 This is what you will get...
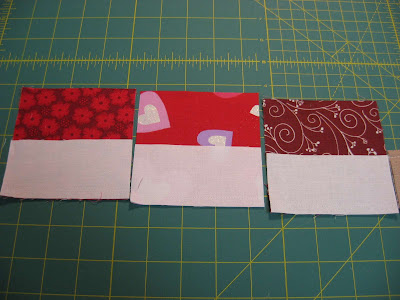 ...and this is how the squares will look from the other side.
 You will end up with a pile of 72 squares with one piece of sashing attached to each.
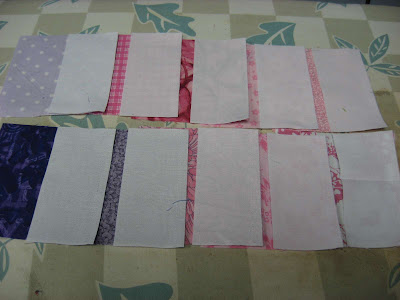 Line these squares up on your ironing board, overlapping to conserve space, and then press the seams to set them. This is done before you open the seam, and it makes each seam press to the side much nicer. I never believed it would make a difference when I would see other people taking this extra step, but it really does, so I recommend it.
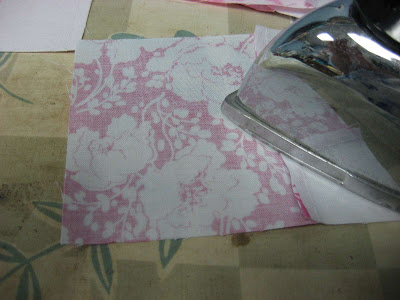 Then take each square individually and press the seam towards the colored square. All seams will be pressed towards the colored squares so they will not show through the white when the quilt is finished.
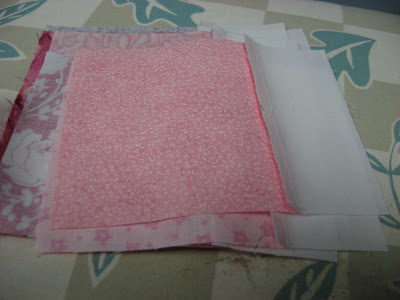 When you are finished pressing, you will have a colorful stack of rectangles with all seams pressed towards the color. (Please excuse my icky ironing board cover...I'm getting a new, oversized, rectangular top for my ironing board very soon! Can't wait!)
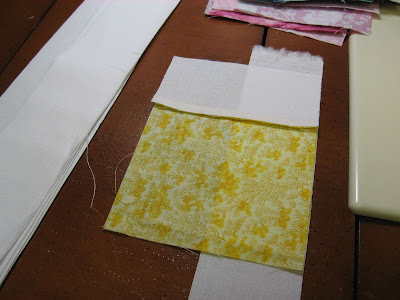 To attach the second sashing piece to each block, do the same thing as before, making sure that you begin with the white going through the machine first instead of the colored square so that the pressed seam will naturally stay towards the color.
 So chain piece all your blocks to the remaining sashing strips, adding a new block after stitching each block...
 ...and always feeding the white section through first to keep that seam going in the right direction...
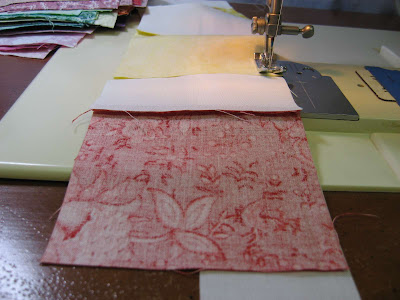 ...until you have added a second sashing to each block.
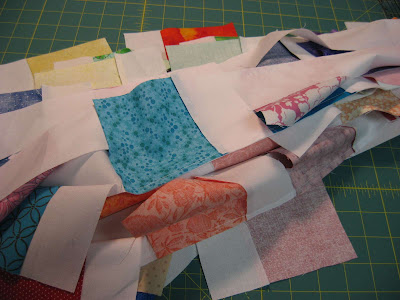 Then bring your nice little pile of colorful strips back to the cutting mat...
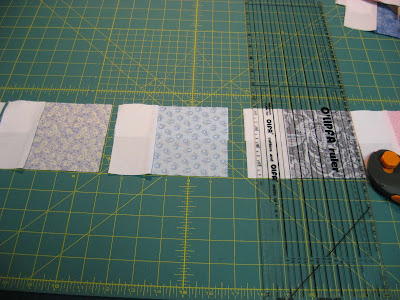 ...and cut the sashing strips apart as you did before...
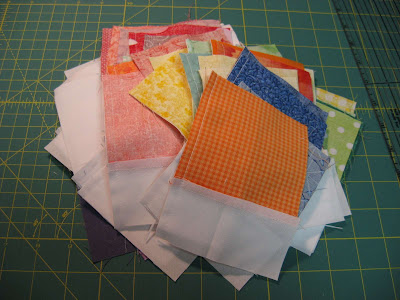 ...and this nice neat little pile is what you will have.
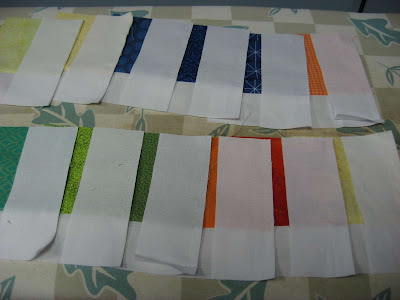 Line these pieces up on your ironing board and press the seams to set them...
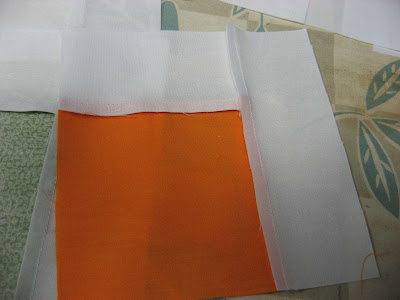 ...then press each one with the seam allowance towards the color.
 Now you will have 72 colored squares sashed with white on two sides. Divide them into your color groups and arrange them in the order you would like them to radiate on your quilt. I did mine in rainbow order (with aqua and pink thrown in) so I stacked mine up in this order: red, orange, yellow, green, aqua, blue, purple and pink.
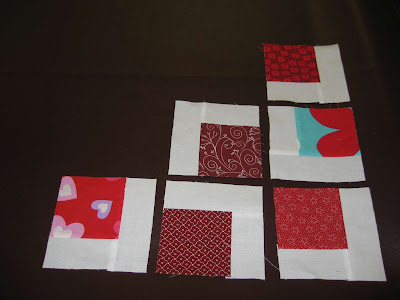 Starting in the lower right corner with red, I placed the first block with the color in the upper left. Then I added the next diagonal row, and the next, as you see above. Take note of the position of the colored squares in the four blocks that form the corner square in the above picture, as that is the pattern that will be repeated throughout.
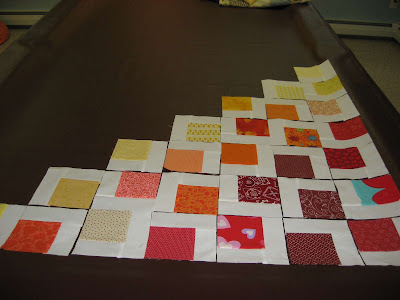 Continue placing your blocks in diagonal rows from lower edge to right-hand edge, taking them right off the stack you made when you organized them into color groups, and paying attention to the position of the colored square in each block.
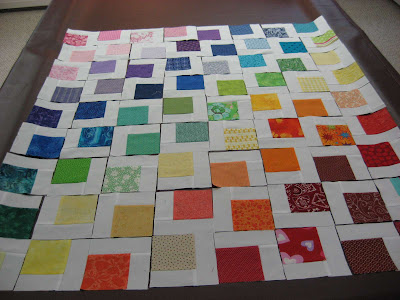 You should have 8 squares across the bottom and 9 squares up the side and your colors should radiate from lower right to upper left in the order you stacked them.
 Before you start piecing your blocks together, check each row and column to make sure each block is positioned correctly for the design. Make any adjustments necessary to maintain the pattern.
Piece your top together, layer it with batting and backing, quilt it, bind it, and enjoy!
This quilt will finish to be approximately 38 by 42 inches.
If you make a quilt using this design, I would love to see it! I would also appreciate a link back to this post if you make use of this design. Have fun with it!
Happy Stitching!
 Click here to return to HookedOnNeedles.com
Keep on reading for a picture-heavy tutorial to make your own rainbow quilt like this...

Materials I used for my quilt:
- 72 4-inch squares in assorted colors (you can use any size square you like in any colors you like, but you may have to adjust the amount of fabric you need for the sashing)
- 1 yard white fabric for sashing (more if you are using larger squares)
 Cut your white fabric into 2-inch strips.
 I used 17 strips, so if you are using squares larger than 4 inches, you will need more strips.
 I used 72 4-inch squares from 8 color groups: red, orange, yellow, green, aqua, blue, purple and pink. Of course you can use whatever colors you have on hand, or swap with friends until you get the colors you want, or purchase a fat quarter of each color. My squares were from a swap, so each square is a different fabric.
 To begin chain piecing the sashing to the squares, lay one square face down onto a strip of sashing so that it is just below the selvage and the right side edges are even. Stitch a 1/4 inch seam. Leave this stitched piece on the machine and add the next square...
 ...and continue stitching...
 ...adding a new square, face down with right edges even, until ...
 ...you come to the end of the first strip. Start another strip and do the same thing with the remaining squares until all the squares have been stitched onto sashing strips.
 All my squares have been chain stitched onto the strips of sashing.
 You can see here that each square is right up next to the previous square. This method of chain piecing makes short work of sashing all these squares! I was able to sew 11 squares onto each strip of sashing. Depending on the fabric you are using, you may be able to sew 11 or only 10, but just keep sewing until all the squares have been added to sashing strips.
 I just thought this was a cool picture!
 Now lay each strip on your cutting mat with the sashing down and the squares up. Line your straight edge up with the edge of each square and cut through the sashing to separate the squares from each other.
 This is what you will get...
 ...and this is how the squares will look from the other side.
 You will end up with a pile of 72 squares with one piece of sashing attached to each.
 Line these squares up on your ironing board, overlapping to conserve space, and then press the seams to set them. This is done before you open the seam, and it makes each seam press to the side much nicer. I never believed it would make a difference when I would see other people taking this extra step, but it really does, so I recommend it.
 Then take each square individually and press the seam towards the colored square. All seams will be pressed towards the colored squares so they will not show through the white when the quilt is finished.
 When you are finished pressing, you will have a colorful stack of rectangles with all seams pressed towards the color. (Please excuse my icky ironing board cover...I'm getting a new, oversized, rectangular top for my ironing board very soon! Can't wait!)
  To attach the second sashing piece to each block, do the same thing as before, making sure that you begin with the white going through the machine first instead of the colored square so that the pressed seam will naturally stay towards the color.
 So chain piece all your blocks to the remaining sashing strips, adding a new block after stitching each block...
 ...and always feeding the white section through first to keep that seam going in the right direction...
 ...until you have added a second sashing to each block.
 Then bring your nice little pile of colorful strips back to the cutting mat...
 ...and cut the sashing strips apart as you did before...
 ...and this nice neat little pile is what you will have.
 Line these pieces up on your ironing board and press the seams to set them...
 ...then press each one with the seam allowance towards the color.
 Now you will have 72 colored squares sashed with white on two sides. Divide them into your color groups and arrange them in the order you would like them to radiate on your quilt. I did mine in rainbow order (with aqua and pink thrown in) so I stacked mine up in this order: red, orange, yellow, green, aqua, blue, purple and pink.
 Starting in the lower right corner with red, I placed the first block with the color in the upper left. Then I added the next diagonal row, and the next, as you see above. Take note of the position of the colored squares in the four blocks that form the corner square in the above picture, as that is the pattern that will be repeated throughout.
 Continue placing your blocks in diagonal rows from lower edge to right-hand edge, taking them right off the stack you made when you organized them into color groups, and paying attention to the position of the colored square in each block.
 You should have 8 squares across the bottom and 9 squares up the side and your colors should radiate from lower right to upper left in the order you stacked them.
 Before you start piecing your blocks together, check each row and column to make sure each block is positioned correctly for the design. Make any adjustments necessary to maintain the pattern.
Piece your top together, layer it with batting and backing, quilt it, bind it, and enjoy!
This quilt will finish to be approximately 38 by 42 inches.
If you make a quilt using this design, I would love to see it! I would also appreciate a link back to this post if you make use of this design. Have fun with it!
Happy Stitching!
 Click here to return to HookedOnNeedles.com
Labels: quilt pattern, quilting, Rainbow quilt, tutorial


23 Comments:
Great tutorial and gorgeous quilt :)
By Melissa, At
September 6, 2011 at 1:17 PM
I love this tutorial - really fascinating to see how this quilt was put together. You are a wonderful teacher!
By annemarie, At
September 6, 2011 at 9:08 PM
Lovely tutorial! You won an award on my blog! Come on over and pass it on if you'd like!
Grace Ann
WouldYouLikeYarnWithThat.blogspot.com
By Grace Ann, At
September 8, 2011 at 3:33 PM
Wow, that is such a great idea for assembling the blocks! I'm definitely going to make one for my little boy - I will send you a photo when I'm done (he's due in November - my fingers are crossed that this is as easy as you've made it look).
By Megan, At
September 9, 2011 at 1:56 PM
Love it! Great tutorial too Mary Grace! Good for you, and lucky us! 8-)
By Myra, At
September 9, 2011 at 3:27 PM
Megan here again - how did you quilt yours? I tried blowing it up to look closely - did you do a series of horizontal and vertical lines?
I voted, by the way!
Thanks.
By Megan, At
September 9, 2011 at 3:46 PM
Thanks! This is a great tutorial. I'm going to try it with my I-Spy squares.
By Anonymous, At
September 22, 2011 at 10:05 PM
Lovely! I have been wanting to make a rainbow quilt - this tutorial is just what I needed! Thank you so much for posting it!
By Unknown, At
September 27, 2011 at 11:12 AM
That is a beautiful quilt! Thanks for the tutorial and sharing the link at Sew darn Crafty!
By Michelle, At
January 23, 2012 at 12:00 PM
How pretty! I have never done a quilt before but this makes me want to give it a try!
By Dani, At
January 23, 2012 at 12:25 PM
What a brilliant tutorial! Thank you!
Btw, your quilt is gorgeous! :)
By Patchmama, At
January 23, 2012 at 1:20 PM
Love the pattern! Made it last weekend :) Thanks for the great tutorial!!!
http://tuxtina.de/2013/01/07/weekend-project-against-the-gloomy-weather
By Anonymous, At
January 7, 2013 at 2:33 PM
So inspiring!! Thank you!
Would you be open to sharing what you did for the top stitching? I can't quite see...
Pictures of my quilt coming... All turquoise and white!
By kate dugas, At
August 20, 2013 at 2:40 AM
Hi Kate! For the quilting on this rainbow quilt, I just stitched straight lines the length and width of the quilt 1/4 inch from each block seam line. If you click on the first picture (the one of the finished quilt at the top) you should be able to see it much larger and maybe see the stitching lines. Also if you check out my second rainbow quilt here: http://www.hookedonneedles.com/2011/09/rainbow-quilt-version-two.html and scroll down to the 4th picture, you can see the stitching lines on the backing pretty clearly. The quilting lines on the second rainbow quilt are a bit more than 1/4 inch from the seam lines, but the same idea.
Your quilt sounds lovely! I'm anxious to see it!
MGM
By Mary Grace McNamara, At
August 20, 2013 at 8:18 AM
Thanks for such a fantastic tutorial! I had pinned it ages ago and I finally got around to doing it. I just thought I'd share.
Here's the link
http://patternsandprojects.blogspot.com.au/2014/01/rainbow-quilt.html
By Deanna D, At
January 21, 2014 at 5:08 AM
I'm glad you liked it MGM! I have just realised that the links weren't there (I must have closed it without saving). I'm very sorry! It has all been fixed up.
Thanks again for the pattern!
Deanna
By Deanna D, At
January 21, 2014 at 2:58 PM
This is awesome!!! Your explanations are very clear, you make me want to try to quilt (even if I never tried it before)!
By RobyGiup, At
April 29, 2014 at 8:24 AM
I appreciate the detail you have included in this tutorial and the helpful hints.
By Murphy Waggoner, At
July 27, 2014 at 6:51 PM
This is a great tutorial - making sense of the design, sewing instructions and color placement. Will definitely give this one a try.
By Aquila's wife, At
August 2, 2014 at 10:39 PM
Thank you sooo much for the great rainbow pattern...you are so generous to post you fantastic idea. And you are loveable!!
By Anonymous, At
October 26, 2014 at 5:26 PM
What a great project for scraps. Pinned.
By Run 'n Stitch, At
July 19, 2015 at 10:08 PM
I'd like to post a photo of my finished quilt, but not sure how to go about it...
By Renee Elizabeth, At
September 19, 2016 at 10:52 AM
Hi Renee Elizabeth! I would love to see your finished quilt and post a picture on my site! You can email it to me at HookedOnNeedles@gmail.com and include any information or story about the quilt or the process or the recipient that you would like to share, and I will share it with my readers. Looking forward to hearing from you!
MGM
By Mary Grace McNamara, At
September 19, 2016 at 11:27 AM
Post a Comment
Subscribe to Post Comments [Atom]
<< Home