After spending some time with Grace the other day picking out fabrics for her bag, I got right to work on it. It really didn't take much effort. Just a little time, a little of that iron-on double stick interfacing stuff whose name escapes me now of which I have almost a whole bolt and use often, and the desire to preserve this precious piece of artwork in a way that would make a little girl very happy. So if your little creative one ever brings you a piece of art that you just cannot part with, here's an easy way to keep it forever - or until it's loved to pieces!
 This is Gracie's original pencil drawing, done on a piece of regular paper for which she had to pay her father one hug after retrieving it from the printer. That's the deal - one piece of paper costs one hug. He loves working from home!
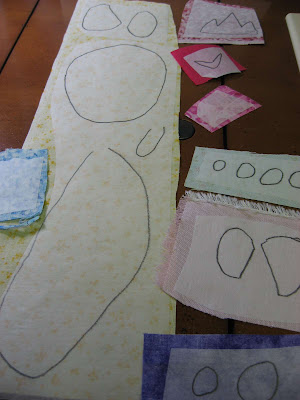 I traced each different part of the princess dog (did you notice the crown?) onto that double stick stuff and ironed the appropriate pieces to the appropriate fabric which had been previously chosen by Grace, trying very hard to preserve every odd curve and misshapen part. It's Grace's artwork I'm trying to preserve after all, not mine!
Then I cut out each shape and peeled the other side off before placing it onto the Paddington Bear fabric which would become the bag.
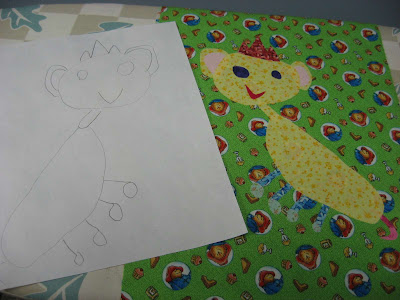 After a good pressing, it's almost done! I did forget about tracing it from the wrong side so that the dog would be oriented the same way on the bag as it is on the drawing. At first Grace was upset about that, until I pulled out the full length mirror and had her hold the picture in front of her and look at it in the mirror. Then she was ok with it! Whew! Don't they look cute together?
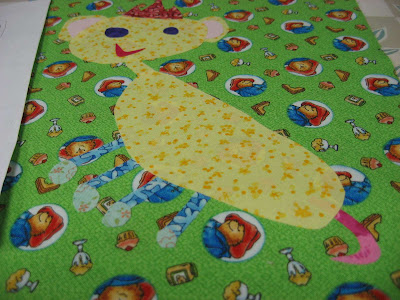 So there she is with all her little parts in the fabrics Grace picked. Just so you know, the parts that you might think are legs are actually tights. She corrected me several times on that one! And the circles at the ends of them are...you guessed it...shoes!
After pressing all the parts, I zig zag stitched around each piece to secure the edges to the bag. She picked out pink (are you surprised?) ribbon for the straps on the bag, so after stitching up the side seams and folding over the top for a casing, I threaded the pink ribbon with THIS awesome tool, poked the ends into the boxed corners, and viola!
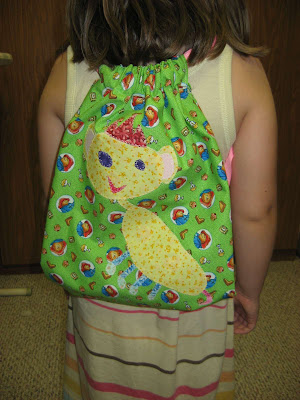 There you have it - one happy little girl with her very own bag! What a fun project this was, mostly because Grace was so excited about it from beginning to end. She stood right at my elbow as I pressed, cut and stitched each piece and when I finally clipped the last piece of thread and had her try it on...oh my! You would have thought I had given her the world! Too precious!
Not all kids are budding bagaholics like Grace, but you could take your child's drawing and do this same thing with it and make it into a pillow (click HERE for a very easy pillow cover tutorial), a picture for the wall, or a pillowcase for your child. Or you could use the artwork to make something special for the grandparents, like a tote bag or pillow. Get some of that double stick stuff and see what kind of precious pieces of art you can preserve in fabric. Your kids will get a kick out of it! Great stash buster project too!
Don't forget to sign up for my giveaway by clicking HERE. Still a few days left to put your name in for a $40 shopping spree and some made-by-me prizes!
Happy Stitching!
 Click here to return to HookedOnNeedles.com
 This is Gracie's original pencil drawing, done on a piece of regular paper for which she had to pay her father one hug after retrieving it from the printer. That's the deal - one piece of paper costs one hug. He loves working from home!
 I traced each different part of the princess dog (did you notice the crown?) onto that double stick stuff and ironed the appropriate pieces to the appropriate fabric which had been previously chosen by Grace, trying very hard to preserve every odd curve and misshapen part. It's Grace's artwork I'm trying to preserve after all, not mine!
Then I cut out each shape and peeled the other side off before placing it onto the Paddington Bear fabric which would become the bag.
 After a good pressing, it's almost done! I did forget about tracing it from the wrong side so that the dog would be oriented the same way on the bag as it is on the drawing. At first Grace was upset about that, until I pulled out the full length mirror and had her hold the picture in front of her and look at it in the mirror. Then she was ok with it! Whew! Don't they look cute together?
 So there she is with all her little parts in the fabrics Grace picked. Just so you know, the parts that you might think are legs are actually tights. She corrected me several times on that one! And the circles at the ends of them are...you guessed it...shoes!
After pressing all the parts, I zig zag stitched around each piece to secure the edges to the bag. She picked out pink (are you surprised?) ribbon for the straps on the bag, so after stitching up the side seams and folding over the top for a casing, I threaded the pink ribbon with THIS awesome tool, poked the ends into the boxed corners, and viola!
 There you have it - one happy little girl with her very own bag! What a fun project this was, mostly because Grace was so excited about it from beginning to end. She stood right at my elbow as I pressed, cut and stitched each piece and when I finally clipped the last piece of thread and had her try it on...oh my! You would have thought I had given her the world! Too precious!
 Not all kids are budding bagaholics like Grace, but you could take your child's drawing and do this same thing with it and make it into a pillow (click HERE for a very easy pillow cover tutorial), a picture for the wall, or a pillowcase for your child. Or you could use the artwork to make something special for the grandparents, like a tote bag or pillow. Get some of that double stick stuff and see what kind of precious pieces of art you can preserve in fabric. Your kids will get a kick out of it! Great stash buster project too!
Don't forget to sign up for my giveaway by clicking HERE. Still a few days left to put your name in for a $40 shopping spree and some made-by-me prizes!
Happy Stitching!
Click here to return to HookedOnNeedles.comLabels: cinch sack, sewing
posted by Mary Grace McNamara on Thursday, August 26, 2010
![]()
![]()


8 Comments:
That is the best idea! I will have to show this to my daughter and have her save some artwork from my grandchildren.
By Nedra, At
August 26, 2010 at 8:31 AM
Nedra, At
August 26, 2010 at 8:31 AM
How special!!!
By Abby and Stephanie, At
August 26, 2010 at 10:57 AM
Abby and Stephanie, At
August 26, 2010 at 10:57 AM
Very sweet bag and excellent design! Tell Gracie that she did a great job designing! When my grandson visits and we make something, I tell him that he is the designer and I am his worker bee. You were a very good worker bee! :-)
By Sandi Linn Andersen, At
August 26, 2010 at 2:15 PM
Sandi Linn Andersen, At
August 26, 2010 at 2:15 PM
How adorable! What a team you two make ;-)
By Adrienne, At
August 26, 2010 at 3:13 PM
Adrienne, At
August 26, 2010 at 3:13 PM
This is awesome! I so have to do this with some things my son drew for me! Thank you for sharing this!
By Gina's Custom Creations, At
August 26, 2010 at 3:29 PM
Gina's Custom Creations, At
August 26, 2010 at 3:29 PM
Oh my gosh - this is such a cute little bag. I can just picture Gracie showing her classmates her special bag. Using her artwork, makes is really special!! Did you use wonder under - love that stuff for applique work.
By annemarie, At
August 26, 2010 at 9:07 PM
annemarie, At
August 26, 2010 at 9:07 PM
A really neat idea,the bag turned out so well.love it.thank you for sharing this idea.
By starry, At
August 26, 2010 at 10:03 PM
starry, At
August 26, 2010 at 10:03 PM
Such an awesome idea!! And so cute. Grace just has to feel so extra special from being involved in this project. Its wonderful.
By Annette, At
August 31, 2010 at 3:37 PM
Annette, At
August 31, 2010 at 3:37 PM
Post a Comment
Subscribe to Post Comments [Atom]
<< Home