Just recently, I posted pictures of a crocheted bag I made using a free pattern that one of my readers had sent me some time ago. You can see the pictures and read about it by clicking HERE. At about the same time I started making my first swirling bag, another reader, Merry, wrote to me for some advice on working this pattern as she was going to be making it along with some of her crochet friends and wanted to make sure she was leading them in the right direction. So I shared with Merry the things about the pattern that I thought might confuse a beginner, and it occurred to me that a tutorial just might be in order. So here it is...
WARNING: This picture tutorial is very picture heavy!
 To begin, print off a copy of the Swirling Bag pattern so you can refer to it and mark it up as necessary. You can find the free pattern by clicking HERE.
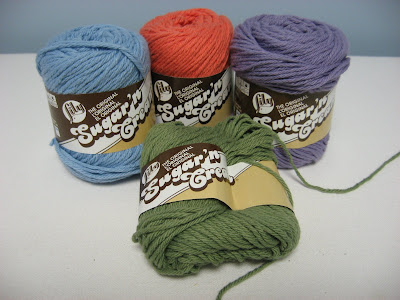
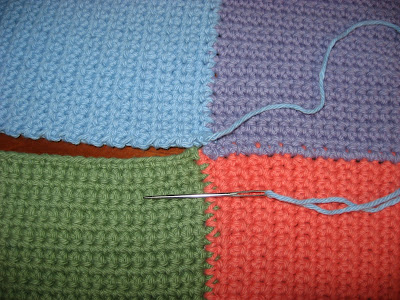
Gather your yarn, either what is recommended in the pattern or a sturdy yarn of your choice. I used the Lily Sugar 'n Cream shown above in the four colors pictured plus one ball of off-white not shown.
Also choose your crochet hook. I used a G hook which is one size smaller than what is recommended for Sugar 'n Cream because I wanted my stitches to be nice and tight. The pattern recommends a size E hook because the recommended yarn is a DK weight cotton, which is much smaller than the worsted weight cotton I used.
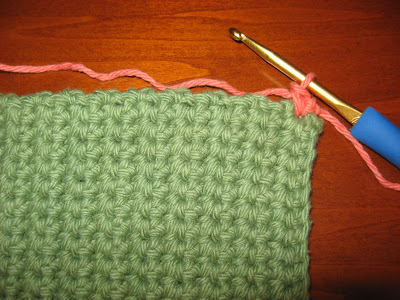
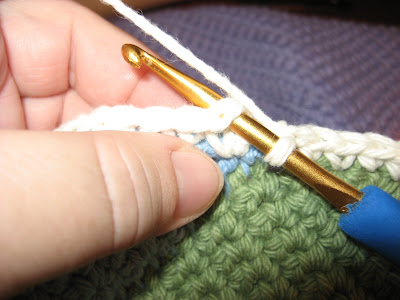
 Work your beginning chain as the pattern indicates, and then the first row of single crochet stitches. To avoid having holes in this first row, work the single crochet stitches into the back bump of each chain instead of into one or both of the loops on top of the chain. This will create a lovely finished edge, pictured above, which will be easy to stitch into later in the pattern and no holes will be left on this row.
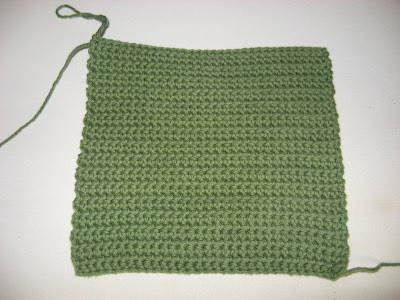 Work the indicated number of rows of single crochet, working your stitches through both loops of each single crochet from the row below, and making sure that your stitch count remains the same up until you finish row 32.
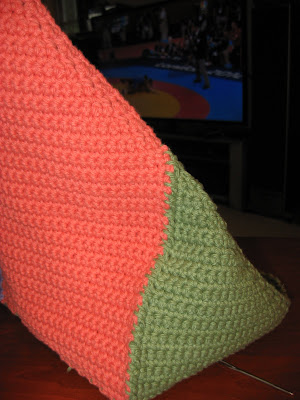
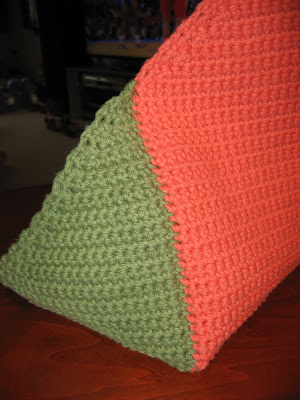
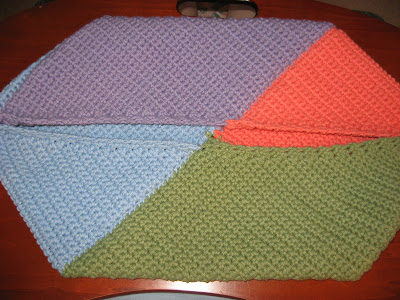
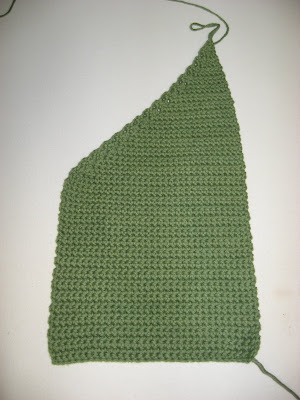 Then begin the shaping of the first section as indicated on the pattern. You will be decreasing one stitch at the beginning of the first row, then at the end of the second row, and you will continue alternating like this until you have created this trapezoid shaped piece with the one long edge shown on the right, the short straight edge shown on the left, and the slanted edge joining the two. So the decreasing is done only on one edge of the piece, not on both edges. After you fasten off, make sure to leave a good 18 to 20 inches of yarn which you will use to sew this slanted edge onto the next piece later.
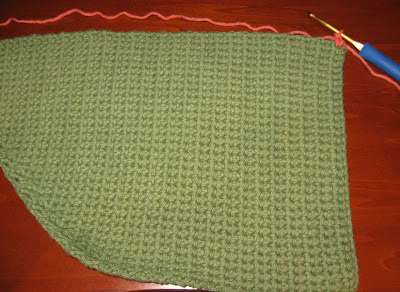 Now begin the second section. Just as the pattern says, work along the longest edge of the first section placing one single crochet into the end of each of the first 32 rows. This will be row 1 of the second section.
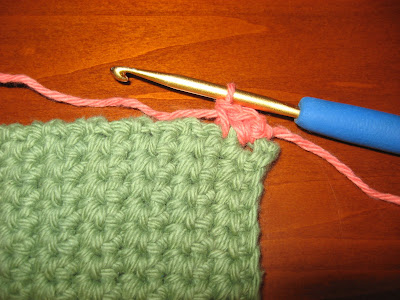
 When I join a new yarn to a row like this, I like to first join with a slip stitch, then work a chain, then the first single crochet into the same space where I worked the slip stitch. It makes for a more substantial join. You do not have to leave a very long tail here, only about 4 or 5 inches. This tail can be stitched over, or woven in later.
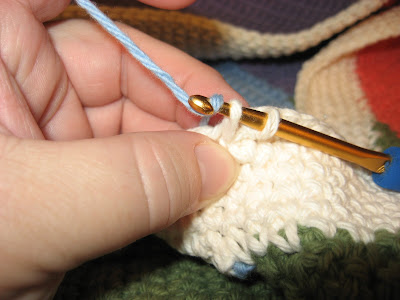
 Then just continue working single crochet stitches into the end of each of the first 32 rows. The above picture shows the first two stitches complete.
 This picture, above, shows all 32 single crochet stitches complete for the first row of the second section. The next thing to do would be to chain one and turn, working 31 more rows of single crochet evenly, without increasing or decreasing. Then chain one and turn in preparation for row 33 and the beginning of the slanted edge.
 When you come to the end of row 32, according to the directions, you will follow the instruction for the first section which tells you to decrease at the beginning of the next row. But if you decrease at the beginning of the row, your slanted edge for the second section will be on the wrong side of the piece. All the slanted edges need to be on the same side of each piece, as shown in the diagram at the end of the pattern, sort of like a pinwheel. So in order for the slanted edge to be along the right edge instead of the left edge, just single crochet to the last 3 stitches, single crochet 2 together, single crochet in the last stitch, chain one and turn. At this point you just keep following the same pattern where you decrease on that same side for each row until you have one stitch remaining and then you fasten off, leaving that long tail again for sewing.
 For the third section, do the same as for the second, working along the longest edge of the second section.
 When you are ready to start the fourth section, you will work it exactly the same way as the previous two, except that you will want to leave a long tail at the beginning which you will not work over or weave in. This long tail is needed to sew the fourth section to the first section. This is where that beginning chain of the first section will come in handy if the first row of single crochets was worked into the back bump of the chain.
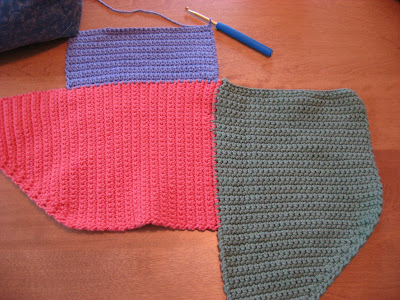
 So once you finish the fourth section, making sure to leave that long tail at the end too, you can lay the whole piece out and see where you need to stitch the fourth section to the beginning of the first section.
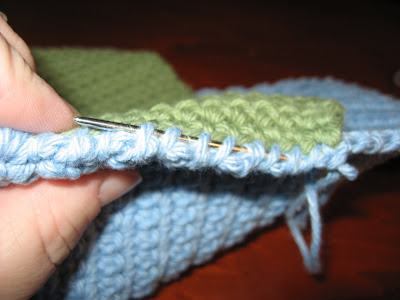
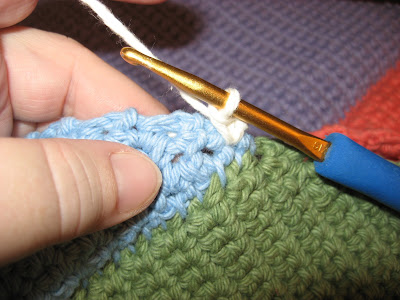
 So with right sides together and edges even, and using a blunt point darning needle, stitch the edges together matching each chain from the first section to the end of a row from the fourth section. The pattern calls for using a woven seam as shown in the pattern glossary, but I prefer using a simple whip stitch since I think it looks nice on the right side when finished. Use whichever you prefer.
 Just continue matching each chain from section one with each row end from section four all the way to the end of the section one chain.
 Keep going...
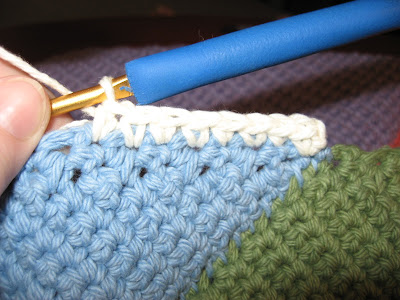
 ...and when you reach the end, make one more loop with your yarn in the same stitches as your last stitch, leaving the loop open. Put your needle through this loop once and then pull up your yarn to tighten the loop. This will secure the end of the whip stitch.
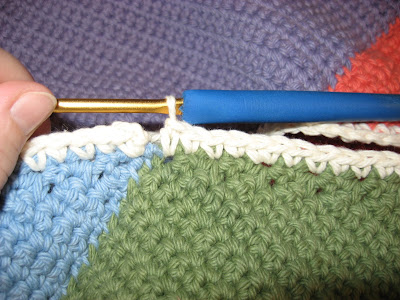
 Then run your needle under six or seven of the whip stitches you just did, and pull the tail of the yarn out and clip it off close to the stitching. This hides the tail of the yarn inside the seam of the bag.
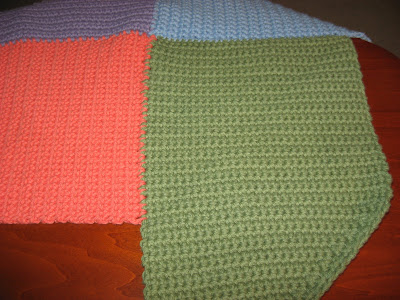
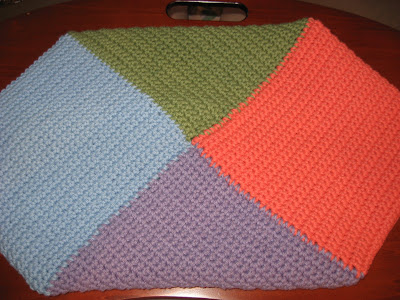
 Now turn your piece right side up and flatten it out to see the lovely seam you just made and how nicely all four section come together. Are we having fun?
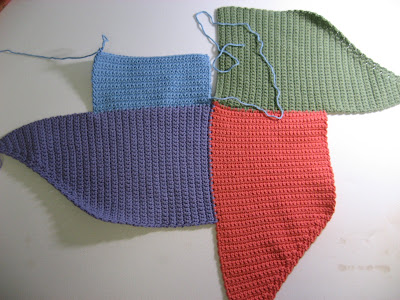
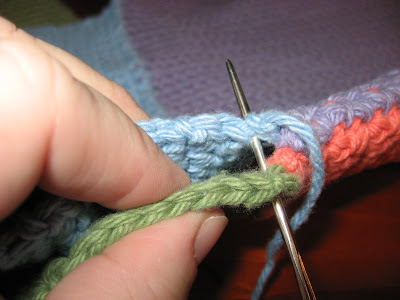
 Now comes the interesting part that will make this into more of a bag-like structure. Take the tail of yarn left at the point of section one, which is the green section in the picture above...
 ...and fold it over (right sides together) so that the tip of section one is even with row 32 of section two.
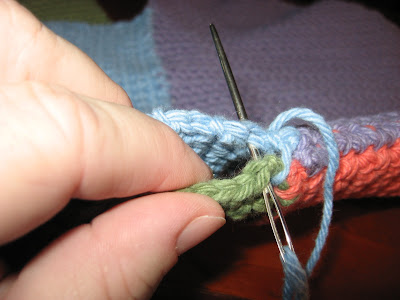
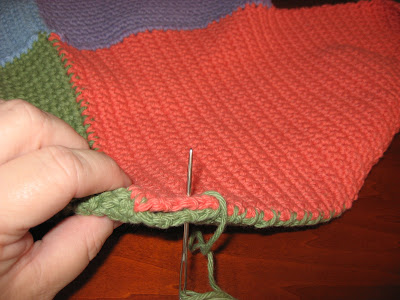
 At this point, I find it easier to flip the whole thing over so that I can stitch from right to left. You can see in the picture above that the yarn is coming out of the end of row 32 of section two, just before the slant begins.
 Now matching row for row...
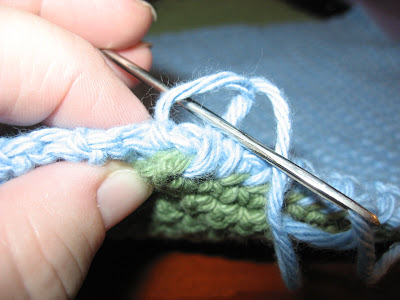
 ...whip stitch towards the beginning row of section two...
 <...ending it the same way the previous whip stitch was ended above and weave in the end.
 This is what the seam will look like from the wrong side...
 ...and after turning it right side out, this is what it looks like from the right side.
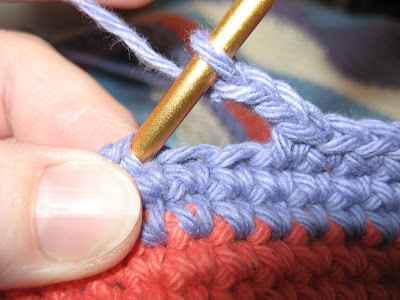
 Next, join section two to section three in the same way that you joined section one to section two...
 ...it gets a little wonky looking at this point! But just keep going! Join section three to section four in the same way...
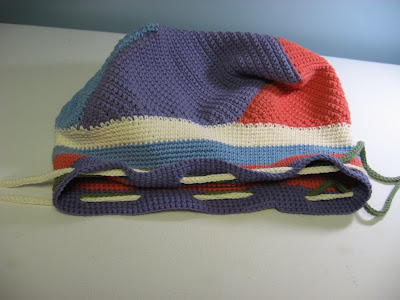
 ...and pretty soon this is what your bag will look like from the bottom...
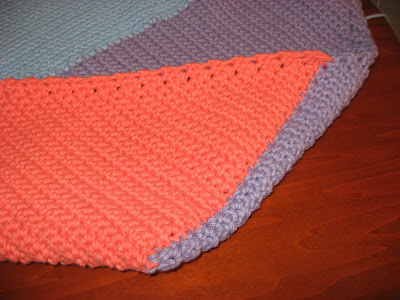
 ...and here it is when folded flat from the top. Notice how the slant edges from each section now make up the top edge of the bag. Pretty clever design, don't you think?
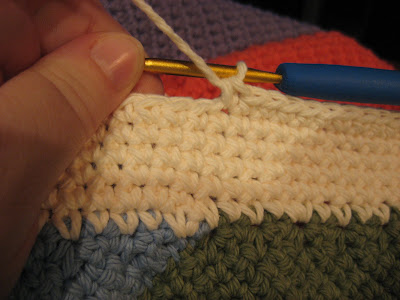
 For the remainder of the bag, just follow the instructions as they are written by joining one color to the top of the bag and stitching 33 single crochets evening across each section of the bag for a total of 132 stitches. This is done with the right side of the bag facing you so that the right side of your stitches will be on the outside of the bag.
 I found that working one stitch into the end of each row, and then one extra squeezed in along the way worked out perfectly.
 This is the top edge on one section.
 When you get back around to the beginning of this first round...
 ...just single crochet into the first single crochet of the round and keep on stitching...
 ...so that the top section of the bag is done in one continuous spiral, instead of separate rounds.
 You can put a marker or a piece of scrap yarn at the beginning of each round if you want to, or you can just notice when you have finished six rounds from where you joined the yarn to the top of the bag. In the picture above, you can see where I joined the white yarn to the blue, and you can easily count six rows to the right and six rows to the left of the stitch on the hook.
 To join the next color of yarn, draw up a loop of the first color (white in this case) and then drop the white and draw up a loop of the new color to finish the single crochet. Cut the white, leaving about a 3 inch tail and knot the white and the blue tails together right up close to the stitch on the inside of the bag, then stitch over the tails or weave them in later.
Continue crocheting in this way until you have worked three 6-round sections and two rounds in the last color.
 When it comes time to work the round for the drawstring eyelets, I do find it helpful to mark the beginning of the round, and as you can see above, I just use a contrasting scrap of yarn through the last stitch.
 To make the eyelets, crochet up to the indicated stitch count then work two chains. Skip the next two stitches and work the next single crochet into the third stitch. Continue with this round and the next three rounds as indicated in the instructions.
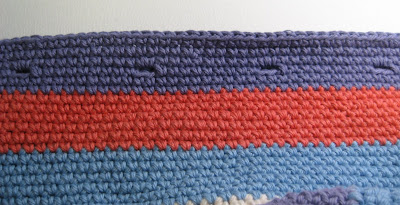 This will create those pretty little holes, or eyelets, evenly around the top of your bag.
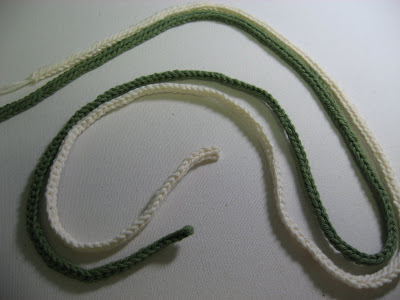 Make the drawstring as indicated. The pattern calls for only one, but I prefer a drawstring bag to close by pulling two strings away from each other, so I made two the same, only different colors!
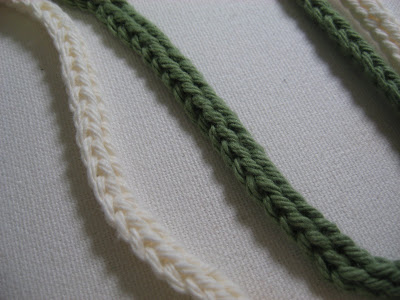 This drawstring was made by working the slip stitch into the back bump of the beginning chains, just as the first row of single crochets in section one. I think this gives the string a more finished look and makes it less stretchy.
 I threaded one string around through all the eyelets from one direction...
 ...and the other string around through all the eyelets from the other direction...
 ...so that when the strings are pulled away from each other, the bag closes neatly.
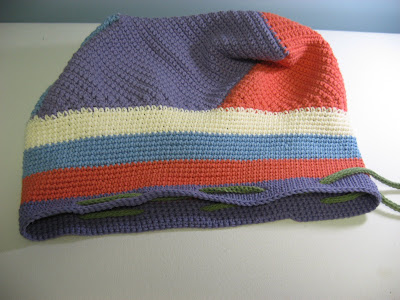
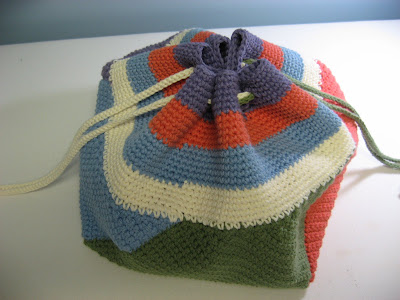
 And there it is...my third swirling bag all finished and ready for some serious toting!
If you would like to see my first two swirling bags, click HERE. Now it's time for you to grab some yarn and a hook and make your own swirling bag. There is so much you can do with this pattern to make it your own. You can see that I used five colors of yarn instead of just four for mine, and I also improvised on the drawstrings. You could work the top of the bag in rounds of all the same color if you wanted, or make rounds of different numbers instead of six, which is what Merry did in her bag. You could use variegated yarns mixed with solids by making two opposite sections in variegated and the other two in a coordinating solid and then work the top in a different coordinating solid. So many possibilities! Have fun with it!
Happy Stitching!
 Click here to return to HookedOnNeedles.com
WARNING: This picture tutorial is very picture heavy!
 To begin, print off a copy of the Swirling Bag pattern so you can refer to it and mark it up as necessary. You can find the free pattern by clicking HERE.
Gather your yarn, either what is recommended in the pattern or a sturdy yarn of your choice. I used the Lily Sugar 'n Cream shown above in the four colors pictured plus one ball of off-white not shown.
Also choose your crochet hook. I used a G hook which is one size smaller than what is recommended for Sugar 'n Cream because I wanted my stitches to be nice and tight. The pattern recommends a size E hook because the recommended yarn is a DK weight cotton, which is much smaller than the worsted weight cotton I used.
 Work your beginning chain as the pattern indicates, and then the first row of single crochet stitches. To avoid having holes in this first row, work the single crochet stitches into the back bump of each chain instead of into one or both of the loops on top of the chain. This will create a lovely finished edge, pictured above, which will be easy to stitch into later in the pattern and no holes will be left on this row.
 Work the indicated number of rows of single crochet, working your stitches through both loops of each single crochet from the row below, and making sure that your stitch count remains the same up until you finish row 32.
 Then begin the shaping of the first section as indicated on the pattern. You will be decreasing one stitch at the beginning of the first row, then at the end of the second row, and you will continue alternating like this until you have created this trapezoid shaped piece with the one long edge shown on the right, the short straight edge shown on the left, and the slanted edge joining the two. So the decreasing is done only on one edge of the piece, not on both edges. After you fasten off, make sure to leave a good 18 to 20 inches of yarn which you will use to sew this slanted edge onto the next piece later.
 Now begin the second section. Just as the pattern says, work along the longest edge of the first section placing one single crochet into the end of each of the first 32 rows. This will be row 1 of the second section.
 When I join a new yarn to a row like this, I like to first join with a slip stitch, then work a chain, then the first single crochet into the same space where I worked the slip stitch. It makes for a more substantial join. You do not have to leave a very long tail here, only about 4 or 5 inches. This tail can be stitched over, or woven in later.
 Then just continue working single crochet stitches into the end of each of the first 32 rows. The above picture shows the first two stitches complete.
 This picture, above, shows all 32 single crochet stitches complete for the first row of the second section. The next thing to do would be to chain one and turn, working 31 more rows of single crochet evenly, without increasing or decreasing. Then chain one and turn in preparation for row 33 and the beginning of the slanted edge.
 When you come to the end of row 32, according to the directions, you will follow the instruction for the first section which tells you to decrease at the beginning of the next row. But if you decrease at the beginning of the row, your slanted edge for the second section will be on the wrong side of the piece. All the slanted edges need to be on the same side of each piece, as shown in the diagram at the end of the pattern, sort of like a pinwheel. So in order for the slanted edge to be along the right edge instead of the left edge, just single crochet to the last 3 stitches, single crochet 2 together, single crochet in the last stitch, chain one and turn. At this point you just keep following the same pattern where you decrease on that same side for each row until you have one stitch remaining and then you fasten off, leaving that long tail again for sewing.
 For the third section, do the same as for the second, working along the longest edge of the second section.
 When you are ready to start the fourth section, you will work it exactly the same way as the previous two, except that you will want to leave a long tail at the beginning which you will not work over or weave in. This long tail is needed to sew the fourth section to the first section. This is where that beginning chain of the first section will come in handy if the first row of single crochets was worked into the back bump of the chain.
 So once you finish the fourth section, making sure to leave that long tail at the end too, you can lay the whole piece out and see where you need to stitch the fourth section to the beginning of the first section.
 So with right sides together and edges even, and using a blunt point darning needle, stitch the edges together matching each chain from the first section to the end of a row from the fourth section. The pattern calls for using a woven seam as shown in the pattern glossary, but I prefer using a simple whip stitch since I think it looks nice on the right side when finished. Use whichever you prefer.
 Just continue matching each chain from section one with each row end from section four all the way to the end of the section one chain.
 Keep going...
 ...and when you reach the end, make one more loop with your yarn in the same stitches as your last stitch, leaving the loop open. Put your needle through this loop once and then pull up your yarn to tighten the loop. This will secure the end of the whip stitch.
 Then run your needle under six or seven of the whip stitches you just did, and pull the tail of the yarn out and clip it off close to the stitching. This hides the tail of the yarn inside the seam of the bag.
 Now turn your piece right side up and flatten it out to see the lovely seam you just made and how nicely all four section come together. Are we having fun?
 Now comes the interesting part that will make this into more of a bag-like structure. Take the tail of yarn left at the point of section one, which is the green section in the picture above...
 ...and fold it over (right sides together) so that the tip of section one is even with row 32 of section two.
 At this point, I find it easier to flip the whole thing over so that I can stitch from right to left. You can see in the picture above that the yarn is coming out of the end of row 32 of section two, just before the slant begins.
 Now matching row for row...
 ...whip stitch towards the beginning row of section two...
 <...ending it the same way the previous whip stitch was ended above and weave in the end.
 This is what the seam will look like from the wrong side...
 ...and after turning it right side out, this is what it looks like from the right side.
 Next, join section two to section three in the same way that you joined section one to section two...
 ...it gets a little wonky looking at this point! But just keep going! Join section three to section four in the same way...
 ...and pretty soon this is what your bag will look like from the bottom...
 ...and here it is when folded flat from the top. Notice how the slant edges from each section now make up the top edge of the bag. Pretty clever design, don't you think?
  For the remainder of the bag, just follow the instructions as they are written by joining one color to the top of the bag and stitching 33 single crochets evening across each section of the bag for a total of 132 stitches. This is done with the right side of the bag facing you so that the right side of your stitches will be on the outside of the bag.
 I found that working one stitch into the end of each row, and then one extra squeezed in along the way worked out perfectly.
  This is the top edge on one section.
  When you get back around to the beginning of this first round...
 ...just single crochet into the first single crochet of the round and keep on stitching...
 ...so that the top section of the bag is done in one continuous spiral, instead of separate rounds.
 You can put a marker or a piece of scrap yarn at the beginning of each round if you want to, or you can just notice when you have finished six rounds from where you joined the yarn to the top of the bag. In the picture above, you can see where I joined the white yarn to the blue, and you can easily count six rows to the right and six rows to the left of the stitch on the hook.
  To join the next color of yarn, draw up a loop of the first color (white in this case) and then drop the white and draw up a loop of the new color to finish the single crochet. Cut the white, leaving about a 3 inch tail and knot the white and the blue tails together right up close to the stitch on the inside of the bag, then stitch over the tails or weave them in later.
 Continue crocheting in this way until you have worked three 6-round sections and two rounds in the last color.
 When it comes time to work the round for the drawstring eyelets, I do find it helpful to mark the beginning of the round, and as you can see above, I just use a contrasting scrap of yarn through the last stitch.
  To make the eyelets, crochet up to the indicated stitch count then work two chains. Skip the next two stitches and work the next single crochet into the third stitch. Continue with this round and the next three rounds as indicated in the instructions.
  This will create those pretty little holes, or eyelets, evenly around the top of your bag.
  Make the drawstring as indicated. The pattern calls for only one, but I prefer a drawstring bag to close by pulling two strings away from each other, so I made two the same, only different colors!
  This drawstring was made by working the slip stitch into the back bump of the beginning chains, just as the first row of single crochets in section one. I think this gives the string a more finished look and makes it less stretchy.
  I threaded one string around through all the eyelets from one direction...
 ...and the other string around through all the eyelets from the other direction...
 ...so that when the strings are pulled away from each other, the bag closes neatly.
  And there it is...my third swirling bag all finished and ready for some serious toting!
 If you would like to see my first two swirling bags, click HERE. Now it's time for you to grab some yarn and a hook and make your own swirling bag. There is so much you can do with this pattern to make it your own. You can see that I used five colors of yarn instead of just four for mine, and I also improvised on the drawstrings. You could work the top of the bag in rounds of all the same color if you wanted, or make rounds of different numbers instead of six, which is what Merry did in her bag. You could use variegated yarns mixed with solids by making two opposite sections in variegated and the other two in a coordinating solid and then work the top in a different coordinating solid. So many possibilities! Have fun with it!
Happy Stitching!
Click here to return to HookedOnNeedles.comLabels: crochet, crochet cotton, crochet pattern, swirling bag
posted by Mary Grace McNamara on Thursday, August 16, 2012
![]()
![]()


3 Comments:
Great tutorial - this looks like it would be fun to make!
By annemarie, At
August 16, 2012 at 8:24 PM
annemarie, At
August 16, 2012 at 8:24 PM
Mary Grace...I give you an A+ on this Tutorial...it sure would have helped me on my bag! I'm just so tickled to have this tutorial, to refer my friend to or any of my new students...I always tell them about your Blog! I love the colors of your bag...you really did a nice job on this tutorial! Thanks a bunch!
Merry ♥
By MerryT, At
August 16, 2012 at 10:23 PM
MerryT, At
August 16, 2012 at 10:23 PM
Great tutorial! I love this color combination.
By Kathleen Berlew, At
July 24, 2015 at 7:05 AM
Kathleen Berlew, At
July 24, 2015 at 7:05 AM
Post a Comment
Subscribe to Post Comments [Atom]
<< Home