Remember back in March when I showed off the Bright Squares Baby Blanket that I crocheted for a friend to give as a gift? Well, that friend had also asked me to make another baby blanket to give as a gift to a different friend of hers and she wanted the second one to be a Noah's Ark theme.
So I started making it and back in April, I showed my progress in THIS post with lots of strings but all the crocheting complete.
Now the blanket is finally complete, and has been delivered. I hope the new mom likes it! Take a look...
 I used the pattern I purchased from Annie's Attic which you can find HERE, but I made the wavy background of the blanket just a little bigger than the pattern called for. I think I added one or two extra 'waves' to this one. I just thought it would end up too small to be very useful if I followed the directions exactly.
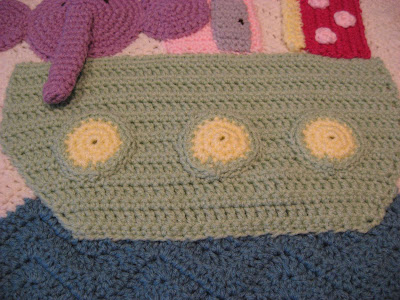 Doesn't that look like such a cozy little boat to sail around in?
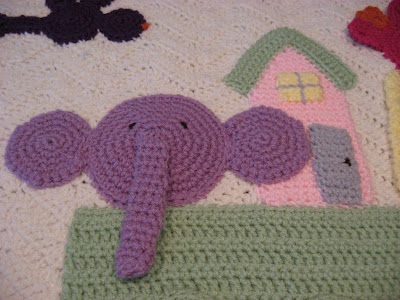 Such a friendly purple elephant!
 This little gold fish is happily swimming in the waves.
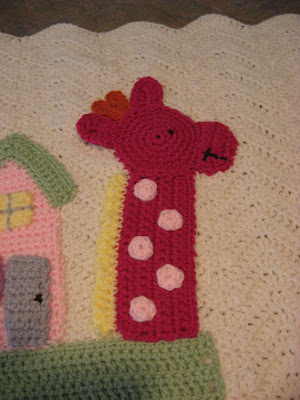 The cheerful pink giraffe has light pink spots along her long giraffe neck and orange horns between two pink ears!
 A pink and yellow turtle floats in the waves.
 And a dark purple bird flies overhead looking for a place to land.
If you decide to purchase this pattern for yourself and make this blanket, you might want to check out the video I posted showing how to work the double crochet decrease which makes the wave design on the background. Even if you don't want to make the blanket with all the detail, this wave design would make a great looking, and cozy, afghan on its own!
Happy Stitching!
 Click here to return to HookedOnNeedles.com
So I started making it and back in April, I showed my progress in THIS post with lots of strings but all the crocheting complete.
Now the blanket is finally complete, and has been delivered. I hope the new mom likes it! Take a look...
 I used the pattern I purchased from Annie's Attic which you can find HERE, but I made the wavy background of the blanket just a little bigger than the pattern called for. I think I added one or two extra 'waves' to this one. I just thought it would end up too small to be very useful if I followed the directions exactly.
 Doesn't that look like such a cozy little boat to sail around in?
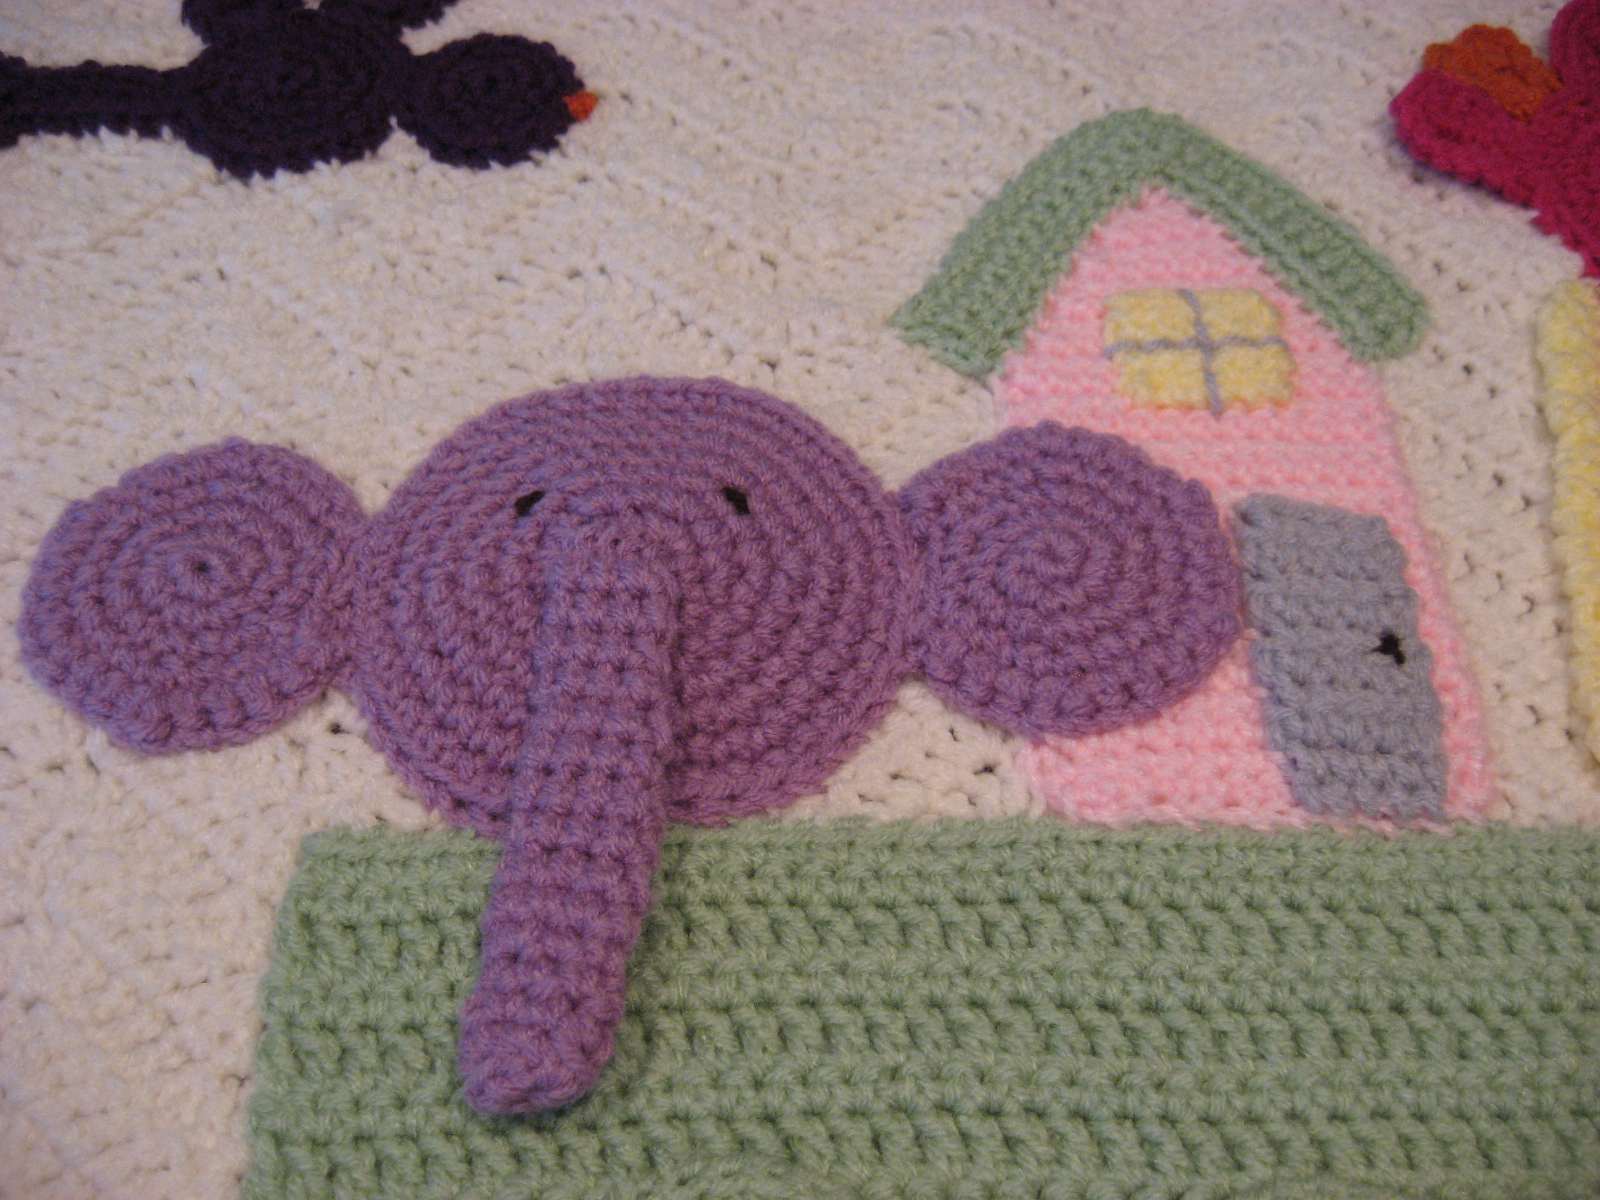 Such a friendly purple elephant!
 This little gold fish is happily swimming in the waves.
 The cheerful pink giraffe has light pink spots along her long giraffe neck and orange horns between two pink ears!
 A pink and yellow turtle floats in the waves.
 And a dark purple bird flies overhead looking for a place to land.
If you decide to purchase this pattern for yourself and make this blanket, you might want to check out the video I posted showing how to work the double crochet decrease which makes the wave design on the background. Even if you don't want to make the blanket with all the detail, this wave design would make a great looking, and cozy, afghan on its own!
Happy Stitching!
Click here to return to HookedOnNeedles.comLabels: afghan, baby blanket, crochet, Noah's Ark
posted by Mary Grace McNamara on Sunday, June 5, 2011
![]()
![]()


16 Comments:
That is adorable. Great job!
By Unknown, At
June 5, 2011 at 5:21 PM
Unknown, At
June 5, 2011 at 5:21 PM
I can't get over how cute this is! I'm sure the baby will love it.
By Cynthia Gilbreth, At
June 5, 2011 at 6:45 PM
Cynthia Gilbreth, At
June 5, 2011 at 6:45 PM
Fantastic job - this will surely be a treasured baby gift!
By annemarie, At
June 5, 2011 at 8:31 PM
annemarie, At
June 5, 2011 at 8:31 PM
What a gorgeous little blanket! Such amazing detail!
I would love if you came over and linked this project to my weekly Round Tuit party at:
http://jembellish.blogspot.com/
Have a great week!
Jill @ Creating my way to Success
By Jill, At
June 6, 2011 at 2:49 AM
Jill, At
June 6, 2011 at 2:49 AM
Congratulations!! It is a very beautiful, and wonderfull work, you are an artist! I love to follow your posts, your work is very inspiring to me! Thanks so much ! Greetings from Buenos Aires, Gabriela
By Ga, At
June 6, 2011 at 8:24 AM
Ga, At
June 6, 2011 at 8:24 AM
Wow!! That is too cute!
By Ricki, At
June 6, 2011 at 5:57 PM
Ricki, At
June 6, 2011 at 5:57 PM
So cute! I am not skilled in crochet, so this blows my mind! Great job!
By KendasCrafts, At
June 7, 2011 at 9:05 AM
KendasCrafts, At
June 7, 2011 at 9:05 AM
Absolutely darling! You did a lovely job!
By Loralynn, At
June 7, 2011 at 3:15 PM
Loralynn, At
June 7, 2011 at 3:15 PM
Beautiful Mary Grace....great job! I LOVE your colors! Wasn't that a fun project? Just got back from vacation, so I'm going to work on finishing mine now!
God Bless You,
Merry ♥
By Merry Thornsburg, At
June 15, 2011 at 9:30 AM
Merry Thornsburg, At
June 15, 2011 at 9:30 AM
I've finished making all the parts, but I'm trying to figure out the best way to attach all to the blanket. Did you use yarn? Quilting thread? Do your stitches show through on the back? Any advise you can provide would be most welcome!
By Anonymous, At
November 25, 2012 at 11:31 PM
Anonymous, At
November 25, 2012 at 11:31 PM
Hi Kelly, when I made each little piece of what gets attached to the afghan, I left the ends long so I could use them to sew the pieces onto the afghan. I tried to just pick up the fronts of the afghan stitches when sewing the pieces on so that no stitches would show on the back. They seemed to get buried into the afghan even if I went all the way through.
Hope this helps!
MGM
By Mary Grace McNamara, At
November 26, 2012 at 10:30 PM
Mary Grace McNamara, At
November 26, 2012 at 10:30 PM
Your blanket looks beautiful with each stitch perfect! I am making this blanket and cannot understand the instructions for the bird wing, on the second row the instructions aren't bringing me to the end of the row...any idea what I am doing wrong?
By Kathy, At
January 13, 2013 at 2:46 PM
Kathy, At
January 13, 2013 at 2:46 PM
Hi Kathy, the bird wing is worked like this: chain 6. slip stitch in second chain from hook. single crochet in third chain. half double crochet in fourth chain. double crochet in fifth chain. 6 double crochets in sixth chain. Then continue on the opposite side of the chain and double crochet in the fifth chain. half double crochet in the fourth chain. single crochet in the third chain. slip stitch in the second chain which is where you should have worked the original slip stitch at the beginning.
Sometimes it helps to write out instructions like this and then cross them off as you do them. I hope this helps you! It's such a cute blanket and a great way to use up scraps of kid friendly yarn!
MGM
By Mary Grace McNamara, At
January 13, 2013 at 6:54 PM
Mary Grace McNamara, At
January 13, 2013 at 6:54 PM
Your blanket is beautiful! I am making the same one. I never sewed on a crocheted piece onto another crocheted piece. I saw that you left long tails at the beginning and end. Do I just sew them around the border of the piece I want to attach? Thanks, Cindy
By Cindy Casey, At
March 26, 2014 at 1:31 PM
Cindy Casey, At
March 26, 2014 at 1:31 PM
Hi Cindy, thanks for writing! Yes, you leave the long tails on the little pieces and use the tails to stitch them onto the blanket background! You can use a whip stitch or a running stitch or whatever you like to attach the pieces onto the blanket, and by using the tails, the yarn will match the piece and then you just secure the tail and weave it between the piece and the blanket to hide it.
Hope this helps!
MGM
By Mary Grace McNamara, At
March 26, 2014 at 6:38 PM
Mary Grace McNamara, At
March 26, 2014 at 6:38 PM
Thank you for getting back so quickly! I appreciate it.
By Cindy Casey, At
March 27, 2014 at 2:07 PM
Cindy Casey, At
March 27, 2014 at 2:07 PM
Post a Comment
Subscribe to Post Comments [Atom]
<< Home