About a year ago, we had just returned from our big summer vacation road trip and I had designed a clothes pin bag for my sister. I wrote about it HERE. In that post, I said that I would be offering a tutorial so you could make your own clothes pin bag, and here it is almost a year later! Well what can I say? I guess good things take time!
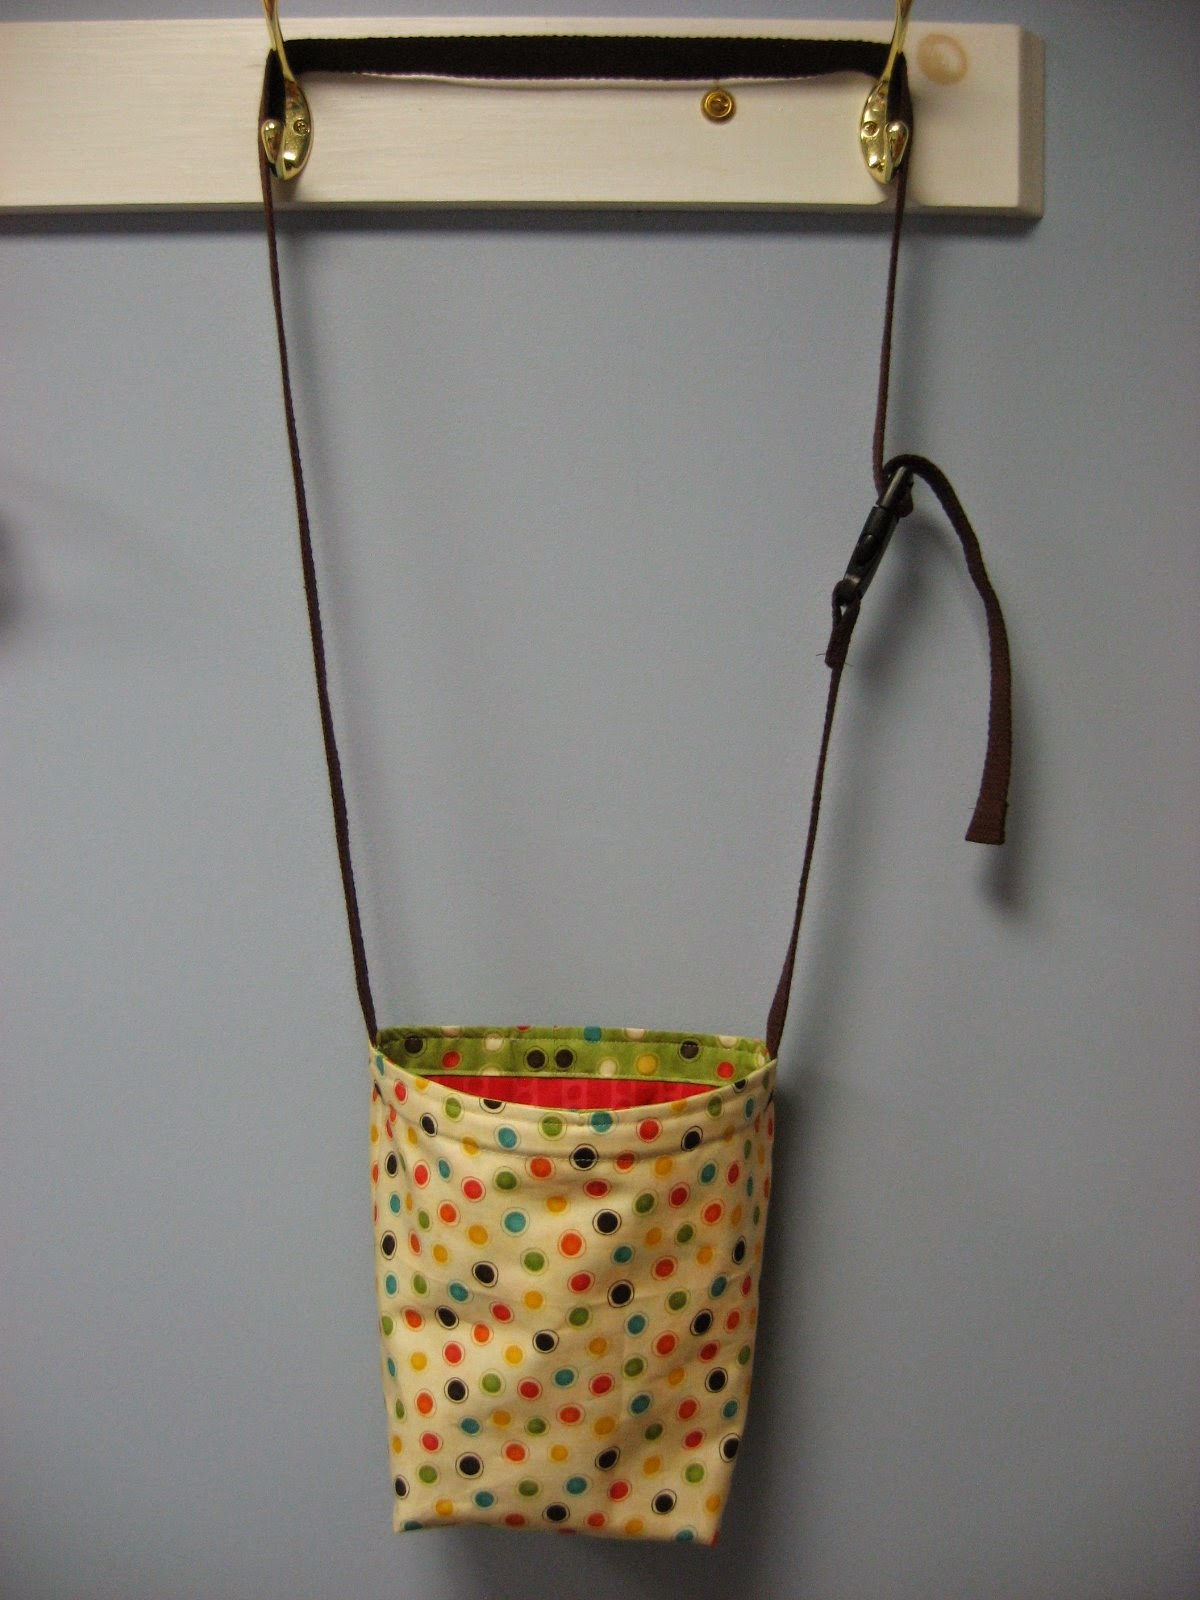
Here is a picture of the finished bag, and following is the tutorial. Be warned though, as it is very picture-heavy! But if you follow the instructions, you should be able to have yourself an Always Open Clothes Pin Bag in short order! This is a great scrap-buster project, so dig through your stash and see what you can use up!
I don't mind if you make these for gifts or even to sell them, but please don't copy my pictures or my words. They are mine, after all! If you use this tutorial for any purpose, please give credit where it is due and link back to this tutorial. I worked hard to bring this to you for free and would appreciate getting credit for my work.

Always Open Clothes Pin Bag Tutorial
An original design by Mary Grace McNamara at HookedOnNeedles.com
Materials:
2 – 8 ½ by 11 ½ pieces of fabric (back outside and back lining)
2 – 12 ½ by 11 ½ pieces of fabric (front outside and front lining)
1 – 20 ½ by 3 inch piece of fabric (casing)
1 – 12 inch length of boning (available at your favorite sewing store)
1 – Parachute Buckle or Center Release Buckle for 1 inch strap (also available at your favorite sewing store)
1 ½ to 2 yards of 1 inch cotton belting (depending on how long you like the strap)
NOTE: ¼ inch seam allowance is used throughout unless otherwise noted.
You may find it helpful to read through the whole tutorial before beginning.
 These are the main pieces of fabric needed. Also needed is the casing fabric which is one piece measuring 20 1/2 by 3 inches.
 With right sides together, sew back to front along both 11 ½ inch sides for outside and for lining.
 Press seams toward backs.
 Press resulting tubes flat so that about an inch of front fabric frames back fabric piece on each side.
 Stitch the bottom edge of outside and lining.
 Mark a 2 inch box on both sides of each of the bottom corners of outside and lining using the side fold and the bottom seam line as guides.
 So you should have drawn eight boxes all together, two for each bottom corner of the outside and the lining.
 Pinch the corners flat at corners of each box so that the drawn lines make a straight line and the front and back come to a point.
 Do this on the corners of outside and lining and then place the corresponding triangle corners together with bottom seams facing each other. The piece on the right will be flipped over onto the piece on the left so that the bottom seams are together, the fronts face one way and the backs face the other, and the result is seen in the next picture.
 Pin along marked line and stitch once on line...
 ...and once 1/8 inch from line inside triangle.
 This is what you get...
 ...two corners, one from the outside and one from the lining, joined together.
 Put the other two corners together in the same way, making sure the bottom seams are lining up with each other, and stitch twice 1/8 inch apart as before.
 Now you can see that the bottoms of the outside and lining are attached at the corners and the little triangle flaps are sticking out from the bag.
 Turn outside of bag right side out over lining. At this point either can be outside or lining. Decide which is which before continuing. This is one of the fronts...
 ...and this is its corresponding back...
 ...and this is the bottom of the bag.
 After turning the whole thing inside out, this becomes the front...
 ...and its corresponding back...
 ...and bottom. This is what I chose as the outside of my bag. Whichever piece you want to be on the outside of your finished bag should be turned to the outside now and it will remain on the outside for the completion of the bag.
Pin raw edges of outside and lining together around top of bag matching side seams and baste around top. Sorry no picture of this step, but you get the idea...stick the top edges together!
Ok, now that we've got that settled...time to make the casing...
 Fold casing fabric in half along the length with wrong sides together and press.
 Open short ends and stitch them right sides together to form a circle.
 Cut a 12 inch length of cotton belting. It helps to tape the cut ends of this cotton belting while working with it so that it does not fray. Remove tape right before stitching through the ends so as not to gum up your sewing machine needle!
 For the buckle, you can use either a Parachute Buckle which is what I used in the tutorial, or you can use a Center Release Buckle which is pictured here and what I am using for the bags I am making to sell in my shop. They both serve the same function and the instructions for attaching them to the cotton belting are the same for either model.
 Following instructions on packaging, thread one end of 12 inch strap into female end of buckle about 1 ½ inches and stitch closed through all layers. This is the part of the strap that is not adjustable.
 Finish one end of remaining strap by turning under edge or zig zag stitching. Again following instructions on packaging, thread finished end of long strap into male end of buckle. This is the part of the strap that is adjustable so do not stitch the end of the strap to the length of strap on the other side of the buckle! It needs to stay loose. Once you try it on, you can trim off any excess, only leaving enough to make the adjustments you will use for yourself. Just remember to finish the cut end of the strap if you trim it later.
 Pin unfinished ends of straps to top of bag...
 ...extending raw edge of strap about ½ inch past raw edge of bag, right sides together, along side seam lines with straps towards the front section of the bag.
 The short strap is on one side and the long strap is on the other side. Baste straps to bag.
 Place casing around outside at top of bag with raw edges even. Pin. Stitch using ½ inch seam allowance through all layers and straps.
 Press seam toward bag...
 ...then press casing to inside of bag over seam. If raw ends of straps extend past the edge of casing, trim them so they will be covered completely by the casing.
 Top stitch around outside of bag a scant ¼ inch from top edge through all layers of bag, casing and strap ends.
 Stitch through all layers at side seams from top of casing to folded edge to act as a stop for the boning so it won't slip out of place.
 Cut a 12 inch piece of boning and tuck it up under casing on front part of bag only. Trim boning a bit if necessary, but you want it to go from side seam to side seam. This is what holds the bag open! Pin casing all around to enclose boning and stitch casing closed all around bag close to folded edge. Tip: The cut end of boning can be sharp, so cover ends of boning with scrap denim or batting or other fabric before tucking it into the casing to keep it from wearing through casing fabric.


 Adjust strap for your size and trim excess belting if necessary. This can be worn over the shoulder across the body like a messenger bag so the bag sits at a comfortable spot on the hip to reach pins, or around the waist, or hung on the clothes line and pulled along as you go.
Fill bag with clothes pins and wait for a sunny laundry day!
I'd love to see your version of this bag if you decide to make one using my tutorial. If you don't want to make your own, check my Etsy shop or drop me a line. I'll make one for you!
Happy Stitching!
 Click here to return to HookedOnNeedles.com
Here is a picture of the finished bag, and following is the tutorial. Be warned though, as it is very picture-heavy! But if you follow the instructions, you should be able to have yourself an Always Open Clothes Pin Bag in short order! This is a great scrap-buster project, so dig through your stash and see what you can use up!
I don't mind if you make these for gifts or even to sell them, but please don't copy my pictures or my words. They are mine, after all! If you use this tutorial for any purpose, please give credit where it is due and link back to this tutorial. I worked hard to bring this to you for free and would appreciate getting credit for my work.
Always Open Clothes Pin Bag Tutorial
An original design by Mary Grace McNamara at HookedOnNeedles.com
Materials:
2 – 8 ½ by 11 ½ pieces of fabric (back outside and back lining)
2 – 12 ½ by 11 ½ pieces of fabric (front outside and front lining)
1 – 20 ½ by 3 inch piece of fabric (casing)
1 – 12 inch length of boning (available at your favorite sewing store)
1 – Parachute Buckle or Center Release Buckle for 1 inch strap (also available at your favorite sewing store)
1 ½ to 2 yards of 1 inch cotton belting (depending on how long you like the strap)
NOTE: ¼ inch seam allowance is used throughout unless otherwise noted.
You may find it helpful to read through the whole tutorial before beginning.


Pin raw edges of outside and lining together around top of bag matching side seams and baste around top. Sorry no picture of this step, but you get the idea...stick the top edges together!
Ok, now that we've got that settled...time to make the casing...


Fill bag with clothes pins and wait for a sunny laundry day!
I'd love to see your version of this bag if you decide to make one using my tutorial. If you don't want to make your own, check my Etsy shop or drop me a line. I'll make one for you!
Happy Stitching!
Click here to return to HookedOnNeedles.com Labels: clothes pin bag, laundry, patterns, sewing, tutorial
posted by Mary Grace McNamara on Friday, August 1, 2014
![]()
![]()


3 Comments:
What a great tutorial! Thank you so much. We took down our patio cover a few months ago and I lost my clothesline. Eventually I'll put up a new one and will definitely make this. I love how clothes smell when they dry in the sunshine.
By Cynthia Gilbreth, At
August 2, 2014 at 12:52 PM
Cynthia Gilbreth, At
August 2, 2014 at 12:52 PM
Great tutorial Mary Grace. Makes me want to hang up a clothes line :)
By Jeanna, At
August 6, 2014 at 4:30 PM
Jeanna, At
August 6, 2014 at 4:30 PM
Thanks for your idea and tutorial! I used it today to make my own bag, using a blueberry print fabric. Looking forward to using it with my pulley laundry line tomorrow :)
By Hillary Doran, At
July 17, 2016 at 8:14 PM
Hillary Doran, At
July 17, 2016 at 8:14 PM
Post a Comment
Subscribe to Post Comments [Atom]
<< Home