Recently I showed you one way to crochet a cord using Daphne's method of the crocheted slip stitch cord. There are many other ways to crochet cords, which I will be sharing with you soon. There are also many ways to knit cords, either by hand or "by gadget". Today I am going to share with you one of my experiences of knitting cords "by gadget".
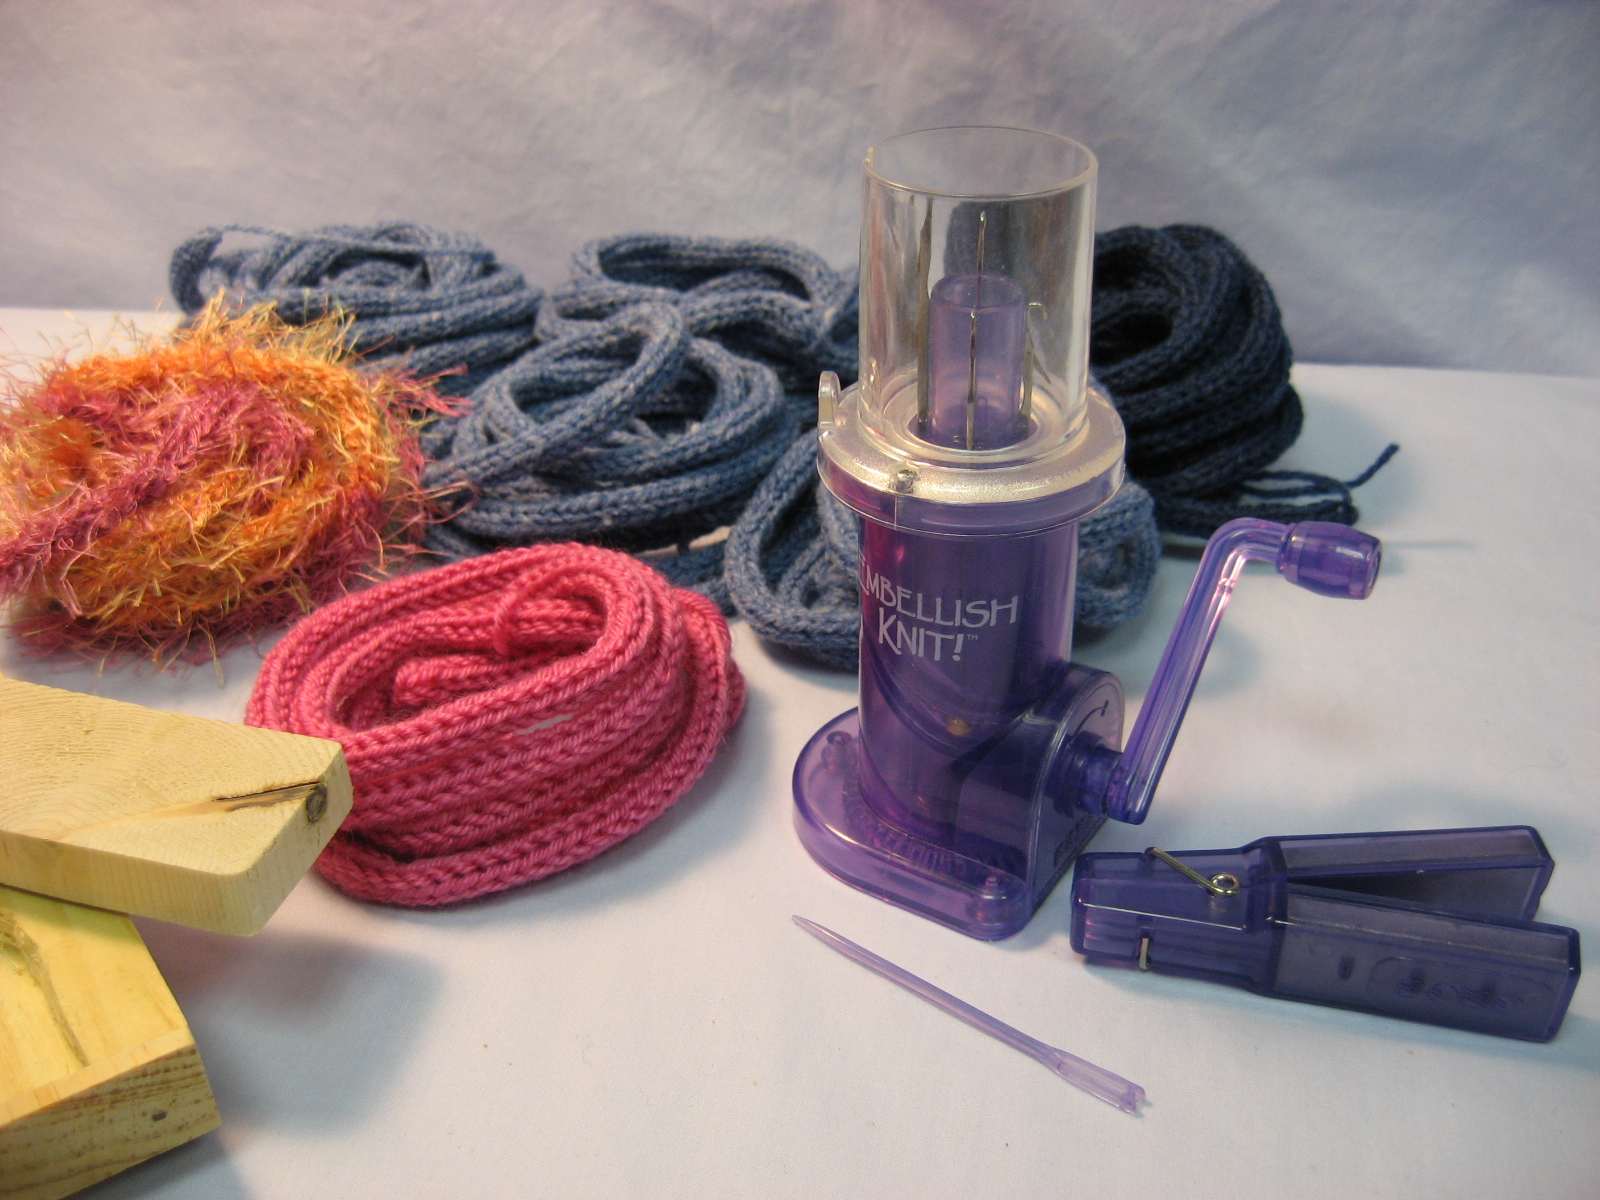
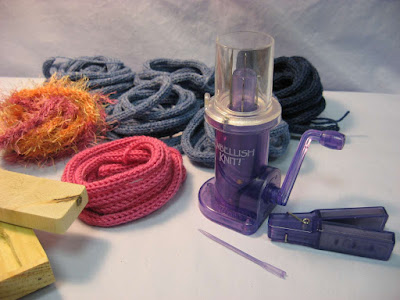 I was in need of a length of i-cord for some project or other a few years ago and I didn't have time to hand-knit one, so I went looking for a gadget that could do the job in a fraction of the time. I discovered a product called Embellish Knit from a company called Bond America. I was intrigued by this little cord knitting machine and was willing to part with about $20 to see just how this little hand-cranked gadget worked. So I placed my order and waited patiently for George the mailman to bring me my new toy.
Less than a week later it arrived and I went right to work. I followed the instructions diligently and, using the yarn that was included in the kit, I whipped up a generous length of shiny pink i-cord. I was hooked! What fun it was to turn that crank and in practically no time at all have a long, neat, pretty length of knitted cord that could be used for any number of creative things.
I did find it just a little awkward holding the machine over the edge of the table while turning the handle, and at the same time making sure the yarn feeding into the machine had no tension on it and the cord coming out the bottom of the machine had enough tension on it. I do, after all, have only two hands! So, necessity being the mother of invention, I went about inventing a little gadget of my own to hold my new cord knitting gadget.
I was in need of a length of i-cord for some project or other a few years ago and I didn't have time to hand-knit one, so I went looking for a gadget that could do the job in a fraction of the time. I discovered a product called Embellish Knit from a company called Bond America. I was intrigued by this little cord knitting machine and was willing to part with about $20 to see just how this little hand-cranked gadget worked. So I placed my order and waited patiently for George the mailman to bring me my new toy.
Less than a week later it arrived and I went right to work. I followed the instructions diligently and, using the yarn that was included in the kit, I whipped up a generous length of shiny pink i-cord. I was hooked! What fun it was to turn that crank and in practically no time at all have a long, neat, pretty length of knitted cord that could be used for any number of creative things.
I did find it just a little awkward holding the machine over the edge of the table while turning the handle, and at the same time making sure the yarn feeding into the machine had no tension on it and the cord coming out the bottom of the machine had enough tension on it. I do, after all, have only two hands! So, necessity being the mother of invention, I went about inventing a little gadget of my own to hold my new cord knitting gadget.
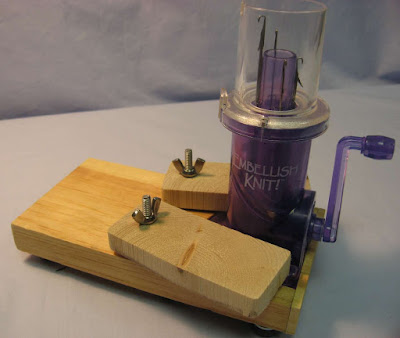 Using pieces of scrap wood and my handy dandy miter saw that my husband gave me as a surprise no-reason gift a few years ago, I devised this little holder that rests on the table with a generous area for holding on to it while just enough of the machine hangs over the edge for the knitted cord to fall freely to the floor. Using this holder made using the machine so much easier!
Now that I had my own holder for my new machine, it was time to try it out with some of my own yarns. Lightweight yarns are recommended for use in this machine so I pulled out some of my leftovers and went to work. You can see in the above picture how much cording I was able to make. I even used some leftover novelty yarn which turned out a really fun and funky looking cord that would look great as a purse handle or formed into fun shapes and tacked onto a hat or made into a headband decoration or any other creative use.
This machine can certainly save time when knitting i-cord and is so much fun to use. There were, however, a few problems I encountered with it besides the issues solved by my little handmade holder. Using the shiny lightweight yarn that was included worked the best. When I switched to my own yarn which was not the shiny type such as Caron brand yarns tend to be, the machine started sticking in spots and I had to actually disassemble the machine and clean out the collection of fuzz that was gunking up the gears. This was a long and tedious process, since the machine is apparently not made with disassembly and reassembly by the user in mind. I did it, though, and learned a lesson in the process...don't use yarns with any kind of fuzz to them. Use only shiny types of yarn such as Caron brand lightweight yarns, or embroidery floss also works well in this machine for a finer cord.
Have you ever used Embellish Knit or Cool Corder made by Bond America? I'd love to hear your experience with it.
Coming up soon are a few more ways to make cord, both knitted and crocheted. I also have another finished oddball blanket to show you before I mail it off for delivery.
Happy Stitching!
Using pieces of scrap wood and my handy dandy miter saw that my husband gave me as a surprise no-reason gift a few years ago, I devised this little holder that rests on the table with a generous area for holding on to it while just enough of the machine hangs over the edge for the knitted cord to fall freely to the floor. Using this holder made using the machine so much easier!
Now that I had my own holder for my new machine, it was time to try it out with some of my own yarns. Lightweight yarns are recommended for use in this machine so I pulled out some of my leftovers and went to work. You can see in the above picture how much cording I was able to make. I even used some leftover novelty yarn which turned out a really fun and funky looking cord that would look great as a purse handle or formed into fun shapes and tacked onto a hat or made into a headband decoration or any other creative use.
This machine can certainly save time when knitting i-cord and is so much fun to use. There were, however, a few problems I encountered with it besides the issues solved by my little handmade holder. Using the shiny lightweight yarn that was included worked the best. When I switched to my own yarn which was not the shiny type such as Caron brand yarns tend to be, the machine started sticking in spots and I had to actually disassemble the machine and clean out the collection of fuzz that was gunking up the gears. This was a long and tedious process, since the machine is apparently not made with disassembly and reassembly by the user in mind. I did it, though, and learned a lesson in the process...don't use yarns with any kind of fuzz to them. Use only shiny types of yarn such as Caron brand lightweight yarns, or embroidery floss also works well in this machine for a finer cord.
Have you ever used Embellish Knit or Cool Corder made by Bond America? I'd love to hear your experience with it.
Coming up soon are a few more ways to make cord, both knitted and crocheted. I also have another finished oddball blanket to show you before I mail it off for delivery.
Happy Stitching!
 Click here to return to HookedOnNeedles.com
 Click here to return to HookedOnNeedles.com
Labels: Embellish Knit, handy helper, i-cord, knitted cord
posted by Mary Grace McNamara on Wednesday, April 8, 2009
![]()
![]()


10 Comments:
I use to have a machine that would make a tube and i would make dresses for my Barbie.
By Jane's Fabrics and Quilts, At
April 8, 2009 at 11:52 AM
Jane's Fabrics and Quilts, At
April 8, 2009 at 11:52 AM
Wow! cool gadget! never seen one of those before!
By Myra, At
April 8, 2009 at 12:19 PM
Myra, At
April 8, 2009 at 12:19 PM
I made a beach bag with handles made from Icord done on the Cool Corder. (http://kitten-with-a-whiplash.blogspot.com/2008/06/holiday.html) I had the same problem with the fuzz that you describe, and had to return one because the crank handle was poorly made. It fit too loosely in the the hole and kept falling out. The replacement came and within a week the handle had snapped off where it goes into the hole. Third time's a charm and this one still works after several years, although initially I was disappointed at not being able to work with anything above a light sportweight yarn.
By Kitten With a Whiplash, At
April 8, 2009 at 3:24 PM
Kitten With a Whiplash, At
April 8, 2009 at 3:24 PM
Hey Mary Grace,
You're always up to something! Knitting an I-chord was in my first ever knit project...a booga bag...I thought it was fun! I didn't know you could crochet one...looking forward to learning about that.
God Bless You,
Merry :)
By Merry, At
April 10, 2009 at 1:26 AM
Merry, At
April 10, 2009 at 1:26 AM
yes the lint collection is a hassle but the compressed air for computers works well to overcome this
By chickyrauch, At
March 6, 2010 at 7:07 PM
chickyrauch, At
March 6, 2010 at 7:07 PM
yes the lint collection is a hassle but the compressed air for computers works well to overcome this
By chickyrauch, At
March 6, 2010 at 7:07 PM
chickyrauch, At
March 6, 2010 at 7:07 PM
I've got one of these. I also found it challenging to hang on to the corder, crank it and monitor the cord & weight. Love your idea for attaching it to the table.
By RAJ, At
September 12, 2010 at 1:39 PM
RAJ, At
September 12, 2010 at 1:39 PM
I just bought one of these and because of fibromyalgia I'm not able to turn the crank by hand for a long time....so I cheat and use a hand drill on it... :-P And it works perfectly!
By Anonymous, At
June 27, 2011 at 4:54 PM
Anonymous, At
June 27, 2011 at 4:54 PM
Mine broke when I used heavy yarn and now the needles are really bent. Could someone please tell me where I could buy some new needles online. Thanks so much.
Doll
By Anonymous, At
April 30, 2013 at 2:28 PM
Anonymous, At
April 30, 2013 at 2:28 PM
I have made seat cushions, by knitting three very long cords, braiding together, then sewing in a circle.
By CDS Studios, At
June 17, 2013 at 3:11 AM
CDS Studios, At
June 17, 2013 at 3:11 AM
Post a Comment
Subscribe to Post Comments [Atom]
<< Home