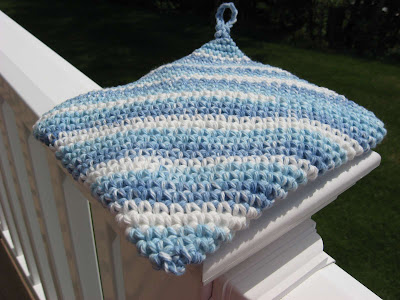
Yesterday these fabulous crocheted hot pads made an appearance here at Hooked On Needles. They've been made by generations of practical crafters, and used by them as well. Would you like to make one or two for yourself? Keep reading and you'll find out all you need to know!
 I put these pictures in here just because I love how they turned out. We've been enjoying some gorgeous weather here in New England lately, perfect for picture taking out on the deck in the morning sun! But if you keep reading, you'll get the information you're looking for, I promise!
I would love to be able to sit with each one of you and walk you through crocheting one of these double thick cotton hot pads, but these videos will have to suffice. Blogger was not cooperating when I tried to publish one video, so I split it into Part One and Part Two and was successful. It actually worked out pretty well since Part One shows how to begin the pattern and get to the point of just having to work hundreds of single crochet stitches. Then Part Two starts up at the point where all the single crocheting is done and it's time to make the loop and finish the seam.
If you're new to crocheting, you may want to brush up on these skills: chain stitch and single crochet.
Now grab your 2 ounce ball of worsted weight crochet cotton, a size H hook, and get cozy. We're going to make us a cotton hot pad!
UPDATE 7/7/2020: Now Blogger is not cooperating at all for showing my videos, so I have posted them on my Facebook page. Click HERE to find the two videos on Facebook.
Here's the written instructions to which you can refer in case you need to refresh your memory on how to get started:
I've listed a handful of these great hot pads in my Etsy shop if you would like to have one but don't want to make it yourself. I'm also happy to take custom orders for one or two, or even for a large number of them if you want to use them for favors at a kitchen bridal shower or give them as gifts.
Coming soon is a cute little sun hat I made by combining parts of a few different hats into one perfect sun hat for a little girl.
Happy Stitching!
 Click here to return to HookedOnNeedles.com
 I put these pictures in here just because I love how they turned out. We've been enjoying some gorgeous weather here in New England lately, perfect for picture taking out on the deck in the morning sun! But if you keep reading, you'll get the information you're looking for, I promise!
I would love to be able to sit with each one of you and walk you through crocheting one of these double thick cotton hot pads, but these videos will have to suffice. Blogger was not cooperating when I tried to publish one video, so I split it into Part One and Part Two and was successful. It actually worked out pretty well since Part One shows how to begin the pattern and get to the point of just having to work hundreds of single crochet stitches. Then Part Two starts up at the point where all the single crocheting is done and it's time to make the loop and finish the seam.
If you're new to crocheting, you may want to brush up on these skills: chain stitch and single crochet.
Now grab your 2 ounce ball of worsted weight crochet cotton, a size H hook, and get cozy. We're going to make us a cotton hot pad!
UPDATE 7/7/2020: Now Blogger is not cooperating at all for showing my videos, so I have posted them on my Facebook page. Click HERE to find the two videos on Facebook.
Here's the written instructions to which you can refer in case you need to refresh your memory on how to get started:
Crocheted Cotton Hot Pad/Pot Holder
2 ounce ball worsted weight crochet cotton
size H crochet hook
Begin by working 37 chain stitches.
Work 3 single crochet (sc) in 2nd chain from hook.
Sc in every chain until one chain remains.
3 sc in last chain.
Work 1 sc into the other side of each chain stitch.
Work 1 sc into first sc and continue working 1 sc into each stitch for 18 or 19 rounds, until the two ends of the top round meet when folded towards each other.
Stop crocheting at a point half way between two ends. Work 15 chain stitches for loop and join with slip stitch into same sc as last stitched worked. Cut yarn, leaving a tail about 1 yard long, and draw tail through loop. Using the long tail, whip stitch both sides of single crochet to each other forming a flat square. Secure end, weave into the inside of the hot pad, clip tail and enjoy!
I've listed a handful of these great hot pads in my Etsy shop if you would like to have one but don't want to make it yourself. I'm also happy to take custom orders for one or two, or even for a large number of them if you want to use them for favors at a kitchen bridal shower or give them as gifts.
Coming soon is a cute little sun hat I made by combining parts of a few different hats into one perfect sun hat for a little girl.
Happy Stitching!
Click here to return to HookedOnNeedles.comLabels: cotton yarn, crochet pattern, crochet pictures, hot pad, tutorial, video
posted by Mary Grace McNamara on Monday, May 17, 2010
![]()
![]()


33 Comments:
Hey Mary Grace!
Another great video...thanks for sharing with us...started one tonight....I think I might have made one before a long time ago...LOL! Makes a great potholder, doesn't it?
Crochet is so fun!
Merry :)
By Merry Thornsburg, At
May 17, 2010 at 9:36 PM
Merry Thornsburg, At
May 17, 2010 at 9:36 PM
thanks Mary Grace....Just have to get some cotton yarn and start making one,will post it when I am finished.
By starry, At
May 18, 2010 at 1:00 AM
starry, At
May 18, 2010 at 1:00 AM
Thanks MaryGrace. I have some cotton yarn bits laying around so this is a perfect project for them.
By Rumi, At
May 19, 2010 at 9:52 AM
Rumi, At
May 19, 2010 at 9:52 AM
Thank you so very much. I haven't crocheted since doing my last niece's baby blanket 16 years ago but want to make presents for friends this Christmas. Your directions and the video are fabulous. Particularly since I'd started another diagonal pattern that said start with 27 chain stitches....I ended up with the tiniest hotpad you can imagine. My husband gets my "mistakes" for Christmas.
Thank you, thank you, thank you. My first hotpad under your direction is beautiful and going to my best friend. Now I have (thanks to the confidence you gave me) another 16 balls of yarn to turn into presents!
Carla
By catghish@pacbell.net, At
September 5, 2010 at 5:44 PM
catghish@pacbell.net, At
September 5, 2010 at 5:44 PM
Thank you for this wonderful tutorial. You go slow enough to explain every step very clearly, and in detail; this is exactly how a tutorial should be. I think I can finally learn how to do this. Thank you again. All of your videos have been helpful.
By Anonymous, At
August 19, 2011 at 7:58 AM
Anonymous, At
August 19, 2011 at 7:58 AM
Thanks so much for your tutorial. Just discovered how to make these beauties yesterday. It was a puzzle until I saw your tutorial. Especially how you finished it off. Thanks again. Happy yarning. AH. Oklahoma
By flannelgirl88, At
March 26, 2013 at 11:25 PM
flannelgirl88, At
March 26, 2013 at 11:25 PM
Thanks for the great tutorial. Just found out how to make these beauties yesterday. Couldnt get the finish correct. Now it looks smooth. Taught my Mother (77) over the phone. She was so excited she did it. Thanks again. Oklahoma
By flannelgirl88, At
March 26, 2013 at 11:28 PM
flannelgirl88, At
March 26, 2013 at 11:28 PM
Great tutorial, but I'm having a problem. I've made a few of these so far and they keep turning out to be rectangular in shape instead of squares.... what am I doing wrong?
By Angie, At
June 3, 2013 at 1:36 AM
Angie, At
June 3, 2013 at 1:36 AM
Hi Angie, thanks for your comment. I would say you probably need to do another round or two before you stitch up the seam. Give that a try and see if you can get a square. It could also be that your stitch height is different than your stitch width resulting in a rectangular shape. Perhaps you could try a smaller hook size so your stitches would be a little tighter. I think these double thick crocheted potholders would be great in any shape!
MGM
By Mary Grace McNamara, At
June 3, 2013 at 8:39 PM
Mary Grace McNamara, At
June 3, 2013 at 8:39 PM
Thank you so much for this - it was very helpful. I have struggled a bit with this method, but I can see that doing three single crochets at each end will make all the difference :-)
By Marie-in-DK, At
March 20, 2014 at 8:04 AM
Marie-in-DK, At
March 20, 2014 at 8:04 AM
I have made thse before and had no problems. Now I've mad one that isn't coming together to stitch up and close. What did I do wrong?
By Seabrax, At
July 15, 2014 at 10:04 AM
Seabrax, At
July 15, 2014 at 10:04 AM
Hi Chris, sorry it's not working out for you! The only thing I can think of is that maybe you are adding stitches in each round, or maybe you have not stitched enough rounds yet and you need a few more before the edges will meet. Hard to know unless I see your work! Keep trying!
MGM
By Mary Grace McNamara, At
July 15, 2014 at 2:51 PM
Mary Grace McNamara, At
July 15, 2014 at 2:51 PM
I'm HOOKED! No pun intended! What great instructions! Thanks for a great tutorial! I love your voice-- very calming and soothing, and the directions were super clear. Guess what all the ladies in my life are getting for Christmas?! :) Thank you thank you thank you!!!!!
By robin chapa, At
August 10, 2014 at 5:03 PM
robin chapa, At
August 10, 2014 at 5:03 PM
Your secret is safe with me, Robin Chapa! I'm so glad you liked this video tutorial. These hotpads are so nice to use, and fun to make too! I use all my leftover scraps of cotton yarn from other projects to make fun color combinations and the diagonal design comes out different on each side. I've seen the cotton yarn on some good sales recently too, so keep an eye out and you can probably save a lot of money on your yarn!
MGM
By Mary Grace McNamara, At
August 10, 2014 at 5:51 PM
Mary Grace McNamara, At
August 10, 2014 at 5:51 PM
Wow I just typed into Pinterest to find a pattern to crochet a pot holder and I found yours. I have crocheted a long time ago and want to do it again. The really weird thing is my name is also Marygrace and my last name starts with M. So I am also MgM! Thanks for the great video and instructions.
By Anonymous, At
October 28, 2014 at 7:05 PM
Anonymous, At
October 28, 2014 at 7:05 PM
Very good instructions! The pace and choice of words for the spoken instructions is excellent. I always called these Magic Potholders, have made tons of them. They are well received gifts. I've taught many beginners how to make them.
Ann
By Anonymous, At
November 27, 2014 at 11:23 AM
Anonymous, At
November 27, 2014 at 11:23 AM
I had received a pair of these hot pads from a patent of mine. I know how to crochet and could not figure it out. So glad to have run into your tutorial. Made one up last night turned out perfect. I have read other tutorials but none as clear as yours. Thanks for sharing!
By Unknown, At
December 30, 2014 at 9:35 PM
Unknown, At
December 30, 2014 at 9:35 PM
Hi Mary Grace, I'm staying busy making your patterns. We're in an unbelievable below 0 freeze. Brrr. Yesterday was the square with 2 oval hot pad and today was this hot pad. Both patterns turned out beautifully. You are so wonderful to share your talents. Thank you. Joan
By Joan, At
January 6, 2015 at 3:06 PM
Joan, At
January 6, 2015 at 3:06 PM
Hi Joan! It's pretty cold here too, but not THAT cold! Great weather for crocheting anything but I usually save my small crochet projects for summer! I am in the middle of a crocheted afghan and it is keeping my lap nice and warm in the evenings! I should write a post about it.
So glad you enjoyed the hot pad video tutorial. I love making those hot pads, and using them too. They wear like iron and work great on the dinner table!
MGM
By Mary Grace McNamara, At
January 6, 2015 at 4:06 PM
Mary Grace McNamara, At
January 6, 2015 at 4:06 PM
I have seen many crochet tutorials on this but this one by far is the best and easiest to follow....thank you for the great tut......
By Anonymous, At
January 15, 2015 at 10:43 PM
Anonymous, At
January 15, 2015 at 10:43 PM
Hi, I have made hundreds of these pot holders, I always use cotton yarn but I never have put the three SC in the ends to start. I also sew the fold together and leave enough yarn to chain a loop in the end to hang them. People love them!
By Diane, At
October 10, 2015 at 11:48 PM
Diane, At
October 10, 2015 at 11:48 PM
I can't see the video but followed written instructions. The hotpad comes out very small, 5" x 5". That doesn't seem right. Maybe the size of my yarn? It's cotton. I don't know what to do other than start off with more chains. Any suggestions?
By Unknown, At
January 2, 2016 at 8:18 PM
Unknown, At
January 2, 2016 at 8:18 PM
Hi Carol, you might try accessing the video on a laptop or desktop computer. My videos are older and were not set up for use on mobile devices. Sorry about that. Someday I'd like to update them, but I am still in nursing school and don't have time to spend on my website right now.
So if your hotpads are turning out too small, I would suggest exactly what you said to do. Start with a longer beginning chain. I've made these with all different lengths of beginning chain and they come out all different sizes. So go for it! Make them as big or as small as you like!
Hope this helps!
MGM
By Mary Grace McNamara, At
January 3, 2016 at 9:20 AM
Mary Grace McNamara, At
January 3, 2016 at 9:20 AM
Thank you so much for your great hot pad video tutorial. I tried following other written directions for this pattern and kept coming up short with precise directions. Your video was very thorough. Thanks again!
By DebbieJo, At
February 11, 2016 at 4:27 PM
DebbieJo, At
February 11, 2016 at 4:27 PM
I love these hot pads. My question is when the pad starts turning in aren't I seeing the wrong side?
Thx
Linda
By Unknown, At
June 29, 2016 at 5:10 PM
Unknown, At
June 29, 2016 at 5:10 PM
Hi Linda! Yes, you are right! If you watch the first video, towards the end at about 6:50, you will hear me mention that you need to turn your work right side out. Some people like the look of the wrong side better though, so whichever side you like the best can be your outside!
Hope this helps,
MGM
By Mary Grace McNamara, At
June 29, 2016 at 6:04 PM
Mary Grace McNamara, At
June 29, 2016 at 6:04 PM
Thank you so much for this post!! I saw a finished product and admired it (so practical and so neat!) - and tried to figure out how to put it together with only one seam - an expedient method escaped me until I saw your video! Also, what a fabulously clean finish! - could be used for finishing many other projects. Thank you again. - Demystified in VA
By Anonymous, At
June 29, 2017 at 3:25 PM
Anonymous, At
June 29, 2017 at 3:25 PM
Dear Demystified, so happy I could be of assistance! I love this pattern and love to hear that other people do too! This past fall and winter, I crocheted about 50 of these to bring to a family reunion in April and I handed them out to anyone who wanted them. They were a big hit and I did not bring one of them home!
MGM
By Mary Grace McNamara, At
July 10, 2017 at 4:14 PM
Mary Grace McNamara, At
July 10, 2017 at 4:14 PM
Good morning! I saw someone making these and came home to Google a pattern. Luckily, I found yours. But, I've tried Internet Explorer, Chrome, and Edge browsers but the video link don't appear. Have you removed them or moved them to another location? Based on others' comments, it would seem that they are very helpful. Thanks in advance!
By Unknown, At
June 6, 2018 at 11:18 AM
Unknown, At
June 6, 2018 at 11:18 AM
Hi Mary, I have not moved them, but Blogger has changed something about displaying videos and I have not had time to update my site. I have discovered though that they can be viewed on an iphone for whatever reason. Such a puzzle and so frustrating, but I hope this helps.
MGM
By Mary Grace McNamara, At
June 10, 2018 at 9:08 PM
Mary Grace McNamara, At
June 10, 2018 at 9:08 PM
Thank you very much for the written instructions and the video. I plan on making a lot of these pot holders as Christmas gifts.
By Bobby Jo, At
August 24, 2018 at 8:38 AM
Bobby Jo, At
August 24, 2018 at 8:38 AM
Does decreasing or increasing number in original chain make pad bigger? I accidentally chained 42 and my pad turned our more rectangle. I prefer a large square.
By lisajeant, At
December 1, 2022 at 1:18 PM
lisajeant, At
December 1, 2022 at 1:18 PM
Hi Lisajeant, yes changing the number in the original chain will change the size of the finished item. To make sure your pot holder ends up square instead of rectangular, you need to make sure you are working enough rounds before closing it up. When I make them, it always seems like I have to do one or two more rounds than I should have to, but then it does end up square. But a rectangle hot pad works just as well!
Hope this helps,
MGM
By Mary Grace McNamara, At
January 25, 2023 at 5:28 PM
Mary Grace McNamara, At
January 25, 2023 at 5:28 PM
Post a Comment
Subscribe to Post Comments [Atom]
<< Home