It's the end of August and the school year has already begun. It seems like we barely just started summer and here we are at the end of it! As far away as Christmas might seem now, we all know it will be here in the blink of an eye.
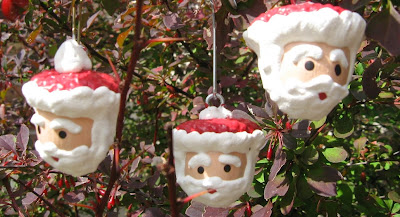
Today I have a fun little tutorial using some of those acorns that are falling from your oak trees. This year happens to be a "big acorn" year for some of the oak trees on our street, and we've been able to collect a few that are quite large, beautifully shaped and intact. A little craft paint turns them into these cute little Santa ornaments!
 Keep reading to see how...
 First you need to collect your acorns. Look for well shaped acorns with their caps still attached, with no worm holes or other deformities or nastiness.
 You don't have to use huge acorns, but I found that painting on the bigger ones was just a little easier than the smaller ones. These monster sized acorns only come around every few years, and this year was it! I think it has something to do with what kind of winter we had last year, or will have this year, or something like that. Anyway, you can see how big this guy is and this one was just freshly fallen from the tree so still very green!
 Since I wanted to start my painting soon and not wait for these acorns to dry out naturally, I spread them onto a cookie sheet and put them in a warm oven (170 degrees) for a few hours to dry them out. Then I gave them a good wipe down and popped the caps off of them...
 ...and glued them back on using hot glue. This is important because if you don't glue the caps on, they will eventually fall off naturally as the acorn ages.
 The next step is to screw into the top of each acorn a small screw eye so you will have something by which to hang the jolly little Santa when he is finished.
 So just screw the little screw eyes into the top, as close to the middle as you can.
 You don't even need to pre-drill a hole or anything like that. You should just be able to push it into the cap and turn a few times to get it started. Then you can put a toothpick or the end of a small screwdriver or paintbrush through the hole to make turning it easier, or just turn it using your fingers. The first few aren't so bad on the fingers, but if you are doing a lot of these all at once, you might want to save your fingertips and use something to help turn the screw. Ask me how I know!
 Let the painting begin! Using inexpensive acrylic craft paint, paint the caps red. Paint the edge of the cap as well as the top, but you don't have to paint all the way down to the acorn itself because the lower part of the edge will be covered in white...you know how the edge of Santa's hat is all white and fluffy, right? Let that dry, and then paint another coat of red on the caps.
 When the second coat of red is dry, paint not quite half of the acorn with a peach color, using even downward strokes from the top of the acorn to the point. Let that coat dry, then paint another coat of peach for the face.
 When the second coat of peach is dry, turn the acorns over and apply dimensional white paint in a swirly motion onto the back side of the cap edge, then apply more of the dimensional white paint all over the back side of the acorn that was not painted peach. If needed, use a paintbrush to spread out the white paint or pull out little points in it to give it the look of white hair. I just used a small paintbrush and sort of pushed it around until it covered the back half of the acorn and looked all thick and fluffy. Give this coating of white a good 12 hours to dry completely.
 Once the back of the hat and head are completely dry, it's time to apply a small circle of red in the area where the mouth will be. I made my red circles bigger than they needed to be so that I had more flexibility in adding the "facial hair" later.
 Add little dots of black paint for the eyes. I used the non-business end of a small paintbrush dipped into a little puddle of black paint and then just touched it to the face where I wanted the eyes to be. Make sure you don't place the eyes too high on the face or you won't have room for the white trim on the cap and the fluffy white eyebrows. Santa does need his fluffy white eyebrows you know! Let the faces dry before proceeding.
 Once the faces are dry, you can finish the white trim on the caps, applying the dimensional white paint in swirling motions to the front part of the cap.
 Then you can add the little eyebrows just by squeezing out little lines of white over the eyes.
 Next apply the mustache by making two curved lines starting from just above the red circle and going down and out towards the side of the face. After that, make a little V below the mustache so that just enough of the red circle shows for the mouth. Fill in the sideburns and beard with swirlies of fluffy white paint to finish him off. At this point, you can add the white pom pom at the top of the cap around the screw eye, or you can wait until the white paint on the face dries to do that.
 I found it necessary to hang my wet-faced Santas to dry because they wanted to roll forward onto their wet faces when I put them on the paper towel lined cookie sheet. I just used a plastic container and a few dowels and a paint brush and some paper clips to hang them.
 It looks like a little Santa convention inside my plastic container! Leave the white paint to dry completely, at least 12 hours, and then spray the little guys with a coating of clear acrylic sealer spray which you can get at any paint or craft store. Let the sealer dry and enjoy your painted acorn Santa ornaments!
Happy Stitching!
 Click here to return to HookedOnNeedles.com
Today I have a fun little tutorial using some of those acorns that are falling from your oak trees. This year happens to be a "big acorn" year for some of the oak trees on our street, and we've been able to collect a few that are quite large, beautifully shaped and intact. A little craft paint turns them into these cute little Santa ornaments!


Happy Stitching!
Click here to return to HookedOnNeedles.com Labels: acorn ornaments, Christmas, Christmas crafts, Painting, Santa, tutorial
posted by Mary Grace McNamara on Thursday, August 28, 2014
![]()
![]()


3 Comments:
That's cute!
By Sarah DeBree, At
August 28, 2014 at 5:44 PM
Sarah DeBree, At
August 28, 2014 at 5:44 PM
I love these Santa's!
By annemarie, At
August 29, 2014 at 9:19 AM
annemarie, At
August 29, 2014 at 9:19 AM
hoW cute are they :D
By The Webbers living a life at the beach, At
September 1, 2014 at 12:50 AM
The Webbers living a life at the beach, At
September 1, 2014 at 12:50 AM
Post a Comment
Subscribe to Post Comments [Atom]
<< Home