Here's a quick and easy newborn baby hat that can be whipped up in a flash (about 2 hours) using up leftover yarn, and it is the perfect gift to bring to the hospital for that sweet little bundle of joy.
 I used Lion Brand's Baby Soft yarn for mine, but you can use any sportweight yarn you have. This can also be done using several colors. Just make up a stripe pattern as you go along, or as you run out of one color just move on to another! I like this yarn because it is very soft, just like the name says, and it flows nicely through my fingers. I never have a problem with it splitting. I used a size G hook for this project.
Start at the top of the hat by making 4 chain stitches. Make a slip stitch through both loops of the first chain. This will form a ring.

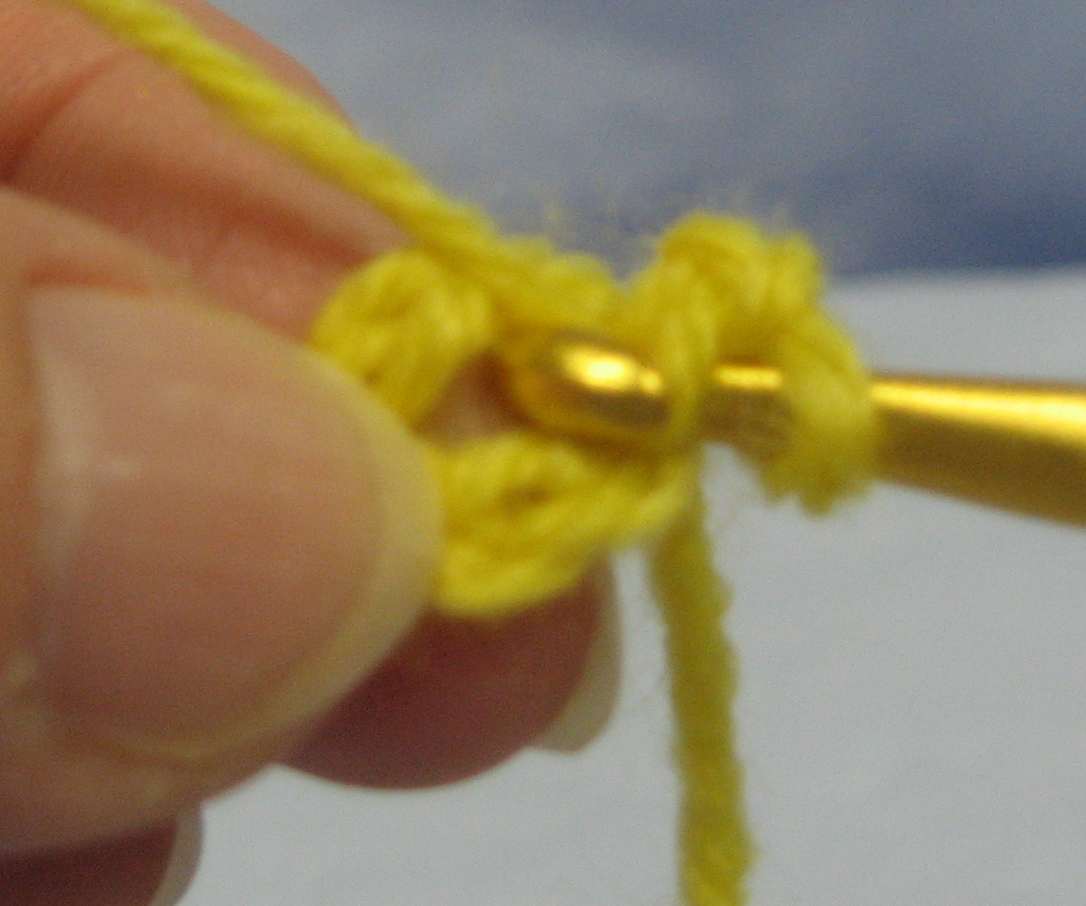
For Round 1, make two chain stitches, then work 13 double crochets into the middle of the ring, like so:

Put your hook through both loops of the first double crochet and make a slip stitch to join. You will have 13 stitches. Note here that the beginning chain 2 of this row is not counted as a stitch.

This is what your piece will look like after Round 1:

Round 2: Chain 2, do not turn your work around. Continue crocheting in the same direction until instructed to turn. Make 2 double crochets into each stitch around the circle and join with a slip stitch into the first double crochet, just as you did in the previous round. You will have 26 stitches and this is what your piece will look like:

Round 3: Chain 2, then make 1 double crochet in the first stitch, 2 double crochets in the next stitch, 1 double crochet in the next stitch. Continue around the circle making 2 double crochets, then 1 double crochet, ending with 2 double crochets for a total of 39 stitches. Join as before. This is what your piece will look like:

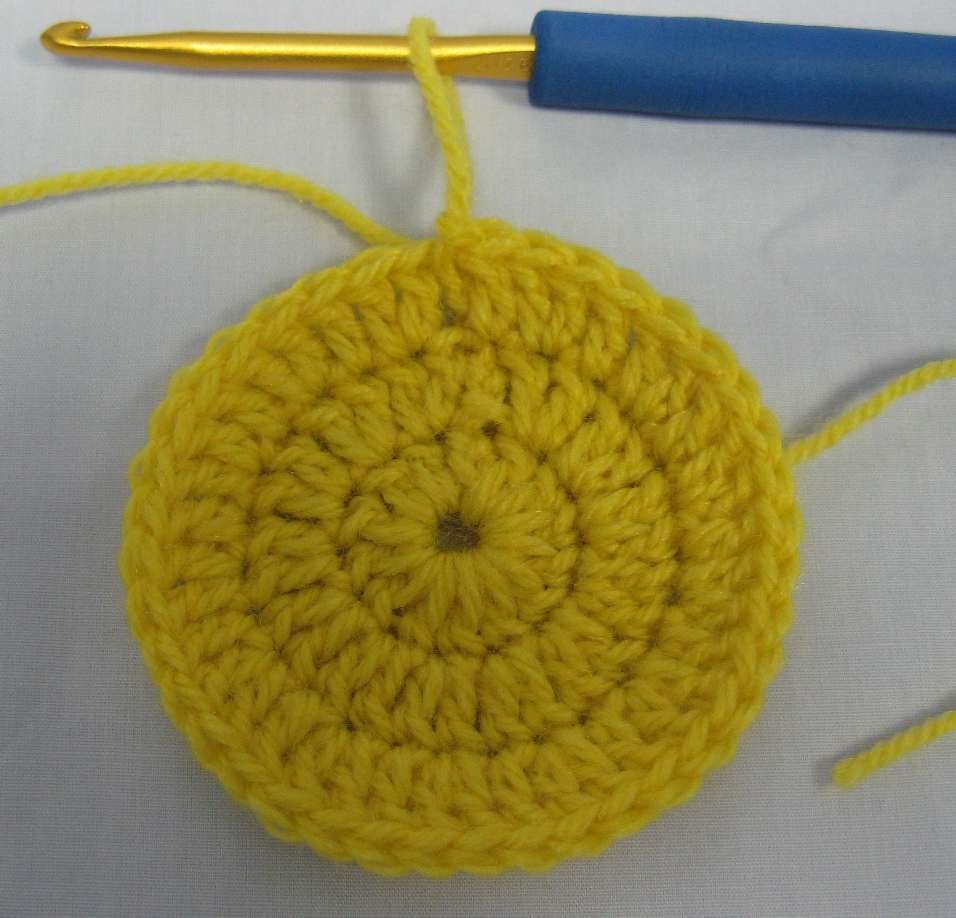
Round 4: Chain 2, then make 1 double crochet in each of the next 2 stitches, then 2 double crochets in the next stitch. Continue around the circle making 1, then 1, then 2, and join as before. You will have 52 stitches and this is what your piece will look like:

Round 5: Chain 2, then work 1 double crochet in each stitch around and join as before. You will still have 52 stitches and this is what your piece will look like:

Repeat Round 5 until you have 13 rounds total. Now it's starting to look like a hat!

Round 14: Chain 2 and turn your work around. Make 1 double crochet in each stitch around and join as before.
Rounds 15 and 16: Chain 2, do not turn work. Make 1 double crochet in each stitch around and join as before. You will still have 52 stitches and this is what your work will look like:

Round 17 (edging): Do not turn work. Chain 1, then make one single crochet in the first stitch. Continue around doing 1 chain, then 1 single crochet, 1 chain, then 1 single crochet without skipping any stitches in the previous row. This will make a little bump between each single crochet. Join with a slip stitch in the first single crochet. You will have a nice decorative edge on the hat that looks like this:

Cut your yarn and pull the tail through the loop on the hook and tighten to make a knot. Weave the loose ends into a few stitches. Turn up the cuff made by the last 3 rows of double crochet being done in the opposite direction from the rest of the hat. Now you have yourself a cozy little infant hat that looks like this:

Congratulations!
Next time I will share this pattern with you in a more condensed version so you can print it out and tuck it into your crochet bag. This is a great take-along project and a good one for those hot summer days when you just need something light and easy to work on. Enjoy!
NOTE: I came up with this pattern after making a similar baby hat pattern by Susan Kraus which can be found here. Susan has other patterns and tips, and lots of information about crocheting for charity.
Happy Stitching!
 Click here to return to HookedOnNeedles.com

Start at the top of the hat by making 4 chain stitches. Make a slip stitch through both loops of the first chain. This will form a ring.

For Round 1, make two chain stitches, then work 13 double crochets into the middle of the ring, like so:
Put your hook through both loops of the first double crochet and make a slip stitch to join. You will have 13 stitches. Note here that the beginning chain 2 of this row is not counted as a stitch.

This is what your piece will look like after Round 1:

Round 2: Chain 2, do not turn your work around. Continue crocheting in the same direction until instructed to turn. Make 2 double crochets into each stitch around the circle and join with a slip stitch into the first double crochet, just as you did in the previous round. You will have 26 stitches and this is what your piece will look like:

Round 3: Chain 2, then make 1 double crochet in the first stitch, 2 double crochets in the next stitch, 1 double crochet in the next stitch. Continue around the circle making 2 double crochets, then 1 double crochet, ending with 2 double crochets for a total of 39 stitches. Join as before. This is what your piece will look like:
Round 4: Chain 2, then make 1 double crochet in each of the next 2 stitches, then 2 double crochets in the next stitch. Continue around the circle making 1, then 1, then 2, and join as before. You will have 52 stitches and this is what your piece will look like:

Round 5: Chain 2, then work 1 double crochet in each stitch around and join as before. You will still have 52 stitches and this is what your piece will look like:

Repeat Round 5 until you have 13 rounds total. Now it's starting to look like a hat!

Round 14: Chain 2 and turn your work around. Make 1 double crochet in each stitch around and join as before.
Rounds 15 and 16: Chain 2, do not turn work. Make 1 double crochet in each stitch around and join as before. You will still have 52 stitches and this is what your work will look like:

Round 17 (edging): Do not turn work. Chain 1, then make one single crochet in the first stitch. Continue around doing 1 chain, then 1 single crochet, 1 chain, then 1 single crochet without skipping any stitches in the previous row. This will make a little bump between each single crochet. Join with a slip stitch in the first single crochet. You will have a nice decorative edge on the hat that looks like this:

Cut your yarn and pull the tail through the loop on the hook and tighten to make a knot. Weave the loose ends into a few stitches. Turn up the cuff made by the last 3 rows of double crochet being done in the opposite direction from the rest of the hat. Now you have yourself a cozy little infant hat that looks like this:

Congratulations!
Next time I will share this pattern with you in a more condensed version so you can print it out and tuck it into your crochet bag. This is a great take-along project and a good one for those hot summer days when you just need something light and easy to work on. Enjoy!
NOTE: I came up with this pattern after making a similar baby hat pattern by Susan Kraus which can be found here. Susan has other patterns and tips, and lots of information about crocheting for charity.
Happy Stitching!
Click here to return to HookedOnNeedles.com Labels: baby hat, crochet pattern
posted by Mary Grace McNamara on Thursday, June 12, 2008
![]()
![]()


64 Comments:
Thanks a lot Mary, I was searching for such instructions along with the photos which can help me till the end of the whole crochet.... Your Crocheted Baby Hat instruction really helped me a lot... please let me know if you post any more crochet instructions with photos...
My email id is supriya.ambetkar@gmail.com
By Anonymous, At
September 26, 2009 at 6:52 AM
Anonymous, At
September 26, 2009 at 6:52 AM
Hello Mary, I would need some help from you, as this cap is for a new born baby, can you please suggest me what would be the basic chain stitch and then row 1 and 2 if I want to make a big cap for a 1 year old kid.
By Anonymous, At
November 14, 2009 at 2:04 AM
Anonymous, At
November 14, 2009 at 2:04 AM
If you want to make this hat bigger for an older child, I would suggest working a few more increase rows before Row 5. Do this by working a dc in each of next 3 stitches, then 2 dc in next stitch, continue around like this and join for the first extra round. For each subsequent extra round, add one more dc before working 2 into the next stitch. When it looks to be big enough around for the size you want, start with Row 5 of the pattern working even until the length of the hat is big enough. Then continue with the cuff at round 14.
Hope this helps. If you want replies directly to you, please leave an email address, or change your profile so that you can receive replies. Makes it much easier for me too!
MGM
By Mary Grace McNamara, At
November 16, 2009 at 12:11 PM
Mary Grace McNamara, At
November 16, 2009 at 12:11 PM
Thanks a lot Mary, I will try this and let you know if i have any difficulty.
my Email address is supriya.ambetkar@gmail.com
By Anonymous, At
November 19, 2009 at 1:33 AM
Anonymous, At
November 19, 2009 at 1:33 AM
I made hats for my whole family for Christmas, with this pattern. For larger hats, I used a larger needle. Love the pattern and love the hats.
By Lewismom, At
January 2, 2010 at 12:05 AM
Lewismom, At
January 2, 2010 at 12:05 AM
Hello Mary, I loved this hat. It is just what I was looking for. But as I'm a beginner I would need your help to increase the size of this hat for an adult. It will be for myself (22-23 in would be the final size). Would you mind helping me to make this hat bigger. Thank you!
By Anonymous, At
January 5, 2010 at 4:30 PM
Anonymous, At
January 5, 2010 at 4:30 PM
Please see the third comment on this post for help on making this hat bigger. It may require a little trial and error, but it should work out if you give it a try!
MGM
By Mary Grace McNamara, At
January 5, 2010 at 5:53 PM
Mary Grace McNamara, At
January 5, 2010 at 5:53 PM
I just crocheted two of these (so fast, easy and way gorgeous results!) and they fit my one and half year old so I think this design might fit up to a small two year old. Thanks so much - this was the only very easy to follow blog I could find and I'm hooked!!
By Mommy Does, At
October 4, 2010 at 12:35 PM
Mommy Does, At
October 4, 2010 at 12:35 PM
THANK YOU FOR THIS WEB SITE, I BEEN LOOKING FOR A PATTERN FOR A BABY HAT. ginnylou63@yahoo.com
By Anonymous, At
January 12, 2011 at 3:00 PM
Anonymous, At
January 12, 2011 at 3:00 PM
I am new to crochet and am having a hard time understanding how to do 2 double crochets in one stitch. Could you pass along some direction? Thank you!
By Beth, At
January 14, 2011 at 5:42 PM
Beth, At
January 14, 2011 at 5:42 PM
Thank you so much for you response. Makes sense now :-)
By Beth, At
January 15, 2011 at 1:07 AM
Beth, At
January 15, 2011 at 1:07 AM
thank you for this great tutorial. I've been looking for a simple but pretty pattern. The pictures are a great help.
By JoAnn, At
January 20, 2011 at 1:12 PM
JoAnn, At
January 20, 2011 at 1:12 PM
I love this pattern!!! So easy!!!!!
By Anonymous, At
June 19, 2011 at 11:59 AM
Anonymous, At
June 19, 2011 at 11:59 AM
First hat I've made :) Thanks so much!!!
By BrookeD, At
July 29, 2011 at 1:22 PM
BrookeD, At
July 29, 2011 at 1:22 PM
Merci pour ce tutoriel, il est très beau. Quelle taille de crochet faut il utiliser ? Merci beaucoup
Christine
antoinechristine@msn.com
By Anonymous, At
October 11, 2011 at 10:19 AM
Anonymous, At
October 11, 2011 at 10:19 AM
first thing i have crochet that actually look like the picture! great tutorial. thanks.
By sukey, At
November 9, 2011 at 6:28 PM
sukey, At
November 9, 2011 at 6:28 PM
first hat I have ever made and it came out BEAUTIFUL!!! Thank you for sharing.
By Anonymous, At
November 22, 2011 at 10:17 PM
Anonymous, At
November 22, 2011 at 10:17 PM
How do you turn your work? I'm confused on that part :( overall I love this thank you so much!!
By Anonymous, At
January 8, 2012 at 12:08 AM
Anonymous, At
January 8, 2012 at 12:08 AM
You made it so easy! I made the hat in 2 hours! Thanks.
By Cheryl, At
January 10, 2012 at 1:26 PM
Cheryl, At
January 10, 2012 at 1:26 PM
Thank you Mary! Even though I have crocheted many adult hats, I was having trouble getting the right size for a baby hat for a gift. Your pattern turned out perfectly and the pictures really helped me get the stitches in the right places. I look forward to making many more and donating most of them. Diane
By Anonymous, At
January 14, 2012 at 12:29 AM
Anonymous, At
January 14, 2012 at 12:29 AM
Will you tell us how to turn work please? I'm almost don't but im stuck on the turning part. I love it already just confused like I said :/
By Anonymous, At
January 14, 2012 at 6:00 PM
Anonymous, At
January 14, 2012 at 6:00 PM
To Anonymous who is having trouble turning her work: Please leave an email address if you have a question so I can respond directly to you!
Go here: http://www.hookedonneedles.com/2010/01/learn-to-crochet-woven-stitch-video.html and watch the video...at about the 1 minute 30 second mark, you will see me turn my work. For this hat, you turn your work where indicated just like you would when working a flat piece.
Hope this helps!
MGM
By Mary Grace McNamara, At
January 14, 2012 at 7:07 PM
Mary Grace McNamara, At
January 14, 2012 at 7:07 PM
I'm left-handed. The beginning of my hat looks like yours until row 5, then it looks nothing like your photo. Is this because I'm left-handed? I am following your instructions to a t and have the correct number of stitches. Thanks.
By Anonymous, At
February 7, 2012 at 1:33 AM
Anonymous, At
February 7, 2012 at 1:33 AM
To Lefthanded Anonymous: Please leave your email address so I can respond directly to you! Crocheting lefthanded should not cause your piece to turn out any differently than mine. How is yours looking after row 5? Hard to diagnose a problem without seeing it! My email address is on the sidebar if you'd like to send a picture of the troubled area.
MGM
By Mary Grace McNamara, At
February 7, 2012 at 12:47 PM
Mary Grace McNamara, At
February 7, 2012 at 12:47 PM
first thing i have crochet that actually look like the picture! great tutorial. thanks.
By خياطة وتفصيل, At
February 13, 2012 at 9:38 AM
خياطة وتفصيل, At
February 13, 2012 at 9:38 AM
What a great tutorial! That is an easy and pretty hat. Thanks so much!
Happy Sew Darn Crafty Party!
Blessings,
Susie
By Little Susie Home Maker, At
April 2, 2012 at 12:52 PM
Little Susie Home Maker, At
April 2, 2012 at 12:52 PM
I just had to say thank you for this. I know it must have took time and I so appreciate it. I am a beginner and have been trying to follow beginner tutorials with no luck. I understood the abreviations, the directions just made no sense. Now that I found this, it all makes sense! Thank you!
By Unknown, At
April 10, 2012 at 10:37 AM
Unknown, At
April 10, 2012 at 10:37 AM
So glad this tutorial could help you understand and have success with your crocheting, Jennifer12! These little hats hopefully will be just the beginning of a lifelong addiction!
MGM
By Mary Grace McNamara, At
April 10, 2012 at 11:49 AM
Mary Grace McNamara, At
April 10, 2012 at 11:49 AM
Thank you so much! My grandmother owned a craft store in the early 1980s, but she passed away when I was 6. I've always enjoyed crocheting, knitting, and quilting, but I've never really gotten past the extreme basics. I'm talking about a double crochet scarf. I just finished a dc baby blanket, which was my largest item. With two different colors no less! Anyways, I've never been able to master any sort of circular item, because I couldn't picture what the different stages would look like. I found your website about 4 hours ago, and now I have an adorable little blue baby hat for my nephew due in August. It's a little lumpy, but I know my grandma would be proud. So, thank you.
By marzipan87, At
June 12, 2012 at 9:36 PM
marzipan87, At
June 12, 2012 at 9:36 PM
hi Mary.thank you very much for showing us a very detail instruction.this is the first time I'm making a hat and planning to give it to my dear friend who is going to deliver in few days time.I've tried making an adult scarf by following your guide on how to do basket weave stitch.It turn out very well indeed and now every body was asking for the same version.
By craftypetals, At
July 6, 2012 at 11:45 PM
craftypetals, At
July 6, 2012 at 11:45 PM
Success!!! Thank you so much for taking the time to post these instructions and pictures. I've crocheted hats before, but I started at the bottom and just removed stitches as I got to the top. This looks so much better, and I'm so proud I was able to follow your great instructions. :)
By Lynn, At
September 6, 2012 at 11:02 AM
Lynn, At
September 6, 2012 at 11:02 AM
Thank you for the pattern, I have been wanting to learn how to make baby hats forever. My dilema is that the top part bubbles and I cannot figure out what I am doing wrong. I've made 3 hats and they have all done the same thing. I would appreciate any help you can give me. I would also like to be added to your e-mail list for any new patterns if I could.
Thank you
Debbie
cakelady2@roadrunner.com
By Anonymous, At
September 16, 2012 at 9:46 PM
Anonymous, At
September 16, 2012 at 9:46 PM
Hi Mary! So excited to make a cute little hat! Mine turned out a little bigger than "newborn" Should I just use a smaller needle? Thanks, April
mandaholbert@gmail.com
By mandaholbert, At
October 26, 2012 at 6:26 PM
mandaholbert, At
October 26, 2012 at 6:26 PM
Hi Mary, love the pattern, thank you! Mine turned out a little bigger than it was supposed to. It would probably fit a 1 year old. Is my yarn too "big" or my needle, or both? thank you!
April Holbert
mandaholbert@mail.com
By mandaholbert, At
October 26, 2012 at 6:28 PM
mandaholbert, At
October 26, 2012 at 6:28 PM
Hi there,
Thanks for the wonderful pattern. I am relatively new to this - but mine has ended up weird so far. I am done with all 13 rows, but it looks almost square? I ended up with up to 55 stitches instead of 52 along the way. I am not sure how that happened, I kept close count. Was I miscounting somewhere? Or am I not supposed to be counting the chain? Thanks!
Sarah
By Nesting with SaSa, At
November 9, 2012 at 1:17 AM
Nesting with SaSa, At
November 9, 2012 at 1:17 AM
Hi Sarah, it would seem that you are not spacing your increases properly and also miscounting somewhere. I'd suggest ripping out what you've done and starting again, paying particular attention to stitch count on each round and regular increases. Hope this helps!
MGM
By Mary Grace McNamara, At
November 9, 2012 at 7:43 AM
Mary Grace McNamara, At
November 9, 2012 at 7:43 AM
I just made the little yellow infant hat from the pattern you posted. I used red and white and put a crocheted snow ball on the top to turn it into a simple santa hat :) Thank you so much for sharing the pattern. I am a relative newbie, so was thrilled with how the hat turned out, not least because of your very clear instruction and the photos.
By AnnMarie, At
December 9, 2012 at 10:52 AM
AnnMarie, At
December 9, 2012 at 10:52 AM
I am a beginner and this is just what I was looking for. Thanks you so much. Can't wait to get started.
By Kathy Davis, At
January 23, 2013 at 6:15 PM
Kathy Davis, At
January 23, 2013 at 6:15 PM
Easy to follow tutorial! I'm a beginner. The hat came out a lot bigger than expected, was hoping for a newborn hat but it should fit by the time he's one! Guess ill try again and modify the stitching...
By Klbc3, At
May 5, 2013 at 8:48 PM
Klbc3, At
May 5, 2013 at 8:48 PM
I am a beginner and this tutorial was easy to follow! Only problem, hats WAY too big for a newborn, guess ill have to try again and adjust the measurements. Thanks!
By Klbc3, At
May 5, 2013 at 8:50 PM
Klbc3, At
May 5, 2013 at 8:50 PM
Love the tutorial! I too, ended up with a hat bigger than newborn size. I used a G hook and medium worsted 4 yarn. Any advice would be greatly appreciated. What did I do wrong??? Jennifer.harp.hoyt@me.com
By Jennifer, At
July 12, 2013 at 1:21 AM
Jennifer, At
July 12, 2013 at 1:21 AM
For all those whose hats are turning out bigger than expected, try using baby yarn and a smaller hook. Sport weight yarn like the Lion Brand Baby Soft I used for this tutorial is smaller than medium worsted 4 yarn, so your hat would naturally turn out bigger when using bigger yarn.
Hope this helps!
MGM
By Mary Grace McNamara, At
July 12, 2013 at 7:59 PM
Mary Grace McNamara, At
July 12, 2013 at 7:59 PM
Mine is actually looking like a hat. Thank you for a simple pattern with pictures. That helps a lot. I did have to have my grandma explain some of it. But I'd never crochet in my life.
By Amanda, At
January 13, 2014 at 2:53 AM
Amanda, At
January 13, 2014 at 2:53 AM
my hat is just turning into a circle whats going wrong.... please reply mary
By Anonymous, At
January 19, 2014 at 12:42 PM
Anonymous, At
January 19, 2014 at 12:42 PM
Hi Anonymous Mary! I sure hope you see this because it's the only way I have to respond to you!
Look back at round 5. You will see that starting in this round, you do not continue to increase. This is what makes the 'hat' shape!
I hope this helps!
MGM
By Mary Grace McNamara, At
January 19, 2014 at 12:49 PM
Mary Grace McNamara, At
January 19, 2014 at 12:49 PM
Thank you! This was my first project and it turned out beautifully
By Anonymous, At
January 30, 2014 at 8:44 AM
Anonymous, At
January 30, 2014 at 8:44 AM
Thanks for posting this, I have been looking for a pattern for beginners.
By Anonymous, At
March 20, 2014 at 11:23 AM
Anonymous, At
March 20, 2014 at 11:23 AM
hello...easy to follow instructions, but dont understand why you would need to turn your work around? if not turned, wouldnt it still turn out?
By Anonymous, At
April 6, 2014 at 8:38 PM
Anonymous, At
April 6, 2014 at 8:38 PM
Hello Anonymous! Good observation! Yes, it would still turn out fine, but the turned up cuff of the hat would be showing the wrong side of the crochet instead of the right side, and the edging would also show the wrong side. I just have a thing about the wrong side of crochet, so whenever possible on an item that only shows one side, I like it to be the right side!
MGM
By Mary Grace McNamara, At
April 6, 2014 at 11:00 PM
Mary Grace McNamara, At
April 6, 2014 at 11:00 PM
These instructions were great, easy to follow, good illustrations. And yes, it only took me a short time to crochet. Thank you so much. This is a great site...:)
By Anonymous, At
April 30, 2014 at 6:43 AM
Anonymous, At
April 30, 2014 at 6:43 AM
Thank you for the pattern! My hat turned out great, except for the part that folds up. That part sort of fanned out and looks weird. Any idea what I did wrong? Do my stitches need to be tighter?
By Abby @ I Used To Have A Brain, At
May 6, 2014 at 10:20 AM
Abby @ I Used To Have A Brain, At
May 6, 2014 at 10:20 AM
Hi Abby, so glad to hear that you made a hat successfully! The only thing I can suggest would be to count your stitches on each round to make sure you are not adding any stitches. If that is not the case, then you could always decrease a stitch or two on each round to make the cuff not fan out. You would just have to play with it to discover the right number of stitches to decrease and if it is necessary on each round. Another thing you could try is using a smaller hook for the cuff than you used for the body of the hat and see if that makes a difference.
Hope this helps!
MGM
By Mary Grace McNamara, At
May 6, 2014 at 11:33 AM
Mary Grace McNamara, At
May 6, 2014 at 11:33 AM
Hi Mary first of all thanks so much for the pictures on the pattern im a visual learner and I've tried to find a pattern like this theres only one problem i dont know how to turn my work could you please explain that to me
By Lulu, At
October 10, 2014 at 4:36 PM
Lulu, At
October 10, 2014 at 4:36 PM
Hi Lulu, thanks for writing! If you look at my video for single crochet, which can be found at this link http://www.hookedonneedles.com/2008/09/learn-to-crochet-single-crochet-video.html, at about the 3 minute mark pay attention to what I do with the row I just stitched. That is what you want to do to turn your work. The only difference between turning your work for the hat pattern and what you see in the video is that you are working in the round for the hat and the video shows turning a flat piece. But the concept is the same, just turning your piece so you start stitching in the opposite direction from what you were stitching before.
I hope this helps!
MGM
By Mary Grace McNamara, At
October 10, 2014 at 7:22 PM
Mary Grace McNamara, At
October 10, 2014 at 7:22 PM
I was looking for an easy baby hat pattern. This one is perfect!
By An Ordinary Girl, At
January 22, 2015 at 12:17 AM
An Ordinary Girl, At
January 22, 2015 at 12:17 AM
Wonderful pattern Mary, I added a row of shells around the edge for a "girlish" twist. Thank you for the easy pattern and helpful pictures.
By The Swenssons, At
May 31, 2016 at 8:10 PM
The Swenssons, At
May 31, 2016 at 8:10 PM
Thanks Mary....its really helpful
By Shaimamilhan, At
September 16, 2016 at 9:58 AM
Shaimamilhan, At
September 16, 2016 at 9:58 AM
I found this crochet pattern very easy to understand. I have been crocheting for years. However I am just now learnig yo to read a written pattern. This pattern was extremly well wtitten. I wish all pattern were like that.
By Marina, At
November 12, 2016 at 9:39 PM
Marina, At
November 12, 2016 at 9:39 PM
wow!!!
u ve made it look so easy...
thank uuu :)
By Rajis Craft Hobby, At
December 12, 2016 at 3:59 AM
Rajis Craft Hobby, At
December 12, 2016 at 3:59 AM
I love this pattern. It's simple but looks great. I used an F hook manx found this is the size I want for a newborn. Thanks-Becky
By Anonymous, At
December 16, 2016 at 2:21 PM
Anonymous, At
December 16, 2016 at 2:21 PM
Quick question for those of us who learned crochet from a person who's not from the US (I'm an American but learned from a German lady who used European/UK terminology so I have to ask since I know both ways):
When you say 'double crochet' (dc)... are you meaning an American dc, or a UK dc (which is a US single crochet)? The picture looks like US dc (UK treble crochet/tc). Please confirm-- thanks!
By Megan M., At
January 8, 2018 at 11:35 AM
Megan M., At
January 8, 2018 at 11:35 AM
Hi Megan M. Thanks for writing! Yes, all my instructions use US terms, so when I say double crochet, I mean US double crochet.
Hope this clarification helps you.
MGM
By Mary Grace McNamara, At
January 8, 2018 at 10:15 PM
Mary Grace McNamara, At
January 8, 2018 at 10:15 PM
I always end up with 27 on the second row what am I doing wrong
By Unknown, At
January 21, 2018 at 7:42 PM
Unknown, At
January 21, 2018 at 7:42 PM
Hi Roberta, thanks for writing. What I like to do is put a stitch marker into the very first stitch of each round so that I know where to do my slip stitch at the end of the round to join. And then be sure to count carefully so that you get the right stitch count for each round. Keep in mind too that the beginning chain 2 of each round does not count as a stitch so your slip stitch would not go into the stop of that at the join. I hope this helps.
MGM
By Mary Grace McNamara, At
January 23, 2018 at 7:32 PM
Mary Grace McNamara, At
January 23, 2018 at 7:32 PM
Post a Comment
Subscribe to Post Comments [Atom]
<< Home