This pattern I'm going to share with you today came to me in a rather round about way, but I have received permission from everyone involved to share it with you here. I mentioned just recently that Terri who used to blog frequently about awesome crochet stuff found this Crocheted Pin Cushion on a website from Denmark, and the pattern is available free on Ravelry. It was written entirely in Danish, by Liselotte who shows some beautiful pictures of her finished pin cushions on her website.
Terri, being the clever and creative person that she is, used the pictures to figure out how to make the pin cushion and wrote down the pattern. She has graciously given her permission to post the pattern here for you to use. Before you do, though, do yourself a favor and take a peek at Liselotte's pin cushions and at Terri's too. They will be a great source of inspiration for you!
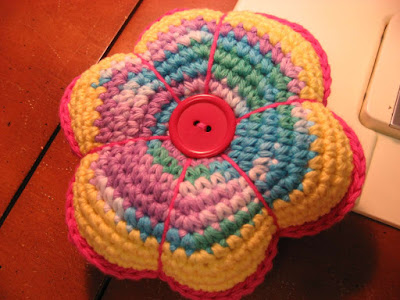 That's the top.
 And this is the bottom of my pin cushion.
Enjoy!
Happy Stitching!

Click here to return to HookedOnNeedles.com
-->
Terri, being the clever and creative person that she is, used the pictures to figure out how to make the pin cushion and wrote down the pattern. She has graciously given her permission to post the pattern here for you to use. Before you do, though, do yourself a favor and take a peek at Liselotte's pin cushions and at Terri's too. They will be a great source of inspiration for you!


Liselotte's Crocheted Pin Cushion in English, via Terri and me!
Start with magic loop of 6 (video of Magic Loop Method coming shortly!)
NOTE: Do not join rounds. Put a marker or piece of scrap yarn in the first stitch of each round to help keep track.
2 sc in each sc - 12 stitches
*1 sc in next sc, 2 sc in next sc* Repeat from * to * around - 18 stitches
*1 sc in next 2 sc, 2 sc in next sc* Repeat from * to * around - 24 stitches
*1 sc in next 3 sc, 2 sc in next sc* Repeat from * to * around - 30 stitches
*1 sc in next 4 sc, 2 sc in next sc* Repeat from * to * around - 36 stitches
Continue increasing in this manner until you have 72 stitches, or until the piece is the size you want it. Make another one in the same manner and the same size.
Join the 2 pieces together at the outside edges, using single crochet with wrong sides together. Before closing up the last 10 stitches or so, stuff pretty firmly with polyester fiberfill, then continue crocheting the opening closed.
Using a doubled piece of yarn, wrap the yarn from the center, around the outside, making pie-shaped wedges spaced evenly around the outside. Pull each one tightly to make the petals puffy. Tie off yarn securely and embellish as you like.
I used re-purposed buttons on the top and bottom of mine. Terri crocheted a little flower for her center. Here are her directions for that:
Start with magic loop of 5 (or how ever many petals you want) Join with sl st to first sc of the 5 sc in your magic loop. In that same st, sc, 3 dc, sc and sl st - 1 petal made. Sl st into next st, sc, 3 dc, sc and sl st - 2 petals made.
Continue around until all petals have been made. Finish with a sl st in the first petal. Attach to center of pin cushion.
Enjoy!
Happy Stitching!
Click here to return to HookedOnNeedles.com
-->
Labels: crochet pattern, crocheted pin cushion
posted by Mary Grace McNamara on Thursday, August 20, 2009
![]()
![]()


25 Comments:
Adorable pin cushions. Thanks for making the pattern available in English. It will be great as little stocking stuffers for a few of my friends this year. To cute!!
My thanks to Liselotte, also!
By Pat, At
August 20, 2009 at 11:31 AM
Pat, At
August 20, 2009 at 11:31 AM
THANK YOU for the translation and making it available in English - and happy crocheting :-)
By Liselotte, At
August 20, 2009 at 1:28 PM
Liselotte, At
August 20, 2009 at 1:28 PM
Thanks for sharing ... another thing to add to my to do list!
By Adrienne, At
August 20, 2009 at 1:55 PM
Adrienne, At
August 20, 2009 at 1:55 PM
nicely done, mary grace...the pin cushions are so fun and quick to make! ☺
By Purple and Paisley, At
August 20, 2009 at 2:05 PM
Purple and Paisley, At
August 20, 2009 at 2:05 PM
I'm doing the "Happy Dance" in Ohio! Thanks so much Liselotte! And thank you Mary Grace for writing out the pattern!
God Bless You,
Merry :)
By Merry Thornsburg, At
August 20, 2009 at 5:34 PM
Merry Thornsburg, At
August 20, 2009 at 5:34 PM
I have a question - I've read the directions and played with a practice piece. I have two questions:
1. Do you start each row with a single chain?
2. When do you join the rounds?
Thanks!
By Sweet P, At
August 20, 2009 at 9:00 PM
Sweet P, At
August 20, 2009 at 9:00 PM
If I ever get good enough at crocheting this is a must do. Thanks. I have it bookmarked!
By Abby and Stephanie, At
August 21, 2009 at 7:02 AM
Abby and Stephanie, At
August 21, 2009 at 7:02 AM
Hello Mary Grace,love the pin cushion, especially the colours....glad you are in the Stichers Angel Swap...it was a lot of fun last year...hugs lyn
By Anonymous, At
August 21, 2009 at 8:26 AM
Anonymous, At
August 21, 2009 at 8:26 AM
Thank you Mary Grace for sharing your pattern. This is really pretty. I recently finished a baby afghan in your woven stitch tutorial, it is awesome and can see myself using that stitch again in the future.
Thanks so much for sharing!
By Anonymous, At
January 25, 2010 at 5:23 AM
Anonymous, At
January 25, 2010 at 5:23 AM
I love this pattern, but am not sure what size hook to use. Suggestions?
By Unknown, At
June 3, 2010 at 10:35 AM
Unknown, At
June 3, 2010 at 10:35 AM
Hi Sarah, I hope you come back here to read this since your profile and email are not available and I cannot email you back.
Anyway, it would depend on the yarn you are using. I would suggest using a hook one or two sizes smaller than what is suggested for the yarn you use so that you will get nice tight stitches and the batting won't poke through.
MGM
By Mary Grace McNamara, At
June 3, 2010 at 9:11 PM
Mary Grace McNamara, At
June 3, 2010 at 9:11 PM
Although your version of the pattern is nice, unfortunately it's different to the version in the original pattern. The outer border is put on differently and the weaving of the strings is different.
Yours is nice, but viewers should be aware that it is different.
By Anonymous, At
August 28, 2010 at 6:31 AM
Anonymous, At
August 28, 2010 at 6:31 AM
This is awesome. I can see myself making heaps of these for my friends, as well as myself.
Hugs
Christine
By Unknown, At
February 9, 2011 at 7:46 PM
Unknown, At
February 9, 2011 at 7:46 PM
I am so thrilled with this pattern! I made my first one here Crochet Attic Thanks so much for posting this!
Thanks,
Eileen
By Eileen, At
April 5, 2011 at 7:17 AM
Eileen, At
April 5, 2011 at 7:17 AM
Thanks so much for the sweet pincushion...love it.
By Gail, At
January 19, 2012 at 8:34 PM
Gail, At
January 19, 2012 at 8:34 PM
Can't wait to try this :D I've been wanting to combine my small pincushions to one big one, so my hubby suggested making one instead of buying it. This is the first pattern I've seen that I really like, so thanks!!
By Jen, At
January 28, 2012 at 11:31 AM
Jen, At
January 28, 2012 at 11:31 AM
These are beautiful! Thank you so much for creating an English version. I've linked to this page (as well as the original) in my blog this morning.
It's at http://www.mooglyblog.com/wp-content/uploads/2012/08/Hexagons-On-Point.jpg if you would like to see it. :) Thanks again!
By Tamara, At
August 27, 2012 at 11:21 AM
Tamara, At
August 27, 2012 at 11:21 AM
Lovely pattern.
Do you join the last round?
By Montse, At
October 9, 2012 at 11:43 AM
Montse, At
October 9, 2012 at 11:43 AM
Thanks for posting this pattern. I have made one so far and it is adorable even with it's imperfections! Now that I know how easy these are I think I am hooked and will have to make a bunch for anyone I know who sews haha!
I posted a picture of my creation with a link back to your page I hope that's okay :)
you can view it here:
http://thewayicrochet.blogspot.ca/2013/03/crochet-pin-cushion.html
By Danielle Richard, At
March 17, 2013 at 3:01 PM
Danielle Richard, At
March 17, 2013 at 3:01 PM
Thank you so much for sharing this lovely pattern.
I was able to make one of these at work today =-)
I blogged about it here on my site and posted a link back to you as well.
http://34creations.com/new-this-week-are-pincushions/
Thanks again.
By Unknown, At
April 4, 2013 at 9:35 PM
Unknown, At
April 4, 2013 at 9:35 PM
I love this! I'm wanting to make these as welcome gifts for our Sewing Club. However, I was wondering what size/type yarn to use? Or will anything work? Thanks!
By Unknown, At
January 8, 2014 at 10:51 PM
Unknown, At
January 8, 2014 at 10:51 PM
Hi Melissa, thanks for the question! I used leftover worsted weight cotton yarn from a boatload of dishcloths I had made, but you can use whatever kind of yarn you have. I do suggest using a hook size that is one or two sizes smaller than what is recommended for the yarn you are using, just so you get nice tight stitches and the batting stays inside!
Hope this helps!
MGM
By Mary Grace McNamara, At
January 9, 2014 at 9:44 AM
Mary Grace McNamara, At
January 9, 2014 at 9:44 AM
Hi,
I'm a crochet player in Taiwan. I love the pin cushion you shared on your blog. I've finished mine and shared it on my blog and facebook. Many people also love this pattern and want to make one on their own, and many of them hope that I can offer the Chinese version so that it would be easier for them to read.
Would you mind if I translate this pattern into Chinese? I would share it only with some of my facebook group members,and I would make sure the origin of the pattern is noted. Looking forward to your reply. Thanks for reading.^^
This is my blog post about this cushion.
http://alison0527.pixnet.net/blog/post/104166241
By Allie, At
April 8, 2014 at 4:59 AM
Allie, At
April 8, 2014 at 4:59 AM
Loved the pincushion pattern.
Made one myself in less than two hours this afternoon.
Picture posted on my blog with a link to your pattern:
http://echosweb.com/2014/07/20/i-made-crochet-pretties/
By Echo, At
July 20, 2014 at 8:19 PM
Echo, At
July 20, 2014 at 8:19 PM
thanks for sharing this pattern!
Rose
By Unknown, At
May 7, 2020 at 11:10 AM
Unknown, At
May 7, 2020 at 11:10 AM
Post a Comment
Subscribe to Post Comments [Atom]
<< Home