Siggy Block swaps are so fun to participate in because you get to make some number of your own blocks, sign them with your name and hometown, and then mail them to the host. The host then organizes all the blocks into piles so that each participant receives one block from everyone in the swap.
When I did Rachel's Modern Siggy Swap last January, I really enjoyed following her tutorial and then receiving 100 different blocks also made from her tutorial. You can see my blocks HERE. Isn't that fun fabric?
So anyway, I got into another siggy swap recently and there were only two requirements for the blocks. They had to be 4 1/2 inches square unfinished, and the middle signature section had to be white. That was it. So at first I thought I would use Rachel's tutorial again and do the diagonal signature section. But then I decided I wanted to do something quick and easy. I also wanted to use up scraps that I had already.
This is how I made my siggy blocks - a quick and easy tutorial...
 NOTE: This method can be done using a regular cutting guide and rotary cutter instead of the tool I used. It just won't be quite as quick!
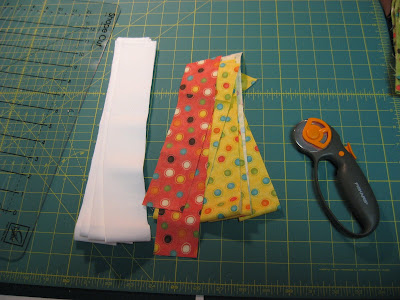
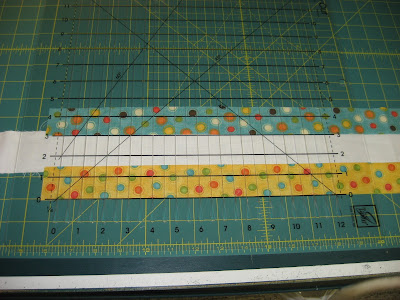
Using my new Shape Cut Slotted Ruler, I cut 2-inch strips from some leftover scrap fabric and also from some white yardage that I still had even after using a bunch of it for my Postage Stamp Quilt! The scrap fabric was what I used for my Eat Play Sleep Repeat quilt from a few months ago. I had some very small strips of the red and yellow leftover, and some bigger pieces of the blue and green. So I used up the red and yellow first, then cut what I needed off the blue and green.
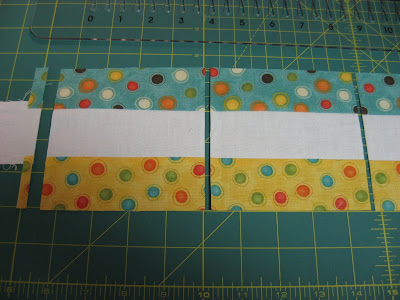
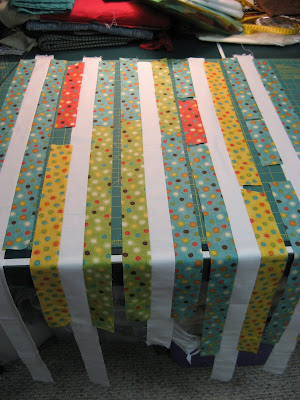 Then I stitched the scrap fabric onto each side of the white strips and pressed the seam allowances towards the scrap fabric.
 You can see here that I just kept adding the smaller scraps onto the white strips and didn't worry about how they would line up with the fabric on the other side. Remember, this is a quick and easy way to make these blocks!
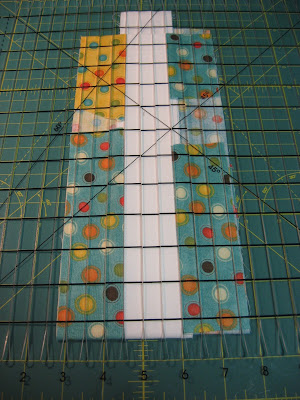 Since the finished size had to be 4 1/2 inches, I folded up each strip to fit under my Shape Cut ruler. I lined up the middle white section so that it took up three of the half-inch sections on the ruler. Then I cut off the quarter inch sections from each side by running my rotary cutter straight down the slots at each end of the strip. This gave me perfect 4 1/2 inch wide strips.
 Then I laid out each strip and, again using my Shape Cut ruler, quickly cut each strip into 4 1/2 inch squares.
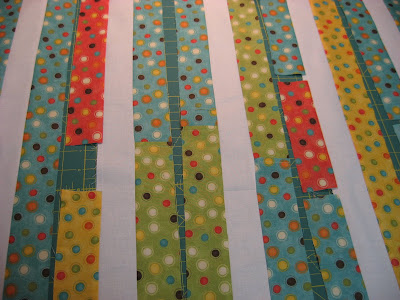
 When I came to a section where the scrap fabric strips ended, I just squared up the strip again at the next spot where there was scrap fabric on both sides of the white.
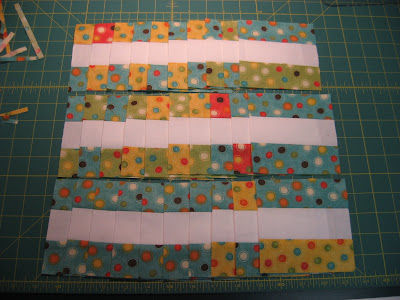 In a jiffy, I had 30 perfect 4 1/2 inch siggy blocks, all ready for my signature.
If you haven't used one of these Shape Cut Slotted Rulers yet, and you find yourself cutting lots of strips as in this tutorial, I would highly recommend grabbing a coupon for your local craft store and picking one of these up. You will not believe the time savings, and also how accurate your cutting will be. I am certain that the use of this new tool is what made my postage stamp quilt come together so easily.
Try it! You'll like it!
Happy Stitching!
 Click here to return to HookedOnNeedles.com
When I did Rachel's Modern Siggy Swap last January, I really enjoyed following her tutorial and then receiving 100 different blocks also made from her tutorial. You can see my blocks HERE. Isn't that fun fabric?
So anyway, I got into another siggy swap recently and there were only two requirements for the blocks. They had to be 4 1/2 inches square unfinished, and the middle signature section had to be white. That was it. So at first I thought I would use Rachel's tutorial again and do the diagonal signature section. But then I decided I wanted to do something quick and easy. I also wanted to use up scraps that I had already.
This is how I made my siggy blocks - a quick and easy tutorial...
 NOTE: This method can be done using a regular cutting guide and rotary cutter instead of the tool I used. It just won't be quite as quick!
Using my new Shape Cut Slotted Ruler, I cut 2-inch strips from some leftover scrap fabric and also from some white yardage that I still had even after using a bunch of it for my Postage Stamp Quilt! The scrap fabric was what I used for my Eat Play Sleep Repeat quilt from a few months ago. I had some very small strips of the red and yellow leftover, and some bigger pieces of the blue and green. So I used up the red and yellow first, then cut what I needed off the blue and green.
 Then I stitched the scrap fabric onto each side of the white strips and pressed the seam allowances towards the scrap fabric.
 You can see here that I just kept adding the smaller scraps onto the white strips and didn't worry about how they would line up with the fabric on the other side. Remember, this is a quick and easy way to make these blocks!
 Since the finished size had to be 4 1/2 inches, I folded up each strip to fit under my Shape Cut ruler. I lined up the middle white section so that it took up three of the half-inch sections on the ruler. Then I cut off the quarter inch sections from each side by running my rotary cutter straight down the slots at each end of the strip. This gave me perfect 4 1/2 inch wide strips.
 Then I laid out each strip and, again using my Shape Cut ruler, quickly cut each strip into 4 1/2 inch squares.
 When I came to a section where the scrap fabric strips ended, I just squared up the strip again at the next spot where there was scrap fabric on both sides of the white.
 In a jiffy, I had 30 perfect 4 1/2 inch siggy blocks, all ready for my signature.
If you haven't used one of these Shape Cut Slotted Rulers yet, and you find yourself cutting lots of strips as in this tutorial, I would highly recommend grabbing a coupon for your local craft store and picking one of these up. You will not believe the time savings, and also how accurate your cutting will be. I am certain that the use of this new tool is what made my postage stamp quilt come together so easily.
Try it! You'll like it!
Happy Stitching!
Click here to return to HookedOnNeedles.comLabels: quilting, Shape Cut, siggy block, tutorial
posted by Mary Grace McNamara on Wednesday, February 2, 2011
![]()
![]()


3 Comments:
The slotted ruler will be perfect for your postage stamp quilt. What a great idea!
By Nedra, At
February 2, 2011 at 4:10 PM
Nedra, At
February 2, 2011 at 4:10 PM
It is amazing how much I learn from your posts - you are a wealth of information and I am enjoying every bit of it!! Love these blocks.
By annemarie, At
February 2, 2011 at 9:23 PM
annemarie, At
February 2, 2011 at 9:23 PM
Wonderful tute MG!! I used my Shape Cut ruler on my piano-keys border for my sampler. It worked out great! Love it! 8-)
By the way, great siggy blocks!
By Myra, At
February 9, 2011 at 1:40 AM
Myra, At
February 9, 2011 at 1:40 AM
Post a Comment
Subscribe to Post Comments [Atom]
<< Home