About 19 years ago, a friend of mine asked if I would help her make a quilt. She had purchased a book on a technique for log cabin quilt blocks that was what I would call 'assembly line'. It intrigued me, so we went fabric shopping together. She bought her fabric and I bought mine so we could each work the same pattern at the same time, only in different fabrics. Hers was to be a gift for some relative. Mine had no specific purpose except to help her make this quilt.
Since I am still in my 'use up what I have while making useful things and freeing up space in my sewing room' mode here, and this quilt and its associated extra fabric have been taking up space in my sewing room for far too many years, I decided this will be my next project to finish.
So I pulled it out, ironed it, ripped border strips, sewed them on, and now all I have left to do is piece the backing and make an appointment with my favorite long arm machine so I can quilt it myself. Here's how it looked just after the 'pull it out' step...
 I spread it out on my husband's pool table (shhhh, don't tell him! He thinks I have enough space without moving into his!) just to get a good look at it and remember what it looked like.
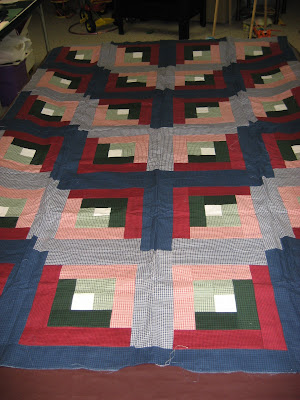 Pretty cool design, don't you think? Kind of plays tricks on your eyes.
 I love the darker and lighter shades of the three colors, and the white square in the middle of each block really stands out.
As I recall, the instructions for this quilt called for all the fabric to be ripped into 2 1/2 inch strips and then stacked in a certain order. The white fabric was cut into squares and stacked. Then the first light color was sewn onto all the white squares and trimmed. After that the same light color was sewn onto the newly pieced blocks and trimmed, and so on until all the blocks were finished. It was a very fast and efficient way to piece these blocks and it did not require cutting and measuring each rectangle of fabric and then keeping track of what went where. I sure wish I had that book or remembered the name of it because it was full of quick and efficient piecing techniques like that. It also included lots of different layouts for log cabin blocks. I'm not sure I would choose this layout if I were to do it again today, but I'm certainly not going to rip out all that stitching and start over!
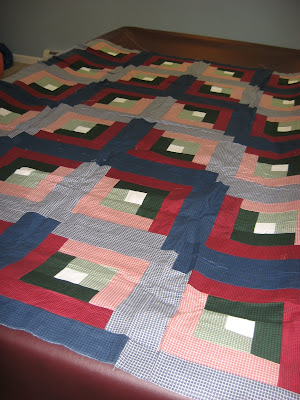
I had enough of the dark red fabric to do the first border around the whole thing. I also had enough of the light green fabric to do another border, so I think this will end up being a very generous twin size quilt. The backing will be pieced using all the leftover fabric except for what I need for the binding, which will be made from the dark blue fabric.
I am pretty sure my quilting partner from way back when finished her quilt and gave it as a gift shortly after our quilting time together. So now I think it's about time I finish mine!
Happy Stitching!
 Click here to return to HookedOnNeedles.com
Since I am still in my 'use up what I have while making useful things and freeing up space in my sewing room' mode here, and this quilt and its associated extra fabric have been taking up space in my sewing room for far too many years, I decided this will be my next project to finish.
So I pulled it out, ironed it, ripped border strips, sewed them on, and now all I have left to do is piece the backing and make an appointment with my favorite long arm machine so I can quilt it myself. Here's how it looked just after the 'pull it out' step...
 I spread it out on my husband's pool table (shhhh, don't tell him! He thinks I have enough space without moving into his!) just to get a good look at it and remember what it looked like.
 Pretty cool design, don't you think? Kind of plays tricks on your eyes.
 I love the darker and lighter shades of the three colors, and the white square in the middle of each block really stands out.
As I recall, the instructions for this quilt called for all the fabric to be ripped into 2 1/2 inch strips and then stacked in a certain order. The white fabric was cut into squares and stacked. Then the first light color was sewn onto all the white squares and trimmed. After that the same light color was sewn onto the newly pieced blocks and trimmed, and so on until all the blocks were finished. It was a very fast and efficient way to piece these blocks and it did not require cutting and measuring each rectangle of fabric and then keeping track of what went where. I sure wish I had that book or remembered the name of it because it was full of quick and efficient piecing techniques like that. It also included lots of different layouts for log cabin blocks. I'm not sure I would choose this layout if I were to do it again today, but I'm certainly not going to rip out all that stitching and start over!
I had enough of the dark red fabric to do the first border around the whole thing. I also had enough of the light green fabric to do another border, so I think this will end up being a very generous twin size quilt. The backing will be pieced using all the leftover fabric except for what I need for the binding, which will be made from the dark blue fabric.
I am pretty sure my quilting partner from way back when finished her quilt and gave it as a gift shortly after our quilting time together. So now I think it's about time I finish mine!
Happy Stitching!
Click here to return to HookedOnNeedles.com
posted by Mary Grace McNamara on Friday, January 14, 2011
![]()
![]()


3 Comments:
Such memories your quilt brings to me - I made three or four of these over twenty years ago - two of them we are still using. Was the book by any chance Eleanor Burns Log Cabin Quilt in a Day?? I remember tearing the strips and stacking just as you mentioned. I still have this book if you are interested. I would be more than glad to share it with you. Now I am getting the urge to make another one - the fabrics I used back then are definitely "dated".
By annemarie, At
January 14, 2011 at 9:16 PM
annemarie, At
January 14, 2011 at 9:16 PM
This looks like the fields & furrows log cabin pattern. I, also, have Eleanor Burns,Quilt in a Day book, it's a must have for the quilt library. Love the fabrics there ageless!
By Anonymous, At
January 15, 2011 at 8:13 AM
Anonymous, At
January 15, 2011 at 8:13 AM
Talk about standing the test of time ;-) That blanket is beautiful and so classic - I bet you feel great having picked this back up!
By Adrienne, At
January 15, 2011 at 9:47 AM
Adrienne, At
January 15, 2011 at 9:47 AM
Post a Comment
Subscribe to Post Comments [Atom]
<< Home