Hooked on Needles


Monday, January 30, 2012

Crocheted Tablecloth ~ My Mom's at it Again!

Thread crochet is one of my favorite types of crochet. I've made loads of doilies and table runners crocheted in thread and I think only a few of them are still in my possession. They make wonderful gifts! I've shown some of them before, HERE, HERE and HERE.

The thread crochet that I do is usually small and fairly quickly finished, but my mother seems to be attracted to Really Big thread crochet projects. I've shown you a few of them before, HERE and HERE. Well, she just finished another one and sent me some pictures. All I can say is Wow! What do you say about this...?


Crocheted Tablecloth
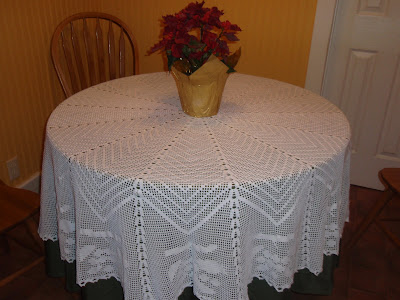
This is a tablecloth crocheted by my mother using size 10 crochet cotton. As I recall, her little kitchen table is about 4 feet across which would make this tablecloth about 8 feet in diameter! Whew! That's a lot of crocheting!


Crocheted Tablecloth
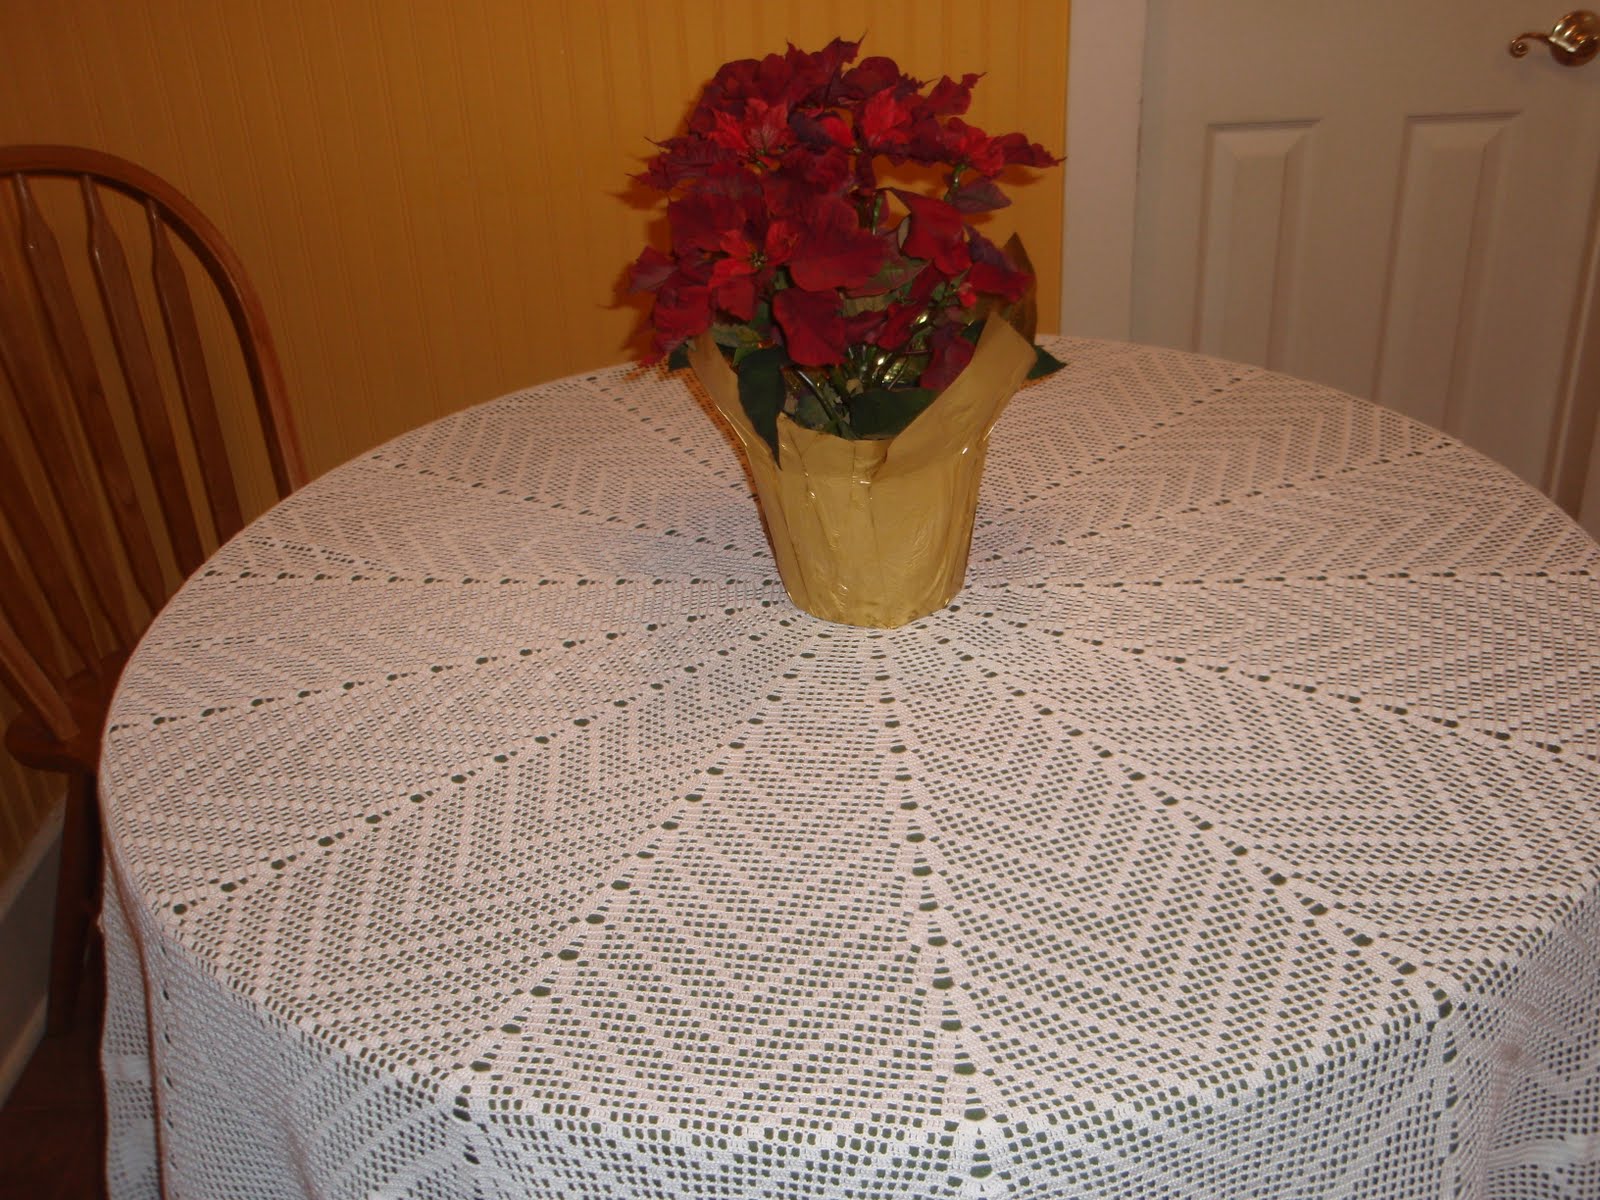
Here you can see that the design has a cherry pattern in the lower part of each section as well as a pretty little scallop around the entire edge. Mom said that the original pattern, from the August 1995 issue of Magic Crochet magazine, called for the cherry design to be crocheted in red and green with a brown stem. She opted for the all-white look which I think I would prefer too! She found this magazine at a garage sale and paid only 10 cents for it! I checked on eBay just now and, well, let's just say, you can't get this magazine on eBay for 10 cents! If you find it at a garage sale or an estate sale, you may be able to take it home for practically nothing, but not on eBay!

I have not done any thread crocheting for a while, and seeing this beautiful tablecloth almost makes me want to take up a long-term project like this. But then again, I do like the near-instant gratification of smaller projects, and the lap-warming qualities of making a big cozy afghan in the winter, so maybe a big thread crochet project is not in my future. But you never know!

Happy Stitching!


Click here to return to HookedOnNeedles.com

Labels: , ,

Friday, January 27, 2012

Upcycled Denim Zippered Accessory Bag

With some of the leftover salvaged denim from this tote bag, and another fun vest panel in a school theme, and of course a zipper, I made another handy little quilted accessory bag which would be perfect for a teacher or anyone who likes apple/school themed things. Take a look...


Upcycled Denim Zippered Accessory BagFor this bag, the denim is layered with fusible fleece and the appliquéd pieces are fused onto the denim and then quilted, so the denim is very sturdy and the bag stands up all by itself.


Upcycled Denim Zippered Accessory BagCute, don't you think?


Upcycled Denim Zippered Accessory BagInside the red zipper, the bag is lined with more school themed fabric which has been backed with fusible interfacing for added structure.


Upcycled Denim Zippered Accessory BagThere's the little school house...


Upcycled Denim Zippered Accessory Bag...and on the other side are some falling leaves.

This bag is bigger than the other zippered accessory bags I made before. I like to use up every inch possible of any scrap fabric I have, so I made this bag as big as I could with these pieces of denim and the zipper I had. It measures 9 by 4 inches on the boxed bottom, 8 inches high, 12 inches from seam to seam at the top and the handle extends 6 inches from the side of the bag. This one will be heading over to my Etsy shop along with the denim tote bag which is already there. These little bags are so fun to make, and I love creating useful things from fabric that was destined for the trash, because there is still so much life left in sturdy denim and I'm such a Frugal Franny! What can I say? I don't like to waste things! Nothing wrong with that, is there?

Happy Stitching!


Click here to return to HookedOnNeedles.com

Labels: , , , ,

Wednesday, January 25, 2012

Upcycling Jeans ~ Don't waste that good denim!

Is there anyone in this world who can honestly say they do not like denim? I love denim! I love wearing it, feeling it, and making things out of it. I even had a whole love seat upholstered in denim with matching pillows...c o z y! I think it's such a shame when someone thinks it's a good idea to throw away a pair of jeans just because the zipper broke or the waistband is threadbare or the seams split. A pair of jeans has so much denim that, even if it is no longer usable as a pair of jeans, all that denim can be salvaged and made into other durable and useful items.

Here's one that I just finished, made out of an old pair of jeans and some fabric strategically cut from some vest panels I had in my stash for a long time!


Upcycled Denim tote bagIs that not a cheerful looking tote bag?


Upcycled Denim tote bagThe inside lining is layered with fusible fleece and quilted to give the bag even more structure than what the denim gives it on its own.


Upcycled Denim tote bagThe handles are also layered with two layers of fusible fleece and quilted...


Upcycled Denim tote bag...and triple stitched into the bag for strength and durability.


Upcycled Denim tote bagThis bag is generously sized (which of course is because the jeans were generously sized :) ), but even if you had a small pair of jeans to work with, the denim could be salvaged and pieced to make whatever project you had in mind.

I've made other things from upcycled jeans and clothing and listed them HERE, so if you're looking for ideas for putting to good use clothing that can no longer be used as clothing, go check it out! Or if you like to make things as gifts or just for fun but you don't have a budget for new fabric, you can always ask people for their old clothing or find articles of clothing at a thrift store to remake and upcycle. Be creative and have fun with it!

Happy Stitching!

Click here to return to HookedOnNeedles.com

Labels: , , ,

Friday, January 20, 2012

Fun Little Zippered Accessory Bags

Last week I showed you a little zippered accessory bag and a tote bag that I had made from some leftover Make Life fabric after making my swap gift for the Accessory Bag swap. You can see those bags HERE. And then I showed you what I received in this same swap, which you can see HERE. Ooooh, I love that sewing fabric!

Today it's time to show you the bags I made for the swap and a few others I have made since then. Here they are...


Fun Little Zippered Accessory BagsThe bag on the right with the blue zipper is what I sent to Mary for the swap, along with a printed copy of my Susie's Quilted Cinch Sack pattern and four fat quarters to make one if she wants to. I hope she does, because it's an easy pattern to make and a wonderful bag to use as a purse. I've been using the one I made in the pattern for almost two years now, and even though it doesn't look quite nearly as good as it did then, it still holds lots of stuff and is so easy to put on my back and go! It really is time for me to make myself another bag!

But back to these little zipper bags...

The bag on the left with the green zipper has also already been sent on to someone as a little surprise gift. Both of these little bags were made using the Strippy Charm Pouch tutorial over at Moda Bake Shop. The larger bag in the center with the red zipper used up the leftover stripes from making the other two bags and was made using the Scrappy Apple Bag tutorial also at Moda Bake Shop. The only change I made was adding the little loop tab on the outside of the bag and I made it with a little bit different dimensions to fit the zipper I had and the scraps I used. This bag has not been spoken for and is available for $15 plus shipping. If you're interested, let me know. It will make its way into my Etsy shop soon!


Fun Little Zippered Accessory BagsThis darling little zipper bag was made using the pieces I had leftover after cutting my charms for the Shades of Gray charm swap recently, and adding that cute tape measure fabric on the bottom from my stash and a cute little black on white floral print for the inside lining.


Fun Little Zippered Accessory BagsFor the strap on this one, I doubled the width of the strip used to make the strap and folded it over four times instead of just two as the pattern calls for. This made the strap much more stiff which I like better.


Fun Little Zippered Accessory BagsThere's the cute little floral print on the inside. This bag has already been spoken for.


Fun Little Zippered Accessory BagsAnd these two beauties were made using the same basic design of the other bags, only using different dimensions to fit the fabric I had available. This fabric is from Moda's Fandango line by Kate Spain and was leftover from piecing the backing for my Fandango Cartwheels quilt which you can see in progress HERE.


Fun Little Zippered Accessory BagsKate Spain is one of my very favorite designers and each fabric line that she designs is better than her last! Isn't that red floral print just fabulous?


Fun Little Zippered Accessory BagsI used it to line both of these little bags! Yum! I have also finished yet another zippered bag using this red print as the entire outside of the bag, and the blue/green stripe print as the lining, but I don't have a picture of that one yet!

All these little bags will end up over in my Etsy shop for purchase, but if you like any of them and want to purchase one, just zip me an email and I'll set up a listing for you. They are only $15 each and I dare say their quality, materials, workmanship and design rival those high priced, name brand (VB) bags you find in boutique stores made by a company that used to pride itself on products made in the USA, but can no longer make that claim since they moved their manufacturing over to China. Have you tried to find the "Made in" tags on one of those bags lately? They used to be front and center and easy to find when they said "Made in USA", but now you have to dig deep only to find the tag now says "Made in China". Anyway, my bags are made right here in my sewing room by little old me. Well, by old me anyway. I guess two out of three isn't bad!

I just have one more thing to say today: Go Patriots!

Happy Stitching!

Click here to return to HookedOnNeedles.com

Labels: , , , , , ,

Accessory Bag Swap ~ Gift Received

My first swap of the year is complete and it was so fun! I'll show you the bag I sent off to my partner next time, but take a look at the darling bag Mary made for me and all the fun stuff she put inside...


Accessory Bag Swap ~ Gift ReceivedIsn't this fabric just too perfect? I just love the colors and of course the theme is right up my alley! That safety pin fabric is my favorite, but I love them all! And the size of this bag is really nice, not too big but not too small either.


Accessory Bag Swap ~ Gift ReceivedAnd look at all the fun things Mary included in the bag: A journal covered with "M"s, a little sewing kit, a fabric eraser (never used one before!), a little pink ruler, a mini mouse pad from a quilt museum, the cutest little vintage-looking card with needles of all sizes inside, and a darling little sewing angel pin which I have worn since I received it.


Accessory Bag Swap ~ Gift ReceivedHere's a close-up of the angel pin with the little button and scissor charm and the cute little doily-like wings and the little wooden plug for the head. Too cute!

Thanks, Mary, for a fun swap! Your gifts were just wonderful! And thanks also to Kris over at Dandelion Quilts for hosting this swap!

Next time I'll show you the bag I made for Mary, and a few others I have made since becoming hooked on these darling little accessory bags!

Happy Stitching!

Click here to return to HookedOnNeedles.com

Labels: ,

Wednesday, January 18, 2012

New Beginnings Mini Quilt Swap ~ Come Join the FUN!

Once again, I have found a swap that I could not resist! Michele over at Quilting Gallery has announced the New Beginnings Mini Quilt Swap and registration has already begun. Click the cute little button below to go check it out...

New Beginnings Mini Quilt Swap


It's a secret swap and there is still time to sign up. I'd love it if I got your name to make a mini quilt for!


Happy Stitching!

Click here to return to HookedOnNeedles.com

Labels:

Tuesday, January 17, 2012

Klutz Window Art ~ a Fun Diversion from Needlework!

Do you find that most people who are creative in one area are also creative in others as well? Do you enjoy more than one form of artsy, crafty, creative activity? Of course you know what I enjoy: anything with fabric, anything with yarn, lots of things with paper. Well I can now add something new to the list thanks to the Christmas gift that our oldest daughter, Elizabeth, gave to our two younger children, Sean and Grace.

Have you heard of Klutz Books? You might think of them as making crafty things for young kids. This product that we just tried for the first time is called Window Art. Sean and Grace just love it. And let me tell you, once you try it, no matter what your age is, you'll be hooked too!

Check out some of the pieces we made recently...


This is from the Christmas Window Art book that was the gift we received for Christmas, along with the deluxe refill pack so we would have lots of colors to choose from and be able to make lots of fun things. Elizabeth did this one and it looks like a perfect piece of stained glass stuck to our slider!


This cheerful snowman looks like he's standing on top of our car! Elizabeth did this one too. Hmmm, now that I think of it, I wonder if she really did get this for the kids!


And it looks like we have a couple of fun-loving kids building a snowman in the driveway! Guess who did this one...yup, Elizabeth! She spent some time here the other day and just couldn't get enough of this stuff!


This is one that Sean did...a cute little girl all dressed in green catching snowflakes on her tongue!

We all made lots of Christmas-specific window art as well, but all of that has since been put safely away until next Christmas. I only left out the winter scenes, and that awesome stained glass star piece which happens to have holly on it. I guess that can be considered winter-like too!

These pieces are hard to photograph well to show off how bright and clear they really are. But if you imagine stained glass with the sun shining through it, that is how they turn out. And they stick to windows, mirrors, the refrigerator, any shiny surface.

You can check these books and the refill kit out at craft stores like Michael's or similar stores, but you'll find them for a lot less money on Amazon. Here are links to the books and the refill kit in case you think you might want to try this fun craft too!


I'd love to know if you give this a try, and see pictures of your creations too. We have another birthday coming up in our house soon, and I have a feeling Elizabeth just might show up with one of the every-day window art books, for the kids of course!

Happy Stitching!

Click here to return to HookedOnNeedles.com

Labels: ,

Monday, January 16, 2012

Piecing a Quilt Backing ~ Do you?

How to piece the backing for a quilt is something I learned of necessity. I used to limit myself to making baby quilts that could be finished quickly and either tied or loosely quilted on my sewing machine. I would pick a solid fabric that coordinated with the front and use it as the back. Easy peasy and not too expensive. But then I started making bigger quilts with fabric lines instead of picking a few random fabrics that sort of went together. When possible, I like to choose one of the fabrics in the line that is made in double wide, so all that is needed is a little trimming to make it ready for the long arm. But that can also add quite a bit to the cost of making the quilt. I have also discovered that, when using pre-cuts, there is not always enough leftover fabric to piece a backing, so purchasing yardage is necessary.

But sometimes the design of a quilt leaves some blocks or motifs from the front unused and available to be pieced into the backing, which is a look that I just love. This is what happened with the Cartwheels quilt top I made not too long ago using the Fandango fabric line by Kate Spain. I had a number of leftover pieces, plus I had been able to purchase some odd cuts of several of the fabrics in the line at a great low price, so piecing the backing would naturally be the thing to do.


piecing Fandango quilt backingThe fun thing about piecing a quilt back is that there is no right or wrong way to do it. Just start sewing fabric together until you have a piece big enough for your quilt! To start this quilt back, I pieced all my leftover blocks into cartwheels and made a long strip that will go up the length of the quilt back, most likely not in the center. Then I chose one of the fabric cuts that was mostly red and pieced it into two long strips, one for each side of the cartwheels strip. I decided I didn't like the cartwheel strip surrounded by red, so I chose two of the lighter fabrics and pieced them into continuous strips, one for each side of the cartwheels.


piecing Fandango quilt backingI also had some of the cute little postage stamps leftover from the front which I pieced into a strip of fabric to go up the length of the quilt back as well. I originally wanted to make this little postage stamp piece go width-wise, but when I cut the yardage of the fabric it was being pieced into, I calculated incorrectly and ended up with pieces that were not as wide as the postage stamp piece. So I improvised and made this piece go vertically as well!


piecing Fandango quilt backingI will continue adding pieces of yardage until the backing is wide enough, and then I will add those red strips that I decided not to use earlier to the top and bottom of the quilt top horizontally. I think that will add a nice pop of color at each end of the back.

Do you get creative when piecing the back of a quilt, or do you like to stick with one fabric or even just an inexpensive cut of muslin? Any way you do it is great, as long as you like the result! For this wall hanging quilt made from siggy swap blocks, I recycled the lining from an old pair of draperies!

Happy Stitching!

Click here to return to HookedOnNeedles.com

Labels: , , , ,

Saturday, January 14, 2012

Butterfly Garden Quilt Top ~ Complete!

This fabric line called Butterfly Garden is so warm and inviting, and piecing this top was a real pleasure. The pieces are big enough to show off all the fabulous prints in this line too. Take a look at the top...


Butterfly Garden Quilt Top ~ Complete!This quilt is pretty big so I can't get the whole thing in a picture since it hangs over the edges of my husband's pool table (shhh, don't tell!), but the edges have a narrow scrappy row of all the fabrics used in the big blocks, and then another round of the sashing fabric to finish it off.

The backing will be the blue flower print that matches the smaller squares, and the border will be the same blue but only with the dots. I can't wait to get this one on the long arm and see how it turns out! But there are two other quilts in line before this one! I should be getting my appointment dates with the long arm soon and I'll be anxious to show you the finished quilts!

In the meantime, I've been making little zipper bags and just loving it! I started this because of the accessory bag swap I joined from Dandelion Quilts, and then I had to make a few so I could choose which I liked best to send to my partner. And then I found a stash of zippers in my sewing chair and some scraps from the other bags and also from the swap squares I cut for the Shades of Gray charm swap, so I just had to keep making these bags! My package was mailed today to my swap partner, so as soon as she received it, I'll show those bags and the others I have made since.

It's been so cold here lately that my sewing room is a great place to stay warm and productive! How's your winter sewing coming along?

Happy Stitching!

Click here to return to HookedOnNeedles.com

Labels: , , ,

Friday, January 13, 2012

Make Life Tote Bag

You know how it is around the first of the year...resolve to use up your stash, finish projects, not jump into more projects. Well, I'm all for the use up your stash thing, but around this time of year, I really do feel the need to join a swap or two. It's probably because the rush of the holidays is over and I'm ready for a change of pace. So I joined the Shades of Gray swap which you've already heard about, and I also joined the Accessory Bag Swap from Dandelion Quilts. You know how much I love to make bags, so this one was a MUST DO for me!

After looking through my stash of fabrics and pre-cuts, I decided that it was time to break into one of my Make Life charm packs. I also had a piece of Make Life yardage, so that was perfect. Here are two bags I made from that charm pack and yardage, but neither of these bags is my swap gift! I'll have to wait until it is received before I show that one to you! Don't want to spoil the surprise!


This accessory bag is small, only about 9 inches across the top and about 5 inches high and 2 inches deep. I found the 'recipe' for it over at the Moda Bake Shop. They have some great patterns over there for all sorts of things. This bag was made using the scrap leftovers from the swap bag I made. I can't stand the thought of those little pieces of fabric going to waste!


Here's the bag from the other side.


And the lining of this bag is made with the yardage that I had of the Make Life fabric. Isn't it fun? I used up an odd little scrap to make the little tab on the side too.

So this bag is not my swap gift, nor is it made using the same pattern as my swap gift, but my swap gift was made using the same line of fabric. When I was finished making these bags, I had the rest of the charm pack and some more yardage leftover, so I made another bag. A bigger bag! Take a look...


It's a tote bag! I just LOVE tote bags! Don't you love tote bags? What's not to love about a tote bag? Even a simple one like this. So handy. So versatile. So useful.


And made with fun fabric like Sweetwater's Make Life line, so cheerful too!


And check out that lining! How can you not smile when you look inside this bag?


Oh! I love it!

However, a girl can only use so many bags. And this girl already has so many bags! So this one is headed to my Etsy shop. All the vital statistics of this fun bag are listed over there, so you can go check it out if you like!

After my swap partner receives her bag, I'll share a picture or two. I actually made two alike, except for the zipper color, so I'll have to think of something to do with the other one. Perhaps a teacher gift or giveaway prize...something to think about!

Happy Stitching!

Click here to return to HookedOnNeedles.com

Labels: , , , ,

Thursday, January 5, 2012

Shades of Gray ~ Swap Fabric Show & Tell

George the mailman was good to me again today...look what he brought...


Shades of Gray ~ Swap Fabric Show & Telloooooh...

Shades of Gray ~ Swap Fabric Show & Tell...aaaaah...

Shades of Gray ~ Swap Fabric Show & Tell...oooooh...

Shades of Gray ~ Swap Fabric Show & Tell...aaaaah...

Shades of Gray ~ Swap Fabric Show & Tell...it's my fabric for Craftytammie's Shades of Gray charm square swap! The swap is already closed, but it's fun sometimes just to follow along.


Shades of Gray ~ Swap Fabric Show & TellI ordered my fabric from 1choice4quilting.com and, as usual, was pleased as punch with the service I received, not to mention these darling charm squares included with my packing slip!

You might think I had enough projects going right now with all the quilts and afghans I've been working on, but I'm thinking perhaps of something different to make with these charm squares from this swap. I'll have to let this idea stew around in my brain for a while before I share it. For now though, I will cut up my fabric and send off my squares and wait with great anticipation for my package to come back to me filled with a wonderful variety of black/white/gray fabric. Of course I'll share it with you just as soon as George drops it off!

Happy Stitching!


Click here to return to HookedOnNeedles.com

Labels: , , ,


Newer Posts Home Older Posts
Copyright ©2010 HookedOnNeedles.com. All rights reserved.