Hooked on Needles


Sunday, July 28, 2013

Crocheted Hexagon Granny Afghan ~ Finished!

Back in June, not even two whole months ago, I showed pictures of the yarn I purchased for this crocheted hexagon granny afghan on THIS post. And now here we are, less than two months later, with pictures of the completed afghan! Wow! This one worked up so quickly and was so fun to crochet. I learned a few things in the process too. One thing I learned was that Bernat Waverly yarn is really wonderful to work with. It has the structure I like in Red Heart Worsted, but it is so much softer and more comfortable. I also learned that the join-as-you-go method of connecting granny blocks is absolutely the way to go! I don't think I'll ever join blocks with whip stitch or single crochet again! Never say never though! So I'll just say I really love this method of joining blocks and will probably use it from now on!

So would you like to see the finished afghan? Click through to the rest of this article and take a look...


The finished measurements ended up being about 68 by 52 inches.

The border on this afghan has the zig zag design on the two long sides instead of straight edges like Lisa made in her original afghan, which you can see over at Polka Dot Cottage where I got this pattern.

Another difference between mine and Lisa's is the color choice for the border rows. Since I only used three shades of each color, I decided to use the medium and dark shades of each color in the border for a six-round border, whereas Lisa used several shades of just green for her border.


So there it is, my crocheted hexagon granny afghan, complete and ready to mail to the newlyweds. I'm already dreaming of color schemes for other hexagon granny afghans since this one was so fun! But my next crochet project has already been started and it is the other wedding gift afghan for another niece who is getting married in a few weeks. This next one is all one piece, crocheted back and forth in rows, and all one color, so it will be a very different project from the hexagon granny. I'll share pictures of that one soon.

Happy Stitching!

Click here to return to HookedOnNeedles.com

Labels: , , ,

Wednesday, July 24, 2013

Yarn Dyeing Experiment #2 ~ Wool with Kool-aid Ice Cubes

For my next yarn dyeing experiment, I am using a 3.5 ounce ball of Patons Classic Wool worsted weight yarn. I am using the same dyeing method as I used with the cotton yarn which I showed the results of HERE, using concentrated Kool-aid ice cubes in a pyrex dish set out in the sun on this hot summer day. Here are the steps I used for the wool...


I prepared the ball of wool the same way I prepared the ball of cotton, using my handy handmade niddy noddy to wind it into a hank.

Then I tied the wool with lengths of scrap acrylic yarn to keep it all neat and tidy.


I laid it in my pyrex baking dish...


...and then retrieved my leftover concentrated Kool-aid ice cubes from the freezer.


After spreading them out randomly on top of the yarn...


...I covered the dish with plastic wrap...


...and set it out on the hot sunny deck to stew for the day.

I am so excited to see how this batch turns out, especially if it holds on to more of the color than the cotton did. I am really hoping that I get more of a tie-dye look with this batch. Stay tuned!

Happy Stitching!

Click here to return to HookedOnNeedles.com

Labels: , , ,

Monday, July 22, 2013

Crocheted Hexagon Granny ~ So Close And Yet...

I was hoping to continue with my yarn dyeing experiments, but Joann's sale schedule is not cooperating with my desire to purchase what I need using a coupon, so it will have to wait. So we're back with the crocheted hexagon granny afghan, and in spite of the horrifically hot weather we have been experiencing here lately, it is still moving along at a respectable rate of speed! Take a look at its progress since last time we talked about it...


All the hexagons were joined together.


Then the half hexies were made...


...and joined to make the short ends straight.


In the pattern as written by Lisa over at Polka Dot Cottage, the instructions say to fill in the long sides as well, but I kind of liked the zig zag look as it was, so I decided to add the border with the long sides not straight.


For the border, I decided to do one round of medium and one round of dark in each shade starting with green, then blue and ending with brown. That would be a total of six rounds of border and bring the finished size of the afghan to a nicely usable size for cuddling.

This sounds like a happy ending for this post on the progress of this afghan, but wait! There's more!

I ran out of the dark green when I was THIS close to finishing the round! This close! Can you believe it? What this means, of course, is that I will also run short on the other two dark rounds since they will be longer and I used the same amount of dark of each color in the hexagons. So I will have to order more yarn before I can finish this afghan!

As you can see in the picture, I did begin the next round of border in the medium blue, so at least I can continue that almost to the end while I'm waiting and do the same with the dark blue and the two browns. Next time I have pictures of this afghan, I hope it will be all finished and folded up neatly, ready to wrap and send to the new bride.

Happy Stitching!

Click here to return to HookedOnNeedles.com

Labels: , ,

Sunday, July 21, 2013

Kool-aid Dyed Cotton Yarn ~ Finished!

Yarn dyeing experiment #1 is now complete. Here are links to the steps of this experiment so you can read all about it from the beginning:

Winding yarn into a hank to prepare for dyeing
Making concentrated kool-aid ice cubes for yarn dyeing
Dyeing Cotton Yarn using Kool-aid ice cubes

My hank of kool-aid dyed cotton yarn is all dry and twisted up nicely into a tidy little hank waiting to be wound into a center-pull ball with THIS handy little gadget and crocheted into some nice washcloths or little drawstring bags or something useful like that. Here's the finished result of this dyeing experiment...


The colors are not at all what I had expected, considering I used five different colors of kool-aid for this hank of yarn. But I still think this hank turned out very pretty with shades of soft pink and a touch of yellow thrown in there.


It remains to be seen how well the color stays with the cotton after this yarn is worked up into something useful and then used and washed. I have been warned that, because kool-aid is a food product, anything dyed with it could eventually attract bugs, so that should be considered when planning what to make with it. I think if it is used for washcloths or something that will be washed frequently, bugs shouldn't be a problem. But then I am pretty sure what little color is left in this cotton will also be washed out over time.

This experiment was fun to do, but I don't think I will use kool-aid to dye cotton again. I do believe that what I read about it most likely is true, that the kool-aid doesn't actually dye cotton, but simply stains it temporarily. I am pretty certain that if I had continued to rinse the cotton, as I mentioned before, that all the color would have been washed away. The cotton fibers just don't absorb acid dyes.

For my next yarn dyeing experiment, I am going to try dyeing another hank of cotton yarn with the same dyes you can buy at the craft store for tie dyeing t-shirts. I have a feeling this will produce better and more permanent colors. I'll save my leftover concentrated kool-aid ice cubes for a nice skein of wool yarn!

I'd love to hear about your yarn dyeing experiments, or any fun and interesting new things that you might be trying this summer. Just leave a comment below!

Happy Stitching!

Click here to return to HookedOnNeedles.com

Labels: , ,

Saturday, July 20, 2013

Dyeing Cotton Yarn Using Concentrated Kool-aid Ice Cubes

Yesterday was very sunny and hot here for the entire day, so it was the perfect day to experiment with my hank of cotton yarn and my concentrated Kool-aid ice cubes. Here's how the experiment went:


At about 10:00 in the morning, I put my tied hank of cotton yarn into my 13 by 9 Pyrex baking dish and got it wet with warm water, then I emptied out all the water and gave the yarn a squeeze up against the side of the dish. I had this idea that it would be good to start with wet yarn, but that might not have been such a good idea.


Then I popped the ice cubes out of the trays and put about four of each color on top of the yarn in a random arrangement. Aren't they so pretty and bright?


Then I covered the dish with plastic wrap...


...and put it out on the very hot and sunny deck to stew for the day. According to my window thermometer, it gets up to about 116 degrees Fahrenheit on the deck during the hottest part of the day! Whew!


Every few hours, I would peek out through the vertical blinds to see how things were going out there in the heat.


When the shadow of the house got close enough, I moved the dish down to the stone wall so it would stay in the sun as long as possible.


When there was no more sun to cook my cotton, I brought it into the house and this is what it looked like when I removed the plastic wrap. I liked it a lot! However, the cotton had not soaked up all the dye and was sitting in a big puddle of dark nasty looking water. I wonder if I had not gotten the yarn wet before putting the ice cubes on it if this would have happened. It's hard to see in this picture because the Pyrex dish I used is also dark, but you can believe me when I say the water in the bottom of the dish was icky looking!


So I dumped out all the excess water and gave the cotton a little squeeze against the side of the dish, then started filling up the dish with water to rinse the yarn. As you can see, quite a lot of the color washed out right away. I rinsed and rinsed and rinsed, waiting for the water to run clear, which it never really did. I imagine I could have kept rinsing and eventually I would have ended up with white cotton again!


So I stopped rinsing at this stage even though the water was still not all the way clear, and I popped the dish into the microwave and set it for three minutes. My theory here is that the heat would set the remaining color in the yarn. We'll have to see if that works out in the long run though.

Once it cooled down, I rolled the colored hank in very thick layers of paper towel to remove any remaining water and then I took the hank downstairs and hung it on my clothes line to dry. It was still damp this morning, but when it is all the way dry, I will bring it up into the light of day and take some more pictures of it. It turned out much lighter than I had expected, most likely because the cotton did not hold on to most of the dye (just like I had read and heard but didn't want to believe!) but the colors are very pretty anyway. The only question is: How long will they last?

So stay tuned for more results on this Kool-aid/cotton dyeing experiment! I still have some ice cubes leftover, so I think I will invest in a ball or two of wool and give that a try. From what I have read and heard, that will work better!

Happy Stitching!

Click here to return to HookedOnNeedles.com

Labels: , ,

Friday, July 19, 2013

Making Concentrated Kool-aid Ice Cubes for Yarn Dyeing

After much research online through google and Pinterest, and also from talking to people who have done similar yarn dyeing projects, I decided to give the Concentrated Kool-aid Ice Cube method a try for dyeing my cotton yarn. Here's what I did:


At about the same time I purchased my cotton yarn, which I discussed HERE, I also purchased packets of unsweetened Kool-aid to use in my yarn dyeing project. For this first experiment, I used two packets each of purple, orange and red, and three packets each of yellow and pink. This picture only shows two packets of each, just so you know.


I opened the packets and dumped the powder into paper cups and labeled each cup with the number of packets and the color. I was certain I would not be able to tell the true colors until I added water because that is what happens with the Easter egg dye every year...I always put the wrong little tablet into the wrong colored bucket...every single time!


There's all the powder in the bottom of the cups.


Next I added just enough warm water to each cup to be able to stir the powder in and get it to dissolve. I used straws for stirring so I could just throw them away afterwards and not have to worry about flinging drops of concentrated Kool-aid all over my clothes! Notice also the thick layer of paper towels on the cookie sheet to absorb any spills or drops! The cookie sheet was used so that I could easily move the project around the kitchen as needed, instead of one cup at a time.


Then, using the design on the cups as a guide, I filled each cup to the same level with cold water and stirred it all up. This worked out to be about six ounces of liquid in each cup when mixed.


I made room in my top freezer drawer for three ice cube trays to sit in the bottom and I put them in empty. Then I took each cup of Kool-aid concentrate and, pinching the cup to make a convenient pour spout, I carefully poured the liquid into the ice cube trays. As you can see, I got eight full ice cubes from each paper cup of concentrate. Then I very carefully closed the freezer drawer and instructed everyone not to touch the refrigerator for a couple hours. I really didn't relish the thought of having to clean up Kool-aid concentrate spills from all my frozen food!
The next step will be to put the yarn and the dye together and see what happens. I am very excited to do that! Stay tuned!

Happy Stitching!

Click here to return to HookedOnNeedles.com

Labels: ,

Thursday, July 18, 2013

Easy Way to Wind Yarn into Hank for Dyeing

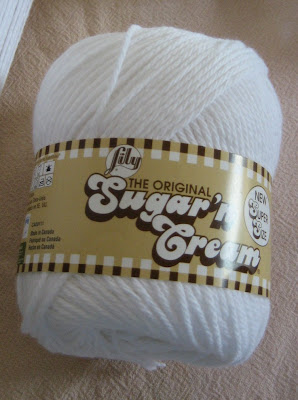
Quite some time ago, I purchased a number of 4-ounce balls of Sugar 'n Cream cotton yarn for the purpose of dyeing it into fun and different color combinations. They have been sitting in my cabinet for far too long! You can see them on the top shelf in the first open-cabinet picture of THIS POST from way back in October 2011! I'd say it's way past time to do something fun with them, wouldn't you?

I have been researching different methods of dyeing cotton yarn and have not yet landed on the one I will actually use, but they all seem to start out the same way, that is, winding the yarn into hanks. I have been pondering this task and trying to come up with an easy way to get this...


...ball of yarn...


...turned into this tied hank of yarn, without having to purchase an expensive gadget. So I did a little more research and discovered that there is a simple tool out there called a niddy noddy that is easy to make and does the trick in a flash!


I'm sure you can buy fancy wooden ones, but I found this website that showed how to make one for practically nothing using pvc, one of my favorite materials for building lightweight structures.


As it turns out, I had all the pvc I needed already in the house! One trip to the attic to pilfer two t-joints off my tomato stake structure that I'm not using in the garden this year, and one trip to the basement to abscond with the length of 1/2 inch pvc pipe my son uses to hold his model rockets when my husband spray paints them (hence the red mark on the center piece of pvc), and then a few quick cuts of the miter saw from a piece of scrap pvc to get the four 6-inch pieces and I was in business!


I discovered that the end caps are not really necessary for the functionality of the niddy noddy, unless I was wanting to wind more than a 4-ounce ball. Then I think they would come in handy for keeping the yarn from sliding off the ends.


It took me about five minutes to wind that 4-ounce ball of cotton onto my new gadget. I was quite pleased with it!


Before I removed the yarn from the pvc structure, I used some scraps of acrylic yarn to tie it in a few places, then after removing the cotton, I tied it in a few more places before twisting it up into the hank you saw above. Acrylic yarn is good to use for tying because it won't absorb any of the dye or release any of its own. Tying loosely is also important so that the dye can reach the areas of cotton under the tie and not leave them white.

The next stage of my yarn dyeing adventure will be to mix up my dye and figure out how to administer it to the yarn. Stay tuned!

Happy Stitching!

Click here to return to HookedOnNeedles.com

Labels: , , ,


Newer Posts Home Older Posts
Copyright ©2010 HookedOnNeedles.com. All rights reserved.